18 Jul 2012

Merge avhd to vhd in HyperV by manual

Hyper-V brings to life several additional disaster recovery scenarios that can be leveraged to our advantage when the need arises. One of the features that really comes into play are VM snapshots. A Snapshot is basically a spot in time where the current running configuration of the Virtual Machines is saved to a Snapshot Differencing Disk file (AVHD), from which you can return to from the future. This tip will show you how to manually merge hyper-v snapshots into a single VM for point in time restores.

When you create a differencing disk the original VHD is no longer modified and the snapshots are merged with the original vhd only when it is powered off. In disaster recovery scenarios, There may be cases where we want to manually merge snapshots ( avhd )

In order to do this, You must first change the extension of the Youngest AVHD file to VHD. 
Any VHD differencing disk(avhd) will always go to its parent, not the root parent.

So if you have a bunch of AVHDs, Each depends on the one before it - like the rungs of a ladder - they are sequential.  Most folks have a very simple linear chain of snapshots. Example : VHD - AVHD1 - AVHD2 - AVHD3 - AVHD4. ( Here AVHD4 is the Youngest and AVHD1 is the Oldest)

The parent of AVHD4 is AVHD3.  The parent of AVHD3 is AVHD2  The parent of AVHDn would simply be the one before it.

You need to Start Merge From Young AVHD to Old AVHD to complete the Merge Operation.

To Start Merge follow the below steps
  • First Identify the Youngest AVHD ( In Our Ex : AVHD4)
  1. Rename the Youngest AVHD (AVHD4)  to VHD ( Should not rename all the AVHDs at a time, Need to Rename only Youngest Avhd First) 
  2. You can choose the Edit Disk option from the Actions menu in the Hyper-V Management Console.
  3. Click Next through the first screen and select the snapshot file on the following screen.
  4. Select Merge on the next screen and choose the To parent virtual disk option and click Finish.
  5. After Successfully Completing Merge, Now Automatically AVHD4 will be deleted.
  • Now Rename the Second Youngest Avhd (AVHD3) to Vhd. and Repeats the Steps from 1 to 4 until Oldest AVHD ( AVHD1) Get Merge with Parent VHD.
Once this has completed you should create a new virtual machine with the default options you would normally use, selecting to use an existing virtual disk on the hard disk screen. You should select the newly merged VHD file.

Now you have Successfully Completed Manually Merge avhd to vhd in Hyper-V

http://social.technet.microsoft.com/wiki/contents/articles/6257.manually-merge-avhd-to-vhd-in-hyper-v.aspx

13 Jul 2012

Configure SQL Server 2008 for Sharepoint 2010 and Project Server 2010 installation

Configure SQL Network Settings for SQL Server 2008
To configure the network settings for SQL Server 2008 complete the following steps:
1. From the computer console click the Start button  >> All Programs  >> Microsoft SQL Server 2008 2.  2. Expand Configuration Tools and select SQL Server Configuration
The system displays the SQL Server Configuration Manager.
3. In the left pane, expand SQL Server Network Configuration, and then select the target SQL Server instance for your Project Server databases.
4. Verify that the TCP/IP option is enabled in the right frame.

Add a SQL Server Login for the Farm Administrator Account
 Project Server 2010 requires that the Farm Administrator Role Account have a SQL Server login with public, dbcerator, securityadmin and sysadmin roles in SQL Server. To create a SQL Server login and add the roles for the login, complete the following steps:
1.       Open SQL Server Management Studio.
2.         Connect to the database engine for your Project Server 2010 target instance
3.         Expand the Security node, then right-click on Logins and select the New Login option


4. The system displays the New Login dialog
5. Enter the domain account you created for the Farm Administrator in the Login Name field. From the Select a page list on the left, select Server Roles.

6. In the Server roles list, select the dbcreator, securityadmin, and sysadmin check boxes. The public roles checkbox is selected by default. Leave this setting selected.
7. Click the OK button to continue.


Enable the Common Language Runtime 
Enabling the Common Language Runtime (CLR) for SQL Server improves Project Server 2010 performance by 30% on average, according to Microsoft. To enable the common language runtime, click on the New Query button in the SQL Server Management Studio window and copy the following query into the SQL Query pane

sp_configure ‘clr enabled’, 1; 
go 
reconfigure; 
go


Click the Execute button to execute the query and enable the CLR. After executing the query the output section should report a success message like the one shown in Code Sample below. Note that the Query includes the RECONFIGURE statement, and it is not necessary to run this again.  

Configuration option 'clr enabled' changed from 0 to 1. Run the RECONFIGURE statement to install.  

Set SQL Server Database Collation 
Your SQL Server collation must be configured for case-insensitive. In a default English language version, the default collation (SQL_Latin1_General_CP1_CI_AS) is compliant with this requirement. If you are not working with a default English SQL Server installation, you may need to change your SQL Server database collation to case-insensitive, accent-sensitive, Kana-sensitive, and width-sensitive.

Prepare SQL Server Analysis Services for Project Server
You must complete two simple configuration steps to prepare your instance of SQL Server Analysis Services for Project Server 2010:
1) Add the Farm Administrator Role account to the OLAP Users Local Group on the server, and
2) Configure the Farm Administrator Role account permissions in SQL Server Analysis services. To add the Farm Administrator account to the OLAP Users Local Group, complete the following steps:  1. Log in to the computer running Analysis Services and select
Administrative Tools from the Start menu and select Computer Management from the submenu.
2. On the Computer Management page, in the left pane under System Tools, expand the Local Users and Groups item. Click to expand the Groups folder and locate the OLAP Users Local Group for your Analysis Services instance as shown for SQL Analysis Services 2008
3. Double-click on the group name to open the group Properties dialog

4. In the Properties dialog, click the Add button. The system displays the Select Users, Computers, or Groups dialog
5. In the Select Users, Computers, or Groups dialog, enter the name of your Farm Administrator account. You may click the Check Names button to verify your entry, or click the OK button to accept your entry. The account now appears in the Members section of the Group Properties dialog shown previously. Click the OK button to close the Group Properties dialog and then close the Computer Management page to continue.

To add the Farm Administrator as an Analysis Services server administrator complete the following steps: 
1. Open SQL Server Management Studio. In the Connect to Server window, select or browse to connect to the SQL Server Analysis Services instance for your Project Sever 2010 deployment.
2. In Microsoft SQL Server Management Studio Object Explorer, right-click on your SQL Server 2005 Analysis Services instance name, and then click Properties from the pop-up menu. The system displays the Analysis Services Properties dialog. From the Select a page pane, click the Security item. Your Analysis Server Properties dialog should look like the
3. Click the Add button. The system displays the Select Users or Groups dialog
4. On the Select Users or Groups dialog, type the name of the Farm Administrator account.
5. Click the OK button to add the Farm Administrator account to the Server Administrators list
6. Click the OK button on the Analysis Server Properties page to exit the operation.
11 Jul 2012

Managed Service Account–SQL Server 2012

As you know there are so many security measures are taken during every release of SQL Server. This version of SQL Server will be using Managed Service account to run SQL server related services. In other terms earlier versions we used Local system account as service account for all SQL Server related services however in this version we be will using individual local accounts for all SQL server related services. In this case whatever application runs on local system are allowed to access SQL Server. So to overcome this MS team has started using managed service accounts in SQL Server.

Let me give you a brief about Manage service account then we will discuss about the new changes related to service account in SQL Server 2012.

What is Managed Service Account?

Managed Service Account (MSA) is a new type of account that’s supported in Windows 7 & Windows 2008 R2. Main reason for this new account type is to isolate one service from another. In earlier operating systems we will run the services either in Localsystem or Domain accounts. Let’s assume you run SQL Server using Local system that means any other service running in Local system can connect to SQL Server and retrieve the data, this seems to be a loop hole when you run it in localsystem. We can use domain account to avoid this scenario however maintaining these domain accounts will take considerable time. In addition to this most of the organizations won’t change domain service account password in a period of time that means if someone knows the password he will be able to connect to SQL Server anytime as the password remains the same forever.
Considering all these things in mind they have added the new account feature in Windows 7 & Windows 2008 R2. Below are the advantages of Managed service account
  • Automatic password management. Password for MSA will be automatically changed every 30 days. However there is a known issue when the password gets changed it can cause a failed authentication attempt using old password, to overcome this you need to install a patch, refer KB article http://support.microsoft.com/kb/2494158 for more details.
  • SPN management is made simpler (domain need to be in Windows 2008 R2 functional level) for these accounts, which allows service administrators to set SPN’s for these accounts. For windows 2003 and windows 2008 functional level, you can update the schema to support this.
You can also create MSA for your own application service. Crucial part is that you don’t have a GUI to create \ configure a MSA for your service, you need to work with powershell cmdlets. For further information on MSA check the KB articles below
http://technet.microsoft.com/en-us/library/dd548356.aspx
http://technet.microsoft.com/en-us/library/ff641729%28v=ws.10%29.aspx

What’s added in SQL Server 2012

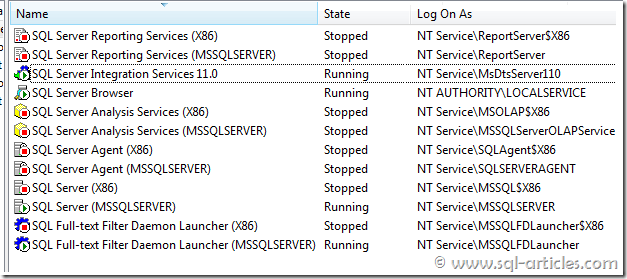
In earlier versions (from SQL 2005) of SQL Server, as part of Service account security standards they created local groups in the computer and granted necessary permission for the groups where ever applicable. However in SQL Server 2012 that’s not applicable, they will create individual managed service account for each SQL Server service. This means all SQL Server related services will run on their own service account there by isolating each services. You can see from the image below each service have different service account and each of these account have their own SID
service_account_sql_2012_1
Naming convention for the service accounts is as below
Service Name
Instance
Service Account Naming Convention
Database Engine Default MSSQLServer
Agent Service Default SQLSERVERAgent
Reporting Server Default ReportServer
Analysis Service Default MSSQLServerOLAPService
Fulltext Service Default MSSQLFDLauncher
Database Engine InstanceName MSSQL$InstanceName
Agent Service InstanceName SQLAgent$InstanceName
Reporting Server InstanceName ReportServer$InstanceName
Analysis Service InstanceName MSOLAP$InstanceName
Fulltext Service InstanceName MSSQLFDLauncher$InstanceName
Integration Service Not applicable MSDtsServer110
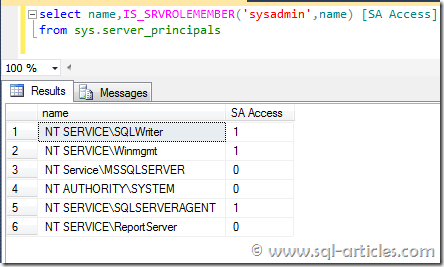
I have a curiosity to check admin permission associated to these accounts, I could see SA access granted only to SQL agent service account and not to database engine, that’s a classic example how they grant only required permission
service_account_sql_2012_2
Finally I’ve checked the administrators group in computer to check is any SQL related groups got created. Yes there are couple of groups still get created in computer for Browser service and analysis services. Analysis service account and browser service account are part of  analysis group & browser group respectively.
service_account_sql_2012_3
From the screenshot above it’s clear that analysis groups are created per instance. Thus MSA is a added security hardening step in SQL Server 2012 to isolate all SQL server related services, thus no more access using local system account.

9 Jul 2012

Dang ky BIS Mobifone

DK BASP gửi +999 để đăng kí gói BASIC PLUS (Tham khảo các gói khác http://blackberry.mobifone.com.vn/#/option)

-Sau khi đăng kí thành công thì tổng đài gửi SMS confirm "Quy khach da dang ky thanh cong goi BASP. Han su dung den ngay....... Xin cam on!."
-Soạn DATA ON gửi 999, chờ tổng đài xác nhận thành công thì khởi động lại máy.

-Khi thấy cụm từ EDGE ở gần cột sóng nhận được 1 message confirm BlackBerry Registration: "Your handheld has been registered with the wireless network".

-Vào phần “Host Routing Table” trong “Setting”, bấm nút “CHÙM DÂU” chọn “Register Now”.Tin nhắn thông báo đăng ký thành công, máy sẽ tự động cập nhật “Services Book”, cách dễ hơn là bạn có thể download những “Services Book” của MOBIFONE được chia sẽ trên các Diễn Đàn rồi cài vào máy.

-Thử vào mạng xem, nếu không được Trở ngược “Mobile Network Options” Ở mục “Data Services”, chọn “On” sau đó khổi động lại máy.

- Để kiểm tra dung lượng soạn KT DATA gởi 999,

- Để hủy, soạn HUY_Mã gói cước, gởi 999 . (trong bài là BASP, thì soạn HUY BASP gửi 999)

-Khi chuyển sang dùng điện thoại BlackBerry mới, chỉ cần gắn SIM cũ, BIS được kích hoạt. Vào trang web http://mobifone.blackberry.com chọn vào Change Device > Detect new device để xác nhận máy mới.

http://www.tinhte.vn/threads/1311966/

Windows update error code 80072EE2 of Windows 2008 R2 running on Hyper V

Windows 2008 R2 has installed on Hyper V without problem but when trying to do windows update I got an "Windows could not search for new updates, An error occurred while checking for new updates for your computer. Error(s) found: Code 80072EE2" error message


None of these suggestions helped solve the connection problem. Error 0x80072ee2 was displayed after all attempts except one that works on my case.

It's simply to disable Large Sent Offload IP4 on NIC that assigned for VM that has error.

14 Jun 2012

Fillet beef with red cabbage

Nguyên liệu
-500g thịt bò fillet
-Bơ
-Cling film
-Bắp cải đỏ red cabbage
-Rượu đỏ
-Bột nêm bò, muối, redcurrant jelly


Cách làm
-Bỏ bơ vào chảo nóng và bỏ thịt bò vào, lật đều các mặt cho thịt bò xăn lại tối đa khoảng 5 phút


-Lấy thịt ra khỏi chảo và cuộn kín với cling film
-Nướng thịt bò trong oven với nhiệt độ 106 độ trong khoảng 40 phút. Chú ý là chỉ dùng cling film cho oven điện, không dùng cho gaz oven


-Bắp cải đỏ xắt sợi cho vào chảo với bột nêm bò, 2 muỗng canh rượu đỏ
-Xào cho đến khi nào bắp cải xăn lại, bỏ thêm redcurrant jelly


 -Thịt bò khi đã nướng đủ thời gian, xắt lát trình bày với bắp cải đỏ và khoai tây nghiền


-And empty plates... :-p

10 Jun 2012

80 Longsland

Victoria Sponge

Nguyên liệu
175g cho mỗi bơ, đường và bột mì nổi số 8
1 gói bột nổi
3 trứng gà loại lớn
1 ống vani

Cách làm
Làm nóng lò nướng
Ray bột bằng ray nhuyễn để bột đuợc trộn đều với không khí


Cho đường và bơ vào máy đánh trứng, đánh cho vừa đặc, thêm trứng vào đánh tiếp. Chú ý cho từng trứng một vào để hỗn hợp đường bơ và trứng được trộn đều

Thêm bột mì đã ray, bột nổi và vani vào trộn đều với hỗn hợp trứng, bơ và đường

Thoa bơ vào 2 khay rồi chia đều hỗn hợp trên vào


Nướng bánh ở nhiệt độ 150 độ khoảng 20 phút.
Lấy bánh để nguội. Trãi đều mứt dâu vào 1 bánh và úp bánh còn lại vào.


Tương đậu phộng

Nguyên liệu
- 4 muỗng bơ đậu phộng
- 4 muỗng nước.
- 1 muỗng tương đen
- 1 muỗng đường
- 1 muỗng nước tương
- 1/2 trái chanh
- Ớt


Cách làm
Chô 4 muỗng bơ đậu phộng và 4 muỗng đường quậy đều trên chảo. Thêm 1 muỗng tương đen, đường và 1/2 trái chanh. Thêm nước tương nhiều it tùy theo thích màu đậm hay nhạt.
Thêm vài lát ớt là chén tương đậu phộng đã sẵn sàng dùng.

5 Jun 2012

Teaming with Intel Pro/1000 MT Dual port PCX on Windows 2008 R2

Unfortunately Intel has stopped supporting teaming for their own network card Intel Pro/1000 MT Dual port PCX on Windows 2008 R2. Don't know why but they think it is not my business ...hmm
To overcome this issue I found a solution from great internet and would like brief it here for your guys
  1. Download the Intel Networking solutions CD v15.3 from here: http://downloadcenter.intel.com/Detail_Desc.aspx?agr=Y&ProdId=879&DwnldID=19002&lang=eng
  2. Extract the files
  3. Use device manager to update the drivers for the Intel Pro1000 MT NICs. I had to do each independently.
  4. You can now run the ProSet install from V15.3_CD\APPS\PROSETDX\Winx64\ProSetDX.msi and it will succeed.
  5. You will now see the TABS for Teaming etc in the properties of the NIC via Device Manager.
You owe me a beer :-)

Intel stopped this CD for downloaded from their site. Don't know why?????? Try alternative link below
http://dl12.lostmydrivers.com/download/drivers/Intel/Network_Drivers/INTEL-PRO-1000-MT-DRIVER-15.3-WINDOWS-XP-32-64-2003-32-64-VISTA-32-64-7-32-64-WINDOWS-VISTA-WIN20/V15.3_CD.zip

Alternative way was tested and worked fine on my system
1. Download and install WinX64.exe driver from Intel
2. When it says "..no Intel adapter card found..." do not click on OK
3. Search for folder PRO1000. If you run as your domain administrator account it must be in C:\Users\Administrator.domain.local\AppData\Local.....
4. Copy parent folder of PRO1000 which includes other folders such as APPS,....
5. Click OK on the pop up window at step 2
6. Manual update driver for each Intel Pro 1000 MT adapter in Device Manager by using driver in PRO1000\Winx64\NDIS61
7. Run Intel WinX64.exe again and it will work

3 Jun 2012

Great beef steak

-Two slides of tender beef steak (3-5 cm thick)
-Rub the steak with vegetable oil, wait for few minutes then season with salt and pepper otherwise the salt will start to eat into the meat and dry it out.
-Heat the solid pan in 200 degree in 15 minutes before start cooking
-Put the steak into the pan and don't touch it until 2 minutes then turn over. Put more oil if it is not sizzling but keep the heat high.
-Sear for 2 minutes more and then turn again.
-Take the steak out and leave it to rest for 5 minutes before you serve. Remember the steak will continue to cook while it is resting.
...I am starve :-)

Move BESX to new server

1. Install BESX on new server
2. Modify firewall if any
3. Download and install BlackBerry Enterprise Transporter files
  • Browse to http://us.blackberry.com/support/server_resourcekit.jsp
  • Click on Download BlackBerry Enterprise Resource Kit 
  • Select BlackBerry Enterprise Resource Kit V5.0 SP3. Don't click on Next button but just look down and download BlackBerry Enterprise Transporter 5.0 Service Pack 3
 4. Install and run BlackBerry Enterprise Transporter and follow 4 steps to migrate user from old BESX to new BESX

Make sure BlackBerry Administration Service type on both old and new BESX must be the same (Active Directory or BlackBerry Administration Service authentication) otherwise you will get the BAS assignment error when migrating.


Good luck

30 May 2012

Place a sent message in Sent Items of Shared Mailbox (Outlook/Exchange 2010)

When user send email from a shared mailbox the message is placed in the Sent Items of the user's mailbox. 
To place the sent message in the Sent Items of the Shared mailbox you have to do 2 simple things

1. Apply the Hotfix KH2459115 (http://support.microsoft.com/kb/2459115) or it can already be installed by Windows update

2. Adding registry setting DelegateSentItemsStyle with a DWORD value of 1 to HKCU\Software\Microsoft\Office\14.0\Outlook\Preferences
 

13 May 2012

Synchronize Project Server 2010 with Exchange 2010

A. Enable Exchange synchronization for the PWA

1. In Server Settings page in PWA, goto Operational Policies - Additional Server Settings - Exchange Server details then check on
2. Synchronize Tasks check box

B. Create a PWA user account for each CAS server
1. From Server Setting page in PWA create new user
2. Clear "User can be assigned as a resource" check box and type the name of CAS server in the Display Name field. For eg CAS_Server

3. In the User Authentication section, enter the Windows account for CAS server computer account in the User logon account field. In my case DOMAIN\CAS_Server$

4. Check on Prevent AD synchronize this account

5. In the Security group section, add the user to the Administrator group

6. Click Save button


C. Configure Project Server users for Exchange synchronization
In Server Settings page in PWA double click on each existing user and check on Synchronize Tasks check box

D. Configure impersonation permissions for the Project Server Queue Service account
1. Discover account that is running Project Server Queue service

2. Log on to Exchange server, launch Exchange Management Shell as Administrator

3. Type the below command, replace the string queuingserviceaccount with the account in step 1

Add-ADPermission -Identity (Get-ExchangeServer).DistinguishedName -User (Get-User -Identity queuingservice_account | Select-Object).identity -extendedRights ms-Exch-EPI-Impersonation

 If you get the below error that means you have more than one CAS server. Please follow step 3.1

Cannot bind argument to parameter 'Identity' because it is null.
    + CategoryInfo          : InvalidData: (:) [Add-ADPermission], ParameterBindingValidationException
    + FullyQualifiedErrorId : ParameterArgumentValidationErrorNullNotAllowed,Add-ADPermission

3.1 Enter the below command in Exchange Power Shell

[PS]$CAS_Server = get-exchangeserver | where { $_.ServerRole -match "ClientAccess" }
[PS]$CAS_Server | foreach-object {Add-ADPermission -Identity $_.DistinguishedName -User (Get-User -Identity queuingservice_account | select-object).identity -extendedRights ms-Exch-EPI-Impersonation}

You will get

Identity             User                                          Deny  Inherited
--------                ----                                       ----  ---------
CAS_Server           DOMAIN\queuingservice_account                  False False

Repeat step 3.1 on every CAS server in your Exchange farm

E. Configure impersonation persmissions for all Exchange users
Execute this command in CAS server
[PS] New-ManagementRoleAssignment -Name PRJEXCHIntegration -Role applicationImpersonation -user DOMAIN\queuingservice_account

You will get

Name                           Role              RoleAssigneeName  RoleAssigneeType  AssignmentMethod  EffectiveUserName
----                           ----              ----------------  ----------------  ----------------  ----------------
PRJEXCHIntegration             ApplicationImp... queuingservice_account         User              Direct


References:
http://go.microsoft.com/fwlink/p/?LinkId=202797  (video)
http://blogs.msdn.com/b/mohits/archive/2010/05/29/integration-of-project-server-2010-and-exchange-2010-2007.aspx
http://technet.microsoft.com/en-us/library/ff468700.aspx

16 Jan 2012

Windows Server 2008 : Domain Name System and IPv6 - Performing Zone Transfers


Copying the DNS database from one server to another is accomplished through a process known as a zone transfer. Zone transfers are required for any non-Active Directory-integrated zone that has more than one name server responsible for the contents of that zone. The mechanism for zone transfers varies, however, depending on the version of DNS. Zone transfers are always pulled by the secondary servers from the primary servers.
Primary DNS servers can be configured to notify secondary DNS servers of changes to a zone and to begin a zone transfer. They can also be configured to perform a zone transfer on a scheduled basis. To set up a secondary server to pull zone transfers from a forward lookup zone, follow this procedure:

1.
Launch Server Manager on the DNS server with the primary zone.
2.
Expand the Roles, DNS Server, DNS nodes, and then select the server name.
3.
Select the Forward Lookup Zones node.
4.
Right-click the name of the zone and choose Properties.
5.
Choose the Zone Transfers tab.
6.
Check Allow Zone Transfers and select Only to the Following Servers.
7.
Click Edit, type in the IP address of the server that will receive the update, and press Enter. The server will be validated, as shown in Figure 1. Because the server is not yet an authoritative server for the zone, the error message “The server with this IP address is not authoritative for the required zone” appears. This will be done in the next section. The error can be safely ignored. Click OK to save.

Figure 1. Setting up zone transfer servers.

8.
To ensure that updates will be processed correctly, click the Notify button, enter the name of the secondary server, and press Enter. Click OK to save changes.
9.
Click OK to save the changes.
Note
In addition to specifically defining recipients of zone transfer notifications by IP address, you can select the Only to Servers Listed on the Name Servers Tab option button as well, assuming that the recipient server or servers are listed on the Name Servers tab.

Now that the primary zone on the primary DNS server has been configured to allow transfers, the secondary zone has to be configured on the secondary DNS server. To create the secondary zone and begin zone transfers, execute the following steps:
1.
Launch Server Manager.
2.
Expand the Roles, DNS Server, DNS nodes, and then select the server name.
3.
Select the Forward Lookup Zones node.
4.
Select Action, New Zone.
5.
Click Next on the Welcome page.
6.
Select Secondary Zone from the list of zone types. Secondary zones cannot be AD-integrated and the options will be grayed out. Click Next to continue.
7.
Type in the name of the zone that will be created (this should match the primary zone name), and click Next to continue.
8.
Type in the IP address of the server or servers from which the zone records will be transferred. Press Enter for each server entered, and they will be validated. Click Next to continue.
9.
Click Finish on the Summary page to create the zone.
After the last step, the zone will automatically transfer from the primary DNS server to the secondary DNS server.

Performing Full Zone Transfers

The standard method for zone transfers, which transfers the entire contents of a DNS zone from the primary server to the secondary server, is known as asynchronous zone transfer (AXFR), or full zone transfer. This type of zone transfer copies every item in the DNS database to the secondary server, regardless of whether the server already has some of the items in the database. Older implementations of DNS utilized AXFR exclusively, and it is still utilized for specific purposes today.

Initiating Incremental Zone Transfers

An incremental zone transfer (IXFR) is a process by which all incremental changes to a DNS database are replicated to the secondary DNS server. This saves bandwidth over AXFR replication changes because only the deltas, or changes made to the database since the last zone transfer, are replicated.
IXFR zone transfers are accomplished by referencing a serial number that is stored on the SOA of the DNS server that holds the primary zone. This number is incremented upon each change to a zone. If the server requesting the zone transfer has a serial number of 45, for example, and the primary zone server has a serial number of 55, only those changes made during the period of time between 45 and 55 will be incrementally sent to the requesting server via an IXFR transfer. However, if the difference in index numbers is too great, the information on the requesting server is assumed to be stale, and a full AXFR transfer will be initiated. For example, if a requesting server has an index of 25, and the primary zone server’s index is 55, an AXFR zone transfer will be initiated, as illustrated in Figure 2.
Figure 2. IXFR zone transfers.

15 Jan 2012

How to install Vmware Vsphere Hypervisor (ESXi 4.1.0) onto a USB stick.

Want to have a portable ESXi on a stick? Here's how to do it.

Purpose


To demonstrate how to install Vmware Vsphere Hypervisor (ESXi 4.1.0) on a USB stick.
We'll be covering two different methods to accomplish the task.
  • Install by writing the Vsphere Hypervisor (ESXi 4.1.0) image onto a USB Stick.
  • Install by using the native installer.

Required


Method 1

1. The install ISO image from Vmware:
2. A USB Stick with at least 900MB of space.
3. RMPrepUSB
An extremely handy tool that makes partitioning, installing grub4dos, and boot preparation simple.
4. Winrar:

Method 2

1. The install ISO from Vmware:
2. A USB Stick with at least 900MB of space.

Installation


Method 1

The basic idea is to extract the ESXi image from the Vmware Vsphere Hypervisor (ESXi 4.1.0) install ISO and write it to the USB Stick using RMPrepUSB.

Extract Image

Open the ISO image, VMware-VMvisor-Installer-4.1.0-260247.x86_64.iso with Winrar
and find "imagedd.bz2" and open it up.
Winrar1
Once you've opened "imagedd.bz2" extract "imagedd" from it.
Winrar2

Write Image onto USB Stick

Plug in the USB Stick and then open RMPrepUSB.
The only things we need to concern ourselves with are the white box at the top that lists all detected drives, and the blue button, File -> USB.
Make sure to select the correct drive from the white box.
Next, click on  File -> USB button.
rmprep1
Select All Files from the drop-down and select "imagedd" and click Open
rmprep1
Several Prompts will appear, keep the defaults and click OK for each one.
rmprep3
This is your last chance to verify that you have selected the correct image/drive.
*Make sure you have the correct drive selected or you can potentially overwrite the wrong USB Stick/Hard drive*
When you've verified click OK.
rmprep4
rmprep5
rmprep6
Now we're done writing the image onto the USB Stick.
You now have a bootable USB Stick with Vmware Vsphere Hypervisor (ESXi 4.1.0) installed.

Method 2

The process is to select the USB Stick as the install device in the Vmware Vsphere Hypervisor (ESXi 4.1.0) installer.

Begin Regular Install of ESXi

With the USB Stick plugged in, boot the server/virtual machine from the Vmware Vsphere Hypervisor (ESXi 4.1.0) install media.


Select Proper Install drive

Proceed through the screens until you get to the Select a Disk screen.
*Be absolutley certain that you select the proper device as to not overwrite the internal hard drive if you have one.*

Proceed through the installation.


Congratulations, you now have a bootable and portable Vmware Vsphere Hypervisor (ESXi 4.1.0) install on a USB Stick!

by Jose Rodriguez http://www.virtualgeekhub.net/content/how-install-vmware-vsphere-hypervisor-esxi-410-usb-stick

5 Jan 2012

Convert from thick-provisioned disk to thin and vice versa on ESXi 4.1

Thin to thick (easy :-): within the vSphre client  open datastore browser and right click on vmdk file you want to convert to think and select Inflate.

Thick to thin (a little bit "pro")
- Connect to host via SSH and use the below syntax: 


1. Shutdown the VM so that we can get exlusive access to the virtual disk.
2. Log into your ESX host using SSH and cd into the VM directory that contains your virtual disk.
3. Run vmkfstools –i srcDisk -d thin dstDisk
4. Edit the settings of VM and remove the existing drive srcDisk. Add a new hard drive and choose the existing drive option then browse to your new thin dstDisk
5. Boot the VM and enjoy.

Note: Dont forget to go back to ESXi host remove the old .vmdk and -flat.vmdk files once you are sure that your VM is operating normally off the thin disk.

Total Pageviews