10 Dec 2013

Content Type

http://en.share-gate.com/blog/sharepoint-columns-site-columns-or-content-types

1 Dec 2013

Make life easier with this

http://www.nintex.com/en-US/Products/Pages/NintexWorkflow.aspx
and this

http://www.muhimbi.com/products/pdf-converter-for-sharepoint.aspx

How to cook the perfect fillet steak

OK, this is pretty far removed from the norm of an IT blog, but it is the weekend so I feel it's allowed. The topic has some technical (practical) aspects, and is something I've been talking with a few people about lately.
I've seen various techniques on how to cook steak properly, but I came across one individual's website (which, frustratingly, I can no longer find) a few years ago, which summarised everything beatifully and set me trying out a few different ways from the norm. In a nutshell: cook the steak from room temperature, oil the meat and not the pan, use a pan as hot as you can, and let the steak rest for at least as long as you cooked it.
It's all about heat
I used to work in a professional kitchen. Well, I was a waiter in a nice restaurant, which meant I spent a bit of time in a pro kitchen (generally on the "other" side of the hot plate). Professional chefs seemingly have a duty to verbally abuse their waiting staff, which mine did with gusto if not applomb.
Several years later, I was being shown round a call centre (as The Client), when I recognised one of the chefs who'd been giving me verbal, was now trying to sell software over the phone. Presumably, the world of cooking hadn't worked out for him quite as he'd hoped.
Anyway, one thing I learned about cooking steak back then was, it's all about heat. Now the trick to cooking a good fillet steak (and that's pronounced fill-it, not fill-eh, unless you currently live in France), is to try to get close to restaurant kitchen heat levels in a domestic kitchen. It can make for a lot of smoke, but it's very effective. Here's the deal...
  • Take your fillet steak out of the fridge at least 20 minutes before you want to cook it, to allow it to get to room temperature. Taking a cold steak and throwing straight onto hot metal won't do anything for the tenderness of the end result.
     
  • Pat the steak with kitchen roll to remove any excess moisture (if the meat is wet, when you put it on the heat, that water will vapourise and only form a barrier between the steak and the heat source).
     
  • Once patted dry, rub a little sunflower or vegetable oil into the steak, with your fingers (don't use olive oil - it burns at too low a temperature), and leave to sit for a few minutes. Season with salt & pepper if you like.
     
  • Put a small, dry, frying pan on maximum heat on the biggest ring/burner on your hob. Leave it there for a least a couple of minutes. In the meantime, go and open some windows. Things are likely to get smokey. I've heard of some people leaving the pan on heat for as much as 10 minutes, but you might struggle to see the cooker by the time you're ready to put the fillet on.
     
  • When the pan is as hot as you can suffer, gently place the steak onto the surface. After 30 seconds or so, move it so it doesn't stick and burn. Now it's a straight function of how hot your pan is, how big the steak is, and how you like it cooked, which will determine how long to leave it there. I tend to find 2-3 minutes each side will give a nice medium-rare on a decent sized fillet on a pan that's been on heat for a few minutes.
There's a trick to being able to tell when the steak is properly cooked, and it involves prodding your own hand. Pressing on the surface with your finger, you'll feel the flesh give way a little, and it should be about the same firmness as if you press with the finger on the fleshy part of your hand when pinching thumb and fingers together. It's easier to show than describe:
 Rare Medium-well/Well-done
So if you touch thumb and index finger, the firmness of your hand will be about the same as a rare steak, while thumb and little finger will be more like well done. Experience and practice will help you out here, and don't be scared of cutting the steak to check it's cooked as you'd like - better a well-cooked dish with a cut in the middle, than an undercooked but nicely presented one.
I can't really understand wanting to cook a lovely fillet of beef to "well done". You might as well save a bit of cash and buy a cheaper cut. In fact, according to Anthony Bourdain (and I've heard this of other chefs too), the skankier bits of beef get set aside for serving to restaurant customers who like their meat good 'n burnt - with a label on the meat saying "SFWD", or "Save For Well Done".
Finally, take the steak off the heat and put on a warmed plate and just let it rest for 10 minutes or so, before serving. You might want to deglaze the pan with a little red wine and maybe a knob of butter, to make a nice sauce. Mmmmmmmmm.


12 Nov 2013

1156 vs 1157 bulb


10 Nov 2013

"Setup Groups for this Site"

If you change your mind and want to create unique groups for sharepoint site after it was created there will be an issue because "Setup Groups for this Site" disappeared. Even you can create groups and make them to be default groups for the site but "Add users to Sharepoint Group" will not be available from drop down box of "your own" Site Owners group.
Luckily you can still get "Setup groups for this site" page appeared by this url
siteurl/_layouts/permsetup.aspx

Hope it will help
Cheers, BB


24 Oct 2013

uninstall spfeature

Uninstall-SPFeature [-Identity] -force

Get SP2010 feature name from feature ID

get-spfeature GUID

23 Oct 2013

Increase size of SP template

To increase the maximum size, simply run the following stsadm command (from the C:\Program Files\Common Files\Microsoft Shared\web server extensions\12\BIN directory) replacing the propertyvalue to the new maximum size (in bytes):
stsadm -o setproperty -propertyname max-template-document-size -propertyvalue 150000000

15 Aug 2013

Giai nhat

Ðánh bại 12 đối thủ trong vòng thi chung kết "Ứng đáp lịch sự lần thứ 35" được tổ chức tối qua tại VN với câu hỏi quyết định "Giả sử trong một bữa ăn tối với một người bạn gái mới quen mà bạn muốn đi toilet thì phải nói cách nào cho lịch sự nhất" một thí sinh người Pháp - một đất nước nổi tiếng về tính gallant của phái nam - đã đoạt giải nhất tuyệt đối với câu trả lời:
"Xin lỗi cô tôi phải ra ngoài một lát để giúp đỡ một người bạn nhỏ của tôi người mà tôi hy vọng sẽ trang trọng giới thiệu với cô trong một ngày gần đây"

12 Aug 2013

Use list in parent site in custom list lookup field

What you need to do is create a site column at the top level site (IT) which is a lookup to your XXX list, then in your sub site you add the site column into your custom list.
From the parent site (the top level site where the list resides)
Go to Site Actions > Site Settings
Under Galleries select Site Columns
Click Create at the top of the list
Give the column a title you will reference in your "child" lists
Select Lookup as the column type
Select the site's column group to categorize the new column
Select the list to lookup from the "Get information from" dropdown
Select the column of the lookup list you want to reference as the key in your "child" lists
(I selected "Title (linked to item)" so that you can easily reference the parent item from your child list item)
Click OK

From the sub-site (site that you need to create the child list)
From the All Items list vies, select Settings > List Settings
At the end of the Columns list select Add from existing site columns
You can filter the selections by selecting the group you associated the parent column with from the dropdown
Select the site column you created above and click the Add button
Click OK and there you have it.

1 Aug 2013

Moving Exec Backup to new server

http://www.symantec.com/connect/blogs/backup-exec-install-blog-upgrades

So, your backup server is a few years old and you find yourself in need of a newer, bigger, better, faster one. Just one problem, you want/need to keep your data from Backup Exec for compliance reasons. You have the perfect server that is ready to take on this new role. It is some new 64 bit monster with Windows 2008 R2, tons of I/O capacity, memory, disk space and more. Then you ask yourself, how do I move Backup Exec’s data from the old server to the new server and keep everything in working order? Time to check the technote database! So you head off to http://support.symantec.com and start doing some queries. You may find this technote:
How to migrate (move) Backup Exec from one system to another with the same version of BE, Windows and same or different computer names.
http://www.symantec.com/business/support/index?page=content&id=TECH67768
In the last 10 years, there have been many who have followed this technote, for just this purpose. When you start reading it, there are some bold statements, and some restrictions. However, lets first review some of the components this technote will cover.
  1. The Backup Exec Database (BEDB).
  2. The Backup Exec Data (Job histories stored on disk, reports, and more).
  3. The Backup Exec Catalogs (Catalog folder on disk).
Today the SQL instance that hosts the BEDB is Microsoft SQL Server Express 2005 SP3. This version happens to be a 32 bit version when installed on either a 32 bit server, or on a 64 bit server. That is good news for customers who want to migrate from 32 bit operating systems, to 64 bit operating systems. That means there is really no difference in the database mounted on a 32bit OS, or a 64 bit OS, so you can carry it forward to a 64 bit OS without any compatibility issues. Furthermore, the Backup Exec Data and Catalogs on disk are files that are obviously transferrable between OS’s as well. The technote above is written to help move these three items between an old and new server. However, there are a few remaining items to consider.
One of the main items to consider is the configuration of the old and new server. The steps in the technote guide you through creating a matching configuration on the new server. If it is the same operating system as the previous install, then the same components and configuration items for that operating system will get laid down by the install. This should give a relatively similar configuration. The restriction at the top of the technote mentions operating systems of different versions. This is most likely for customers who tried to go backwards. Some examples where this would be broken would be:
  1. Customer installed the Deduplication option on Windows Server 2008 (64 bit), then tries to move to Windows 2008 (32 bit). This option does not install the same on Windows 2008 (32 bit), so this will cause issues.
  2. Customer has Microsoft Exchange (64 bit). Tries to move their data back to a Windows Server 2003 (32 bit) machine. Selections lists in the database would fail to protect these servers since they require tools that can only be present on a 64 bit machine. 
These are just a couple examples of how this could lead to possible compatibility/supportability issues. There may also be additional issues when migrating from 32 bit to 64 bit operating systems of different operating system versions, though I am not personally aware of any. I know of customers who have successfully migrated this way, but it not a supported upgrade path as is called out in this technote:
How to migrate Backup Exec to another server with a different Windows OS version.
http://www.symantec.com/business/support/index?page=content&id=TECH129826
There is also the added difficulty of having to move to a newer version of the product, and not being able to upgrade to the current version. Here is an example. A customer has Backup Exec 12.5 installed on a Windows 2000 Server. They would like to migrate to Backup Exec 2010 R3. However, Backup Exec 2010 R3 does not support installing on Windows 2000. In a situation like this, the only upgrade path is the following technote:
How to use BEMIG to manually upgrade the Backup Exec database from a previous version
http://www.symantec.com/business/support/index?page=content&id=TECH50537
Again this technote lists similar restrictions as the previous technote. Most if not all of the restrictions have very valid reasoning. Primarily because of the work that is done during the install, with respect to these items. The Backup Exec Installation will often make some database changes in coordination with the migration scripts. It’s a carefully orchestrated flow to carry the configuration forward to the new version. Trying the steps in the technote against a server that meets the restrictions will be hit or miss. Mostly depending on the database version being migrated, and changes made in each version of the product after that version. For example, trying to migrate a database that is from the 12.5 product, using the migration(BEMIG) scripts in our 2010 R3 release will yield failures when the “Shared Storage Option” is installed. This is because the install does some of the work, and the scripts do the rest of the work during the migration sequence. The only reliable way to get upgraded when you meet the restrictions is through operating system upgrades, and the supported Backup Exec Install upgrade paths. Now, if you don’t meet the restrictions, then you are essentially using the migration scripts in the newer version of the product, to migrate your database to the new version. This is the same sequence that the Backup Exec Installer uses to migrate the database between versions. However, you should also be careful that the old configuration and new configuration match as closely as possible. Doing so will save you many hours of frustration and issues that could be avoided!
Another question I received, asked about lingering server/devices post upgrade, that are un-removable in the Backup Exec 2010 UI. This issue may happen when migrating to a server with a different server name and different hardware. It’s a difficult issue to solve for our support team, and usually requires their intervention to fully remove. For this reason, it is recommended that you migrate to a server with the same name, and similar configuration. It saves many hours of resolving configuration issues when you do. If you decide change your server name, you will not be able to carry forward a deduplication folder, or its associated jobs. You may also decide to recreate your selection lists for proper viewing. There may even be more items you find needing your attention when you do. Save yourself the headache and keep the same server name. Follow the technote and copy the data to the network, take the server offline, bring up the new server with the same name, and finish followng the technote. You will be glad you did!

25 Jul 2013

Increase the SharePoint 2010 Upload File Size Limit

http://angler.wordpress.com/2012/03/21/increase-the-sharepoint-2010-upload-file-size-limit/

The Problem.
For teamsites and collaborations, sometimes it can be useful to upload big file size documents – which is allowed only partially by SharePoint and IIS. They both have different default settings for the maximum upload file size of a single document or file. They are:
  • SharePoint Server 2010: 50 MB
  • IIS7: ~30 MB
So, when trying to upload a big document, this results in the following error:
image
85 MB is simply too much for the above mentioned settings. Now, the solution section will show you how to fix this.
The Solution.
The good news is: This can be custom tailored to your needs, by simply following 3 steps. Here comes the first step:
1. Increase the SharePoint Upload Limit via Central Administration
First, you must increase the SharePoint 2010 upload limit.
  • Central Administration
  • “Manage Web Applications”
  • Select desired web application row (don’t click on the title, just select)
  • “General Settings” in the ribbon
  • Under Maximum Upload Size, change the setting to the desired value (e.g. 200 MB in our example)
  • “OK”

image
Now, the web app is equipped for receiving large files, but IIS7 will still prohibit it, resulting in the same error message as above. So, let’s move on to step 2.

2. Increase the IIS7 request length
Use the following command on the machine you are running the IIS 7:
%windir%\system32\inetsrv\appcmd set config -section:requestFiltering -requestLimits.maxAllowedContentLength:valueInBytes
In our case, we’ll simply put 200x1024x1024=209715200 bytes.
You will receive a confirmation message after applying the command. Please bear in mind that you will need to run the cmd.exe in administrator mode.
image
3. Increase the IIS7 connection timeout length (optional)
One more thing to keep in mind is the connection timeout settings: When you upload large files, depending on your connection speed it can happen that the connection times out. If you want, you can increase the connection timeout to a larger value. The standard is 120 seconds. This step is optional, but can become required if you have users with low speed internet connections.
image
  • Open IIS
  • Select the Web Application
  • Click on Advanced Settings
  • Expand Connection Limits
  • Set the new value for Connection Time-out (seconds)

This is it – all done!
You users will now be able to upload larger files:
image
As usual, test any commands, configuration and settings on a test environment before applying them in production. Applying request lengths bears also some security implications to keep in mind. Use any advices and configurations at your own risk and evaluate risks before applying them.

7 Jun 2013

IIS 7.5 and ASP.NET 2.0 class

Introduction

We currently use Windows XP with IIS 5 on our development machine. Recently, I needed to work on the project at home, and I decided to use my laptop instead of having to bring my desktop home. Problem is, my laptop is configured with Windows Server 2008 R2 and IIS 7.5. After getting my laptop ready for use, I needed to attach my ASP.NET website project to IIS 7.5. After timeless searching on Google, reading thousands of articles, I found no answer. I decided to do it myself (which often is the best option) and got it working in almost no time. I wrote this article to help anyone out there who either (a) struggles to get it working or (b) needs to do this in the future. Use it, don't use it, it's up to you. I suggest that you adapt this article if you are not using Windows Server 2008 R2. Google is usually helpful here.

Installing IIS 7.5

At this point, I assume you already have your website project and all related technologies on the target system. Click Start, then point to Administrative Tools and select Server Manager. On the left-hand side, you will see a list of items. Select right-click on Roles and select Add Roles. If the welcome page shows, click Next. Then you will be presented with a dialog that asks you to select all the roles of your choice ("Select one or more roles to install on this server."). Select the Web Server (IIS) option.
IMPORTANT: Ensure that all sub-items under Web Server (IIS) are also selected. Click Next/Install. Your system will require a restart to continue the IIS Installation.

Configuring IIS 7.5

Now that you have restarted your computer, click Start > Administrative Tools > Internet Information Services (IIS) Manager. Expand your server name, then expand Sites. Right-click on Default Web Site and select Add Virtual Directory.
IIS Manager 
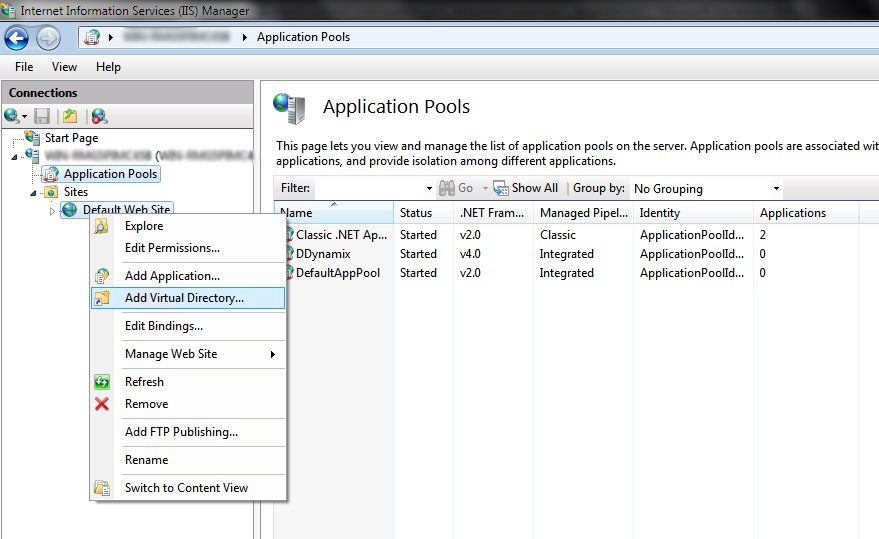
Now type in an alias (it will appear as localhost/(youralias) when browsing), then select the actual path of your website. It is highly recommended to keep all hosted websites within one folder located in C:\ (e.g. C:\Websites\Website1). This way, some privilege issues will not occur when running the application on a Windows 7/2008 R2 machine.
Expand the Default Web Site. Right-click on your newly created website and select Convert to Application.
Convert to Application

Configuring Access Permissions

With the introduction of enhanced UAC in Windows Server 2008 R2, you will already know by this time that at some point there will be an access privilege issue. First, we will configure IIS to use an impersonation account instead of the default IISPool account.
Authentication 
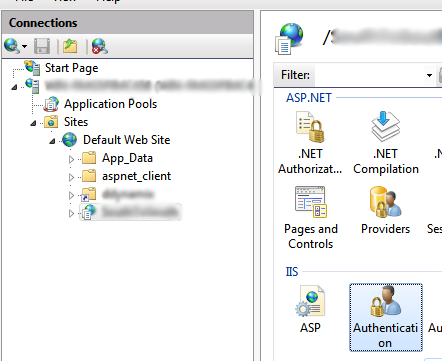
Click on your website in the connections view. On the right-hand side, a page will open presenting you with a lot of options. In the IIS section, double-click on Authentication.
Once the Authentication page is open, right-click on ASP.NET Impersonation and select Enable. Now you have successfully configured IIS and its authentication method. Now, we need to configure SQL Server to allow this impersonated account to access the databases. First, open SQL Server Management Studio.
Expand the Security item listed in the Object Explorer (all images relates to SQL Server 2008 R2).
SQL Server 
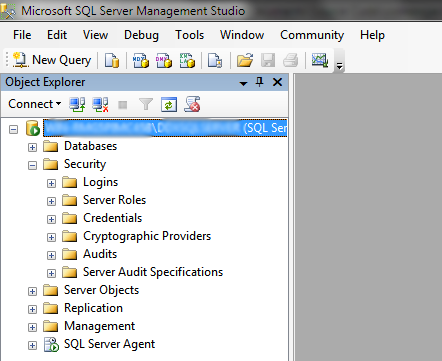
Right-click on Logins and select New Login. In the dialog that just opened, click Search. Within the Object Search dialog, select Advanced. Now click Find Now.
Select User Account 
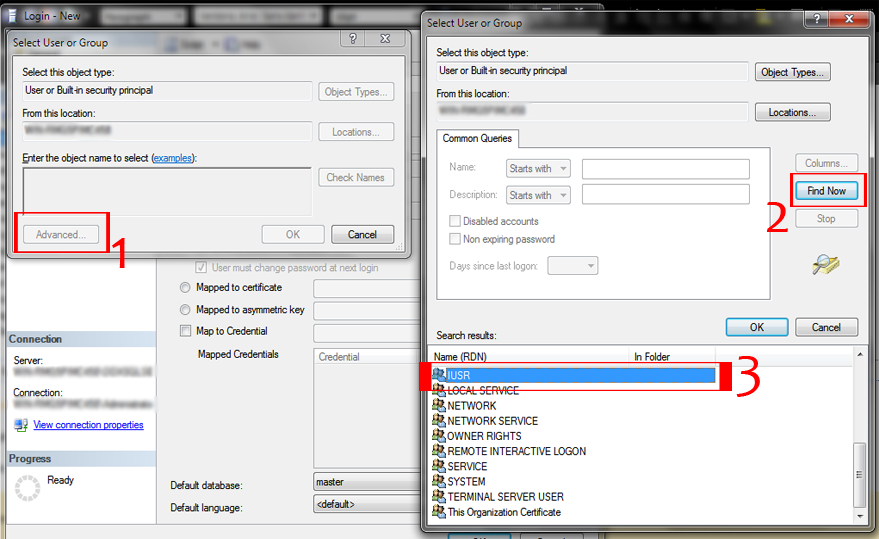
Select IUSR and click OK. Click OK once again. If, at the end of this article, you still experience SQL Login problems, try adding more Server Roles in the Server Roles tab.
Click on the User Mappings tab. Select all the databases listed and finally, select the database your application uses. In the option box below it, select all the role options listed. Now click OK.
Open your favorite browser, and type in the address bar localhost/(youralias). Voila!

License

This article, along with any associated source code and files, is licensed under The Code Project Open License (CPOL)

http://www.codeproject.com/Articles/290238/Getting-Started-with-IIS-7-5-and-ASP-NET-2-0-Class
 

3 Jun 2013

AD Replication ports

http://social.technet.microsoft.com/wiki/contents/articles/584.active-directory-replication-over-firewalls.aspx


AD Replication ports (http://thetechnologychronicle.blogspot.com/2012/05/list-of-ad-replication-ports.html)

RPC endpoint mapper
135/tcp, 135/udp
Network basic input/output system (NetBIOS) name service
137/tcp, 137/udp
NetBIOS datagram service
138/udp
NetBIOS session service
139/tcp
RPC static port for AD replication
1111/TCP
RPC static port for FRS
2347/TCP
Server message block (SMB) over IP (Microsoft-DS)
445/tcp, 445/udp
Lightweight Directory Access Protocol (LDAP)
389/tcp
LDAP ping
389/udp
LDAP over SSL
636/tcp
Global catalog LDAP
3268/tcp
Global catalog LDAP over SSL
3269/tcp
Kerberos
88/tcp, 88/udp
Domain Name Service (DNS)
53/tcp, 53/udp
MOM
TCP/UDP 1270
NTP
123/udp
Remote Desktop
3389/tcp

26 Apr 2013

email to multiple users from SP workflow

http://go4answers.webhost4life.com/Example/send-email-multiple-users-161965.aspx


How to insert multiple person/group field contents into CC portion of workflow email

Issue:  You want to be able to pull the values contained in a multiple person/group field in a SharePoint list into a workflow, and insert them into the CC portion of the send email workflow action.
A most brilliant colleague of mine was able to find a quick and easy workaround for this pesky issue.
In this scenario, the users to be CC'd are contained in a multiple person/group field in the list that the workflow is running on, called 'Assigned To Secondary'
To solve the problem:
  1. set workflow var:SecondaryAssigned to CurrentItem:Assigned To Secondary (formatted as a string)
  2. if workflow var:SecondaryAssigned is not empty
  3. set workflow var:SecondaryAssignedAddr to workflow var:SecondaryAssigned (formatted as email address, semicolon delimited)
  4. send email
  5. in the CC portion, select workflow var:SecondaryAssignedAddr (formatted as a string)
Hope that helps...!

http://geekswithblogs.net/DinoGrl/archive/2012/04/24/sharepoint-2010-how-to-insert-multiple-persongroup-field-contents-into.aspx


How to get SPUser or SPGroup from Person or Group field

You have person or group field in SharePoint list and you want to programmatically get the user or person.


The below code to gets SPUser from User or Group field in the list 
Multiple choice X
Groups X
 
//get SPUser
SPFieldUser userField = (SPFieldUser)item.Fields.GetField("Users");
SPFieldUserValue userFieldValue = (SPFieldUserValue)userField.GetFieldValue(item["Users"].ToString());
SPUser user = userFieldValue.User;

Multiple choice Y
Groups X

//Multiple choices are allowed
SPFieldUser userField = (SPFieldUser)item.Fields.GetField("Users");
SPFieldUserValueCollection userFieldValueCollection = (SPFieldUserValueCollection)userField.GetFieldValue(item["Users"].ToString());
foreach (SPFieldUserValue userFieldValue in userFieldValueCollection)
{
    Console.WriteLine("     " + userFieldValue.User.LoginName);
}


Group Y


//Group or User are allowed
SPFieldUser userField = (SPFieldUser)item.Fields.GetField("Users");
SPFieldUserValue userFieldValue = (SPFieldUserValue)userField.GetFieldValue(item["Users"].ToString());
//Tries to get SPUser
if (userFieldValue.User != null)
{
   SPUser user = userFieldValue.User;
}
//if the field contain group
else
{
  SPGroup group = web.SiteGroups.GetByID(userFieldValue.LookupId);
}


24 Apr 2013

SCR

http://web123.vn/hoidap/traloi/67694/van-de-thay-nhot-xe-lead.html

Xe tay ga thường khá đắt tiền, do đó việc bảo dưỡng kỹ xe tay ga không chỉ giúp chủ nhân giữ được xe mới, bền mà còn giúp tiết kiệm chi phí sửa chữa và giảm thiểu những phiền toái.

Bảo dưỡng xe còn giúp xe duy trì được hoạt động thật tốt, bảo đảm an toàn cho người vận hành và giảm ô nhiễm khí thải của động cơ.

Thời kỳ chạy rà máy (Rodage):

Chạy rà máy thường được thực hiện với 2000 km đầu tiên. Trong thời gian này, nên chạy xe với tốc độ không vượt quá 50 km/giờ. Trong 500 km đầu tiên, nên thường xuyên thay đổi tốc độ khi chạy nhưng không nên vượt qúa ½ vòng tay ga. Sau khi chạy được 1 giờ, bạn nên cho xe nghỉ 10 phút. Giai đoạn này nên kiểm tra thêm các bộ phận bôi trơn, thắng, dầu nhớt (nên thay nhớt từ 2 -3 lần trong 2000 km đầu), độ mở xupap, các đai ốc, bulong…

Bảo dưỡng kiểm tra định kỳ:

Chu kỳ bảo dưỡng trong giai đoạn này nên tiến hành thông thường sau mỗi 2000km. Tuy nhiên chu kỳ này có thể ngắn hơn nếu chế độ vận hành của xe quá khắc nghiệt, tải nặng hay điều kiện về hạ tầng giao thông không đảm bảo. Sau đây là bảng tham khảo về chu kỳ bảo dưỡng. Ngoài ra, bạn cũng nên tuân theo những yêu cầu hoặc khuyến cáo khác của nhà sản xuất:
Hạng mục - Chu kỳ

Kiểm tra ống nhiên liệu 4.000 km
Tính năng thao tác tay ga 3.000 km
Thay bầu lọc gió 4.000 km
Ống thông gió cacte 4.000 km
Thay Bugi 8.000 km
Kiểm tra và điều chỉnh khe hở xu pap 4.000 km
Thay dầu nhớt 2.000 km
Rửa lưới lọc dầu nhớt 10.000 km
Điều chỉnh cơ cấu garangti 4.000 km
Kiểm tra dây curoa truyền lực 8.000 km
Thay dây curoa mới 24.000 km
Thay dầu bánh răng hộp giảm tốc 2 năm
Kiểm tra hao mòn hệ thống thắng 4.000 km
Kiểm tra bộ phận ly hợp 8.000 km
Kiểm tra thắng, phuộc nhún 3.000 km
Kiểm tra bánh xe, săm, lốp 3.000 km
Kiểm tra ổ bi tay lái 10.000 km


Việc thực hiện các chế độ kiểm tra trên nên được thợ có chuyên môn tiến hành để đảm bảo các yếu tố kỹ thuật khi bảo dưỡng.

Đây là Kinh nghiệm quan trọng khi dùng xe ga


Không nên đề nổ máy rồi vận hành ngay, tránh lạm dụng phanh trước hay thường xuyên vệ sinh phao xăng là những kinh nghiệm nên biết khi sử dụng xe ga.

Nếu bạn muốn sử dụng xe ga đúng cách và giữ cho xe bền lâu thì hãy cố tránh những thói quen xấu sau:

1. Đề nổ máy và vận hành ngay

Giống như xe số, chủ của những chiếc xe tay ga cũng luôn mắc phải thói quen này. Tuy nhiên, đối với xe tay ga, thói quen này có sức "tàn phá" lớn hơn nhiều. Thông thường, xe tay ga luôn có vòng tua máy cao hơn so với kiểu xe số.

Chính vì vậy tại thời điểm khởi động, nếu không áp dụng phương pháp nổ galanti chờ ban đầu, những tiếng động lách cách hoặc thậm chí "rào rào" phát ra từ hệ thống supap của động cơ sẽ khiến chủ xe phải tốn khoản tiền khá lớn để khiến chiếc xe nổ êm trở lại.

2. Lạm dụng phanh trước


Với thói quen thuận tay phải, rất nhiều chủ xe quen thực hiện thao tác bóp phanh trước khi bị giật mình. Việc sử dụng phanh trước với xe ga xảy đến rất nhiều nguy hiểm do đường kính vành xe nhỏ, hành trình giảm xóc ngắn. Hãy luôn sử dụng đồng thời hai phanh sau và trước để đảm bảo an toàn nhất. Trên một số loại xe ga đời mới, hệ thống phanh đồng thời CBS luôn cho phép người sử dụng chỉ cần dùng một phanh trái là có thể dừng xe bằng cả hai phanh.

3. Xe ga như đi... xe số


Thực hiện những cú "ga thốc" cho xe vọt nhanh rồi sau đó phanh gấp sẽ khiến cụm côn ly hợp và dây cô roa truyền động nhanh bị hỏng hơn. Ngoài ra, khi thực hiện kiểu "ga thốc" và phanh liên tục cũng đồng nghĩa với việc bạn đang "ném" từng "cốc" xăng của mình đi một cách vô ích.

Khi thốc ga, chiếc xe cung cấp cho bạn một gia tốc lớn và mạnh để có thể di chuyển dài hơn. Thế nhưng khi bóp phanh gấp, xe giảm tốc độ đột ngột khiến bạn sẽ phải tiếp tục "nạp" một lượng xăng tương ứng để đi tiếp. Hãy luôn giữ tốc độ và tay ga được đều nhất có thể, điều này sẽ mang lại độ bền cho bộ ly hợp, dây cua-roa và tiết kiệm nhiên liệu hơn.

4. Không vệ sinh phao xăng

Đối với nhiều chiếc xe tay ga đời mới, nhiều xe như Honda Sh, Honda SCR... đều sử dụng kiểu phao xăng được thiết kế kèm theo một lưới lọc hình "chiếc lá" bao bọc lấy ống hút xăng. Cụm phao xăng nằm ngâm ngay trong bình chứa nhiên liệu.

Rất nhiều chủ xe đã bỏ qua chi tiết này khi tiến hành bảo dưỡng cũng như khi sử dụng. Điều này khiến cho tấm lưới lọc sau một thời gian sử dụng sẽ xảy ra hiện tượng mạt sắt và chất bẩn bám chặt vào lọc xăng dẫn tới tắc ống hút xăng, hỏng bơm xăng, hoặc "nhẹ nhàng" hơn là khiến chiếc xe không đạt được công suất và tốc độ tối đa do thiếu xăng. Vì vậy hãy luôn kiểm tra phao xăng vào những kỳ bảo dưỡng toàn bộ để chiếc xe có thể vận hành được tốt hơn

5. Không chờ đèn tín hiệu phun xăng FI tắt đã khởi động

Mang lại khả năng tiết kiệm nhiên liệu và vận hành êm ái, phun xăng điện tử mang lại nhiều ưu việt hơn loại chế hòa khí (bình xăng con) thông thường. Tuy nhiên, hệ thống phun xăng điện tử cũng cần phải được sử dụng đúng cách mới có thể vận hành tốt. Chính vì vậy, sau khi bật khóa điện, hãy chú ý chờ đèn tín hiệu FI tắt rồi hẵng bấm nút khởi động.

Nếu làm đúng cách này, hệ thống bơm nhiên liệu sẽ có thời gian nạp đủ nhiên liệu vào vòi bơm. Đồng thời hệ thống phun xăng cũng có khoảng thời gian để hoàn tất khâu khởi động nhằm phun nhiên liệu được chính xác và bền hơn. Còn nếu làm ngược lại cách này, hệ thống bơm nhiên liệu sẽ rất dễ bị hỏng. Ngoài ra, bạn cũng nên lưu ý việc bảo dưỡng làm sạch kim phun định kỳ theo hướng dẫn của nhà sản xuất.

6. Vận hành xe ở tốc độ chậm

Đa phần tầng lớp thanh niên và phụ nữ cũng như người lớn tuổi đều "thích" vận hành xe ga một cách chậm rãi để có thể nói chuyện, "ngắm phố phường" hoặc để an toàn. Tuy nhiên, với những chiếc xe ga sử dụng két nước, điều này vô tình gây ra tình trạng nhiệt độ xe tăng cao và xe tốn nhiên liệu hơn.

Khi vận hành những chiếc xe ga có sử dụng két nước, bạn nên đi ở một tốc độ trung bình khoảng trên 40km/h tùy mức độ an toàn cho phép của đoạn đường vận hành. Việc vận hành chiếc xe nhanh hơn một chút sẽ giúp lượng gió làm mát cho két nước được nhiều hơn và đỡ tốn nhiên liệu hơn.

Ngoài ra, không nên điều chỉnh cảm biến nhiệt độ kích hoạt hệ thống làm mát muộn hơn hoặc sớm hơn so với nguyên bản. Bởi động cơ khi quá nguội hoặc quá nóng đều không thể làm việc tốt. Nhiều trường hợp do thợ sửa xe điều chỉnh quạt làm mát khởi động sớm nhằm...tiết kiệm điện đã vô tình làm động cơ trở nên nóng hơn, nước sôi ở nhiệt độ cao và tăng khả năng sinh cặn tại két nước. Hãy luôn vệ sinh két nước và thay mới nước làm mát trong quy trình bảo dưỡng toàn bộ xe.

7. Xe ga có khả năng lội nước

Nhiều chủ xe nghĩ rằng, với thiết kế dạng "phi thuyền" những chiếc xe tay ga có thể lội nước một cách dễ dàng và an toàn. Tuy nhiên, thiết kế của động cơ lại trái ngược lại suy nghĩ này. Với thiết kế động cơ đặt thấp, cụm truyền động với nhiều lỗ thoát khí và hệ thống côn sử dụng kiểu "bi văng", nước là kẻ thù "không đội trời chung".

Những lỗ thoát khí trên cụm truyền động và bầu lọc gió đặt thấp luôn là những nơi mà nước có thể thâm nhập dễ dàng nhất. Và khi nước đã "nhiễm" vào cụm côn văng đồng nghĩa với việc chiếc xe sẽ đứng ì một chỗ trong khi động cơ vẫn đang "gào rú" do trượt bi côn.

Và chỉ một thời gian sau, hệ thống côn văng sẽ rất dễ bị han rỉ dẫn tới hiện tượng xe bị giật (hiện tượng này cũng xảy ra khi cụm côn xe bị bụi bẩn - PV). Đừng biến chiếc xe trở thành "ca nô bất đắc dĩ" và vệ sinh cụm truyền động thường xuyên sẽ giúp chiếc xe luôn vận hành được êm ái.

8. Dùng dầu nào cũng được

Với tâm lý "dầu nào rẻ thì thay" và "dầu nào cũng là dầu" của nhiều chủ xe sẽ khiến cho động cơ hay gặp trục trặc và độ bền giảm đi. Trên thị trường hiện nay, có rất nhiều loại dầu được bày bán với công dụng và tính năng khác biệt. Vì vậy, lựa chọn đúng loại dầu sử dụng cho xe ga là điều quan trọng.

Có nhiều cách để tìm đúng loại dầu cho xe mình, cách tốt nhất là hãy đọc kỹ loại dầu sử dụng cho xe được ghi trong sách hướng dẫn sử dụng mỗi khi mua xe mới. Khi thay dầu xe, hãy đừng "tiếc tiền" bởi dầu xe ga luôn đắt hơn xe số thông thường. Hãy hỏi kỹ loại dầu dùng cho xe ga trước khi thay dầu. Cách đơn giản nhất, trên mỗi chai dầu dùng cho xe ga luôn có chữ "scooter" ghi trên nhãn hộp.

9. Lắp còi báo động không ảnh hưởng tới xe

Vấn nạn mất cắp xe luôn là điều khiến nhiều chủ xe đau đầu, đối với những chiếc xe đắt tiền như Honda Sh, Piaggio LX, Honda Spacy... luôn là mục tiêu hàng đầu của bọn trộm. Rất nhiều chủ xe đã phải lắp đặt hệ thống báo động cho xe của mình. Nhưng với chất lượng và nguồn gốc xuất xứ không rõ ràng, trình độ thợ có tay nghề thấp có thể khiến xe của bạn gặp những hiện tượng như: cháy xe, chập điện, ổ khóa từ phát hiện "nhầm" khiến IC khóa từ khóa toàn bộ hệ thống điện trên xe dẫn tới việc chủ xe phải bỏ ra số tiền lớn để thay mới toàn bộ hệ thống IC và ổ khóa từ mới.
Việc lắp đặt thêm hệ thống báo động đòi hỏi chất lượng cũng như kiến thức và tay nghề của người thợ lắp đặt ở mức cao. Đối với những chiếc xe sử dụng ổ khóa từ như Piaggio LX, Honda Sh300i... Việc lắp đặt thêm hệ thống báo động là hết sức nguy hiểm đối với hệ thống điện trên xe. Cách tốt nhất, hãy luôn gửi xe ở nơi có người trông giữ. Điều quan trọng là luôn có sự cảnh giác cũng như cẩn thận cho chiếc xe mới mang lại sự an toàn tối đa chứ không phải do bất kể thiết bị hiện đại và tiên tiến nào.

10. Xe ga đắt tiền sẽ bền hơn và ít phải bảo dưỡng hơn

Sở dĩ có điều thứ 10 bởi người viết bài đã từng chứng kiến không ít những chiếc xe tay ga vốn đắt tiền thậm chí còn khá mới phải ở trong tình trạng "bổ máy" làm lại toàn bộ động cơ do những lầm tưởng về giá trị chiếc xe đi kèm với độ bền!

Nhiều chủ xe coi thường việc bảo dưỡng đúng quy trình và thời gian biểu cho chiếc xe của mình. Đối với một chiếc xe ga, việc bảo dưỡng thường xuyên và đầy đủ là điều hết sức quan trọng. Nó quyết định độ bền, tính kinh tế và vận hành êm ái, thoải mái khi sử dụng. Vì vậy hãy luôn chú ý tới các ghi chú mà nhà sản xuất đã đề ra và dành một chút thời gian để chăm sóc chiếc xe của mình một cách thường xuyên.

17 Apr 2013

Move/Migrate Sharepoint 2010 list based workflow

http://gavinmckay.wordpress.com/2011/08/29/howto-move-or-migrate-sharepoint-2010-list-based-workflows-between-sites-and-site-collections/


HOWTO Move or Migrate SharePoint 2010 List-based Workflows between Sites and Site Collections

I’ve experienced this issue a lot when trying to migrate workflows between test SharePoint 2010 farms and production farms, in particular with workflows attached to lists. When moving a workflow to another site collection or server farm, the association to the list is broken and the workflow cannot be attached to the list. You also cannot use SharePoint designer to fix this via the standard methods as the unattached workflow cannot be reattached to the list.
List-based workflows are tied to three different lists – the “main” source list where the data is held (such as a Forms library or custom list), a task list, and a workflow history list. The latter in particular is tricky, because it is a hidden list and cannot be viewed via the normal interface.
The fix for this is to modify the source workflow files to force the workflow to reattach to the list. The following method assumes that your new site/location that you are moving the workflow too does not yet have any workflows already attached to any lists on the site. When a workflow is created in a site for the first time, a Tasks list and a Workflow History list are automatically created/used by the workflow. These lists must exist before you can force your migrated workflow to attach to the list.

Step 1 – Create a Blank Workflow

  1. Using SharePoint designer, connect to your destination site
  2. Create a new list-based workflow called “test” (or whatever), attaching it to your migrated list
  3. Create one condition (i.e. if 1 = 1)
  4. Create one action (i.e. add comment “hello”)
  5. Save and publish the workflow
After this step has been completed, your site will now have a Tasks list and Workflow History list.

Step 2 – Get the list ids for your new workflow

The list ids are required to configure your migrated workflow.
  1. Using SharePoint Designer, connect to your destination site
  2. in the left-hand side, in Site Objects, select All Files
  3. in the All Files list, select Workflows
  4. Select your new workflow that you just created (in this example, “test”)
  5. You should see (at least) four files:
    text.xoml
    test.xoml.rules
    test.xoml.wfconfig.xml
    test.xsn
  6. Right-click on test.xoml.wfconfig.xml and select Open With, Notepad
  7. Look for the tag in the xml:
  8. Record the Guid entries for ListID, TaskListID, and HistoryListID

Step 3 – Update the migrated workflow

  1. Still using SharePoint Designer, All Files, Workflows, this time select your migrated workflow
  2. You should again see (at least) four files. Right-click on “your-workflow.xoml.wfconfig.xml” and select Open with SharePoint Designer (As XML)
  3. Find the Association tag and very carefully change the Guids so that your migrated List IDs are the same as the “test” workflow List IDs.
  4. Save the file
  5. Close SharePoint Designer
  6. Open SharePoint Designer again and open your site
  7. Instead of All Files, this time click on Workflows
  8. Select your workflow
  9. Save the workflow
  10. Publish the workflow
Your workflow should now be reassociated with your list on your new site.


Total Pageviews