23 Nov 2010

Virtualizing Citrix XenApp on vSphere

Today many organizations who use XenApp are still bound to x86 platforms because of legacy applications which don’t run on a x64 platform. Sometimes an application does run on a x64 platform but is not supported by the vendor on a x64 platform. By sticking to the x86 platform, modern server hardware can’t be fully utilized due to the memory limit of 4 GB of the x86 platform.
To overcome this limitation virtualization comes to practice! Virtualizing a XenApp server has always been a challenge. However with the maturity of vSphere and current CPU’s, there isn’t a limitation anymore to not virtualize a XenApp server. In this article I will share you my experience of implementing a virtualized XenApp production environment for a customers and give you my recommendations for a successful virtualization of XenApp.
This article is split in different parts. In the first part I focus on the configuration of the XenApp VM. In the second part I will look at the application landscape and the underlying ESX host and in the last part I will look at the performance results.

Building a XenApp VM

The configuration of a XenApp VM is crucial to the performance of a virtualized XenApp server and has a direct link with the hardware configuration of the underlying ESX host. As with every VM there are four main performance aspects that need to be optimized for the corresponding workload: cpu, memory, disk I/O and network I/O.
CPU
The most important resource for the XenApp VM is CPU. XenApp VM’s tend to use a lot of CPU resources and this is most likely to be the first bottleneck. In creating you XenApp VM, there are two scenario’s: scale-out or scale-up. In the scale-out scenario there a lot of light XenApp VM’s created with one vCPU. In the scale-up scenario less VM’s are created with two vCPU. The main objective is to not over commit your physical CPU’s. Let’s say you have a ESX host with two Quadcore CPU’s, which is a total of 8 cores. If you create eight 1 vCPU VM’s, each VM can schedule a dedicated CPU. The same applies for 2 vCPU VM’s, if you create four 2 vCPU VM’s, each VM can schedule a dedicated set of CPU’s.
Depending of the workload on your XenApp VM, one of this scenario’s fits best. If you have light workloads the scale-out scenario might be best, but in most situations the scale-up scenario does the best job. In most circumstances, using 2 vCPU’s allows for more users and a more consistent user experience. With the improvements made to the CPU scheduler in vSphere, like further relaxed co-scheduling, SMP XenApp VM’s are no longer a problem. If you are using a host with Intel Nehalem CPU’s enable the CPU and Memory hardware assistance (more information on this in part II).
Disk I/O
The second important resource is disk I/O. This will be further explained in the next part of this article but for now I recommend to use two virtual disks for a XenApp VM. One for the operating system and one for the applications. For optimal disk I/O performance, make sure you align the file system in the guest OS.
Memory
The next resource for the XenApp VM is memory. With memory there is one simple rule. Don´t over commit memory for your XenApp VM´s. Depending of the workload of the XenApp server, configure the XenApp VM with the corresponding amount of memory. In most situations this will be 4096 MB of RAM (assuming you are using a 32 bit OS). Make sure you also make a memory reservation of the same size. This way the XenApp VM has all the configured RAM available and the VMware balloon driver cannot degrade the performance of the XenApp VM.
Network I/O
The last resource for the XenApp VM is network. I haven´t seen any XenApp VM implementation where network i/o results in a bottleneck but for best results use the new VMXNET 3 vNIC. The VMXNET 3 has less impact on the CPU which is always useful.
Other considerations
I recommend to use Windows Server 2003 R2 x86 for building the XenApp VM. Windows Server 2008 uses a lot more resources. This probably will be a lot better with Windows Server 2008 R2 but at time of writing this article, XenApp is not certified for use with Windows Server 2008 R2. Furthermore I recommend to remove the CDRom drive and floppy disks. The floppy disk can be complete disabled in the BIOS of the VM. Always install the latest VMware Tools to provide the optimized drivers for the virtual SCSI and network devices and install the balloon driver.
So let’s summarize the preferable XenApp VM configuration:
2 vCPU
4096 MB of RAM with 4096 MB reserved
1 LSI Logic Parallel SCSI controller
2 virtual disks, one of OS and one for applications
1 VMXNET 3 vNIC
CDRom drive removed
Floppy drive removed
CPU and Memory hardware assistance enabled if using Intel Nehalim processors
Again, depending on your environment another configuration could be more desirable. A consistent server configuration is very important in a XenApp farm so I recommend to build a dedicated template for deploying XenApp VM’s.
In the next part of this article I will look at the application landscape and the underlying ESX host for building your virtualized XenApp farm.

vSphere design considerations

I recommend to create a dedicated VMware cluster for virtualized XenApp servers. The reason for this is use of vSphere functionality and the resulting licensing costs. Because XenApp VM’s are highly resource intensive there is no need for VMware DRS. VMware DRS is useful when there are a lot of VM’s with different resource demands but with XenApp VM’s this is not the case. All XenApp VM’s are resource intensive. Furthermore I do not recommend to use vmotion on XenApp VM’s because end-users could experience a delay in there XenApp session during a vmotion. Based on these facts a vSphere Standard edition license gives enough functionality for the VMware cluster with XenApp servers, which I will call the VMware XenApp cluster in the rest of this article. By using vSphere standard, the XenApp servers are protected against hardware failures by VMware HA and using the vSphere standard license keeps the cost of a virtualized XenApp server low. There’s one caveat, if you use distributed vSwitches in your environment you are stuck with standard vSwitches with vSphere standard or you should use the vSphere Enterprise Plus license for the VMware XenApp cluster.
Hardware considerations
Selecting the right server hardware is essential for successful virtualization of XenApp servers. I recommend to use hardware based on the Intel Nehalem processor architecture. At time of writing this article, this is the Intel Xeon 55XX series. The Nehalem processor architecture provides support for hardware-assisted memory management unit (MMU) virtualization. MMU virtualization provides a significant performance increase.
The number of physical CPU cores should be matched with the number of vCPU’s. For virtualized XenApp servers, do not overcommit CPU resources. For example, if you intend to run 4 XenApp servers with 2 vCPU’s, your ESX server should have 8 cores. It is possible to slightly overcommit but you should monitor your CPU ready time for bottlenecks.
I used diskless HP Proliant BL460 G6 servers for building a VMware XenApp cluster, but any modern server will do. These servers are equipped with 2 Quadcore Intel E5540 CPU’s and 24 GB of RAM. With this configuration I managed to run 5 XenApp VM’s with a good performance. With 6 XenApp VM’s the CPU ready time becomes greater than 5% and the performance isn’t acceptable anymore.
Because XenApp VM’s are disk I/O intensive (especially during logon hours) I recommend to make dedicated datastores with the size for holding a maximum of four XenApp VM’s within the VMware XenApp cluster. This way the XenApp’s VM’s make optimal use of the I/O queue’s each lun provide. Also create the datastores on the fastest lun you can provide. I used raid 1 fibrechannel lun’s for the XenApp VM datastores.

Application Landscape

Each XenApp VM will contain some standard applications and custom application specific to the business. In this article I focus only on the standard applications. Here’s a quick overview of the standard application set I use on a XenApp VM:
- Microsoft Internet Explorer 7
- Microsoft Office 2003
- Antivirus software
I used Internet Explorer 7 because Internet Explorer 8 had more CPU spikes. I don’t know the reason for this, maybe some web application has not been optimized for IE8 but I didn’t have the time to investigate this problem. By default IE8 also starts two iexplorer processes for each user which requires a little more resources. Office 2003 was used because the customer was still using Office 2003. This is a plus because Office 2007 requires more resources. I recommended to use antivirus software on your XenApp VM.
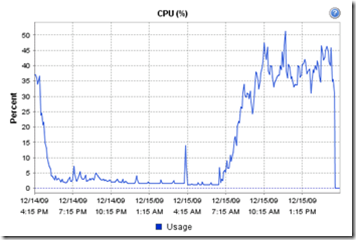
With this configuration I managed to run 5 XenApp VM’s on a single ESXi host with each XenApp VM supporting 25 users. This makes a total of 150 users on one physical server. The user experience with this configuration is within normal range.
The following chart show’s the CPU usage from the ESXi host with 5 XenApp servers running. image
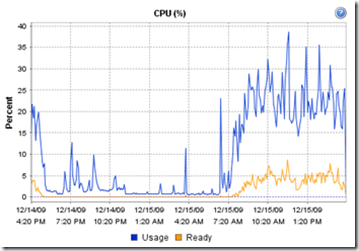
The following chart show’s the CPU usage from a XenApp VM.
image
Please note that the CPU ready time is below the 5%.


http://vknowledge.wordpress.com/2009/10/26/virtualizing-citrix-xenapp-on-vsphere-part-i/

http://vknowledge.wordpress.com/2009/12/15/virtualizing-citrix-xenapp-on-vsphere-part-ii/

http://virtualfuture.info/2009/03/citrix-xenapp-on-vmware-esx-1-or-2-vcpu/

22 Nov 2010

SSL VPN Security


Introduction

In recent years, various virtual private network (VPN) technologies have been widely used to provide secure site-to-site connectivity and remote access. There are many reasons for such overwhelming adoption and business success; two major factors are total ownership cost savings and productivity enhancements. The total ownership cost can be considered as the initial deployment cost plus the cost of user training, support, and facility maintenance over time. Productivity enhancements can be measured in terms of tool effectiveness, user time savings, usability improvements, and user satisfaction.
Secure Sockets Layer (SSL) VPN is an emerging technology that provides remote-access VPN capability, using the SSL function that is already built into a modern web browser. SSL VPN allows users from any Internet-enabled location to launch a web browser to establish remote-access VPN connections, thus promising productivity enhancements and improved availability, as well as further IT cost reduction for VPN client software and support.
Additional VPN background information is widely available. This paper addresses security issues and challenges associated with SSL VPN, including general VPN security and specific SSL VPN security, as well as endpoint device security and information protection. Security mechanisms that can be used for risk mitigation are also discussed.

Advantages of SSL VPN

SSL VPN has some unique features when compared with other existing VPN technologies. Most noticeably, SSL VPN uses SSL protocol and its successor, Transport Layer Security (TLS), to provide a secure connection between remote users and internal network resources. Today, this SSL/TLS function exists ubiquitously in modern web browsers. Unlike traditional IP Security (IPSec) remote-access VPN technology, which requires installation of IPSec client software on a client machine before a connection can be established, users typically do not need to install client software in order to use SSL VPN. As a result, SSL VPN is also known as “clientless VPN” or “Web VPN”.
Another SSL VPN advantage over IPSec VPN is its ease of use for end users. Different IPSec VPN vendors may have different implementation and configuration requirements. SSL VPN, on the other hand, requires only a modern web browser. End users may even choose their favorite web browsers without being restricted by the operating system.
One SSL VPN advantage for end users is in the area of outbound connection security. In most environments, outbound Secure HTTP (HTTPS) traffic, which is also based on SSL, is not blocked. This means that even if a particular local environment does not permit outbound IPSec VPN sessions (such restriction is not unusual), SSL VPN is likely free of such restriction.
There is a difference between a full VPN tunnel and an SSL-enabled proxy server. The latter is an application gateway that supports a certain type of applications. A complete SSL VPN, on the other hand, is a VPN that provides all VPN characteristics and local LAN user experience (in terms of network access). If application access requirements are modest, SSL VPN does not require additional client software to be installed on the endpoint device. For broader application access, a dynamically downloadable tunneling client is typically delivered when needed to the client machine to support such full SSL VPN capabilities.

Security Risks

While providing significant business benefits and cost savings, VPN technologies (SSL VPN included) come with their own security issues. These issues must be dealt with appropriately to ensure the confidentiality and integrity of data and information, as well as overall corporate network security. The following discussion first addresses the general security risks associated with using computers via VPN to access a company’s internal network, then addresses SSL VPN security risks.

General Security Risks

User-credential-related risks
VPNs provide easy access from the Internet into a corporate network and its internal resources. VPN security is only as strong as the methods used to authenticate the users (and the devices) at the remote end of the VPN connection. Simple authentication methods based on static passwords are subject to password “cracking” attacks, eavesdropping, or even social engineering attacks. Two-factor authentication, which consists of something you know and something you have, is a minimum requirement for providing secure remote access to the corporate network. In some cases, three-factor authentication may be necessary; this form of authentication adds one more requirement—something you are (a biometric such as fingerprint or iris scan, for example).
Spread of viruses, worms, and Trojans from remote computers to the internal network
Remote access is a major threat vector to network security. Every remote computer that does not meet corporate security requirements may potentially forward an “infection” from its local network environment to an organization’s internal network. Up-to-date antivirus software on the remote computer is required to mitigate this type of risk.
Split tunneling
Split tunneling takes place when a computer on the remote end of a VPN tunnel simultaneously exchanges network traffic with both the shared (public) network and the internal (private) network without first placing all of the network traffic inside the VPN tunnel. This provides an opportunity for attackers on the shared network to compromise the remote computer and use it to gain network access to the internal network. A host-based firewall is an effective way to defend against network-based attacks. Furthermore, many organizations have chosen to disallow split tunneling.

SSL VPN Risks

Security risks more specific to SSL VPN are discussed below. Many of these risks are related to the fact that SSL VPN can be used on public machines.
Lack of required host security software on public machines
SSL VPN makes it easy and convenient to connect from anywhere on the Internet to a corporate internal network. However, public machines used for SSL VPN may not have the required antivirus software installed and properly maintained; also, they typically do not have a host-based firewall installed and enabled. These public machines cause a major threat when used for SSL VPN. They may spread viruses, worms, and Trojan horses—and may even become a back door for malicious attackers. Even strong user authentication will fail to protect the network if a remote computer has been compromised, because an attacker can “piggyback” onto a live session via the Trojan and target the internal resources.
Physical access to shared machines
If a remote computer has an established network connection to your internal network, and the user leaves the session open, your internal network is now exposed to people who have physical access to the machine. Unauthorized personnel may use this computer to explore and attack your internal resources. SSL VPN significantly increases this type of risk—a connection can be started from any Internet-based machine. The physical access nature of shared machines adds numerous risks besides providing unauthorized network connection to the corporate internal network; these are discussed later in this paper.
Keystroke loggers
SSL VPN client machines may be more vulnerable to keystroke loggers because publicly accessible computers (at kiosks, for example) may be involved. These computers may not meet your organization’s security policies and standards. When these machines are compromised, keystroke loggers may allow interception of user credentials and other confidential information. It is possible to install malicious software or even hardware-based keystroke loggers to gather sensitive information.
Endpoints—loss of sensitive information and intellectual property
Sensitive information covers a wide range of items, including user credentials (account name/password), sales forecasts, internal personnel information, and customer information. Intellectual property includes source code, company, and even third-party (under NDA) design and technology information. Critical information may be left on a remote computer if the computer is not properly protected—this is especially important when the remote computer is shared with the public. Endpoint protection is key to addressing this type of risk. User awareness and education also play critical roles.
Man-in-the-middle attacks
In a man-in-the-middle attack, the attacker intercepts user traffic to capture credentials and other relevant information. The attacker then uses this information to access the actual destination network. During the process, the attacker typically serves as a proxy/gateway that presents a false SSL VPN site to the user; this proxy/gateway passes whatever authentication the user enters on to the real destination site. Depending on the sophistication of the malicious proxy/gateway, many actions may be taken once access to the internal network is gained. Some information may be sent back to the user, or the user may be terminated with a fake “service not available” message.
This attack typically works when a user does not properly verify that he or she is communicating with the real SSL VPN headend website. The general corporate user typically does not have sufficient knowledge to read and to verify that an SSL certificate belongs to an appropriate party before connecting; often, the user clicks “yes” and accepts a certificate permanently. And in some kiosks, the public machines might have their web browser security settings so low that no warning is issued when an SSL certificate appears suspicious.
Hardware limitation
Certain two-factor authentication mechanisms like smart cards do not work with certain public machines. For example, some kiosk machines might not have the necessary hardware (USB ports, for example) available to plug in the card reader.

Risk Mitigation

While many vendors and products are available in the market today, they may not all provide sufficient risk mitigation mechanisms and capabilities. A thorough planning and comparison process can help you identify what is most appropriate and effective to protect your organization. Below is a detailed analysis of the security measures that should be applied when implementing SSL VPN.
Security policies and secure access through strong user authentication
SSL VPN deployment and users of SSL VPN should comply with the remote access and VPN security policies in your organization. Strong user authentication is a top priority; several choices are available to achieve this purpose. Typically, one starts by implementing two-factor authentication techniques. Examples include hardware tokens, digital certificates (as a form of user authentication), and smart cards. In addition, your organization should also clearly state what types of host security requirements must be met (such as personal firewall, antivirus, hot fixes, or security patches). Other decisions should include whether your organization permits split tunneling.
Host identity verification
There is a difference between trusting a user (after passing strong user authentication) and trusting that user’s computer. While the former has traditionally been emphasized, only recently has the latter been given sufficient attention (see Trusted Platform Module - TPM). As discussed earlier, a Trojan-laden computer defeats strong user authentication. But a “company computer”, which is typically supported and managed according to corporate security policies, typically deserves more trust than a “non-company computer”. A secure SSL VPN infrastructure should allow you to verify a remote host’s identity by checking on predefined end device parameters. Examples include registry entries, special files in a specified location, or digital certificates (as a form of device authentication). The host identity information can be used to make your access permission decisions.
Host security posture validation
Once a remote computer is allowed access to the VPN, it becomes an extension of your organization’s network. Host security to protect this endpoint device is vital to protect both the data residing on the host and the connection to your internal network. Your SSL VPN infrastructure should be able to validate host security posture by examining version of antivirus software, personal firewall, service updates, security patch levels, and possibly additional customized scripts and files. This validation is critical to ensure compliancy with your corporate security policies and standards.

Secure desktop
What do you do if a remote computer does not meet your rigorous corporate security policies and standards? A major SSL VPN business benefit is to allow users to “VPN in” from any Internet-based computer. Many of them are non-company assets that typically would not meet your security policies and standards. To solve this dilemma, some recent SSL VPN products provide the ability to create a safe “sandbox” or “secure desktop” on the remote computer. This secure desktop is typically protected from other processes on the computer and has an “on-the-fly” encrypted file system. Malicious codes, even if they are present on the computer, are not able to access the content stored in the secure desktop. This type of implementation also helps ensures that data will be erased in a secure manner at the end of the session.

Cache cleaning
To further protect confidential information and intellectual properties, advanced SSL VPN implementation should allow deletion of all traces of session data from locations such as browser history, Internet temporary files, and cookies. The cache cleaning feature mitigates the risk of leaving sensitive information behind.
Keystroke logger detection
Ideally, malicious codes such as keystroke loggers can be detected before a user starts a VPN session. Recent SSL VPN products offer such security features. They allow keystroke logger detection before a user login session is performed. Be aware, however, that different vendors may offer varying degrees of success and effectiveness—and most are powerless in dealing with hardware-based keystroke loggers.
Configuration consideration
Check your intended SSL VPN products to see if they allow you to configure the following:
- Session timeouts—A short timeout (typically set to 10 minutes or less) reduces the opportunity for unauthorized personnel to gain access to your internal network via a public computer.
- SSL version verification—The SSL server function of the VPN concentrator must be configured to reject SSL 2.0 connections. SSL version 2.0 contained many security flaws, which have been fixed in SSL version 3.
- Server certificate support—To create the SSL/TLS tunnel and to prevent server spoofing (man-in-the-middle attacks), the VPN concentrator should install a server certificate chained to your corporate root certificate authority. Alternatively, you should use a server certificate issued by a trusted certificate authority.
To further reduce the risks caused by remote computers, you may consider imposing additional security restrictions. One option (based on the remote computer’s host security parameters) is to require SSL VPN sessions to start from certain pre-approved source IP addresses and to restrict access to a limited list of resources only, if the remote computer does not meet your existing host security requirements. Another option (based on the remote computer’s device identify) is to severely restrict access to a minimum number of applications/resources only, if the remote computer cannot be verified to be a “company asset”. The choice of these restricted applications/resources should be such that they provide basic user needs without exposing sensitive information.

User education and security awareness
User education and security awareness is an integral component of an organization’s overall security effort. SSL VPN user security awareness campaigns may focus on the following:
- Awareness information on why VPN in general and SSL VPN in particular present security risks to your organization
- Discouraging use at public terminals that do not meet your corporate security policies and standards
- Encouraging users to exercise security precautions, such as terminating VPN sessions and clearing documents/information before leaving a public computer
- Tips that remind users to pay attention to URL details and to examine the server certificate (via the little gold padlock in the corner of the web browser, for example) to guard against man-in-the-middle attacks.

Conclusion

SSL VPN promises to provide more productivity enhancements, improved availability, and further IT cost savings. SSL VPN security offers yet additional information security challenges. Successful SSL VPN deployment and operations involve managing security risks while supporting business needs. The security risk analysis and risk mitigation mechanisms discussed in this paper should help you deploy and secure SSL VPN in your organization.

Acknowledgements

The author Steven Song is a Security Architect for Corporate Security Programs Organization at Cisco Systems Inc. and specializes in network security.

17 Nov 2010

MTU, what difference does it make ?


Packet size, often referred to as MTU (Maximum Transmission Unit) is the greatest amount of data that can be transferred in one physical frame on the network. For Ethernet, the MTU is 1500 bytes, for PPPoE 1492, dial-up connections often use 576.
Each transmission unit consists of header and actual data. The actual data is referred to as MSS (Maximum Segment Size), which defines the largest segment of TCP data that can be transmitted. Essentially,
MTU=MSS + TCP & IP headers.

For the purposes of this article and all comparisons I'll make the following assumptions:
  • MSS=MTU-40 <-- a standard 40 byte header (20 byte IP and 20 byte TCP)
  • packets are not being fragmented
  • no packet loss
  • no router congestion
  
Packet size vs. latency
Let's examine a transfer of 1,500,000 bytes of data using different packet size over a T1 line (T1=1,544,000 bits/sec) using the following formula:
  ( MSS + header ) * 8 bits/byte---------------------------------- = latency (per hop)          1,544,000 bits/sec.
Then, using different MTU values, we can calculate the relevance of packet size to latency.
If MTU = 1500, then: (1460+40) * 8 / 1,544,000 = 7.772 ms delay per hop
If MTU = 576, then: (536+40) * 8 / 1,544,000 = 2.924 ms delay
Assuming a transfer over 10 hops, the 1500 MTU would wield 77.72 ms delay, while a 576 MTU would take 29.24 ms to transfer over a T1 line.
It is obvious then that smaller packets will be transmitted faster, simply because of the throughput limitation of the line. It's however somewhat moot point in large transfers, all that's illustrated above is the fact that transferring more data takes more time :)
 
Throughput vs. packet size
Using the same formula from our previous example, let's assume we need to transfer 1 MByte file over the same T1 line.
1MByte = 1024 KB = 1,048,576 bytes.
If MTU = 1500, then: (1460+40) * 8 / 1,544,000 = 7.772 ms delay per hop1 MByte / MSS = 1,048,576 bytes / 1460 = 718.2, or effectively 719 packets to transfer 1 MByte.Then, to transfer 1Mbyte: 719 packets * 7.772 ms delay per hop = 5588.068 ms, or 5.588 seconds per hop.If we are transferring our 1 MByte file over 10 hops, it will ideally take us:(1st packet * 10 hops * 7.772ms delay) + 718 * 7.772 = 5.658 seconds.

If MTU = 576, then: (536+40) * 8 / 1,544,000 = 2.924 ms delay per hop.1 MByte / MSS = 1,048,576 bytes / 536 = 1956.3, or effectively 1957 packets to transfer 1 MByte.Then, to transfer 1 MByte: 1957 packets * 2.924 ms delay per hop = 5722.268 ms, or 5.722 seconds per hop.If we are transferring our 1 MByte file over the same 10 hops:(1st packet *10 hops * 2.924ms delay) + 1956 * 2.924 = 5.748 sec.

The difference comes from the fact that when using larger packets the overhead is smaller. To transfer 1 MByte, if using MTU of 1500 there are 719 * 40 = 28,760 bytes of overhead, while if using MTU of 576 1957 * 40 = 78,280 bytes, additional 49,520 bytes of headers transferred each MByte. For our 10-hop transfer, the additional overhead accounts for just a fraction of a second, however it makes a difference if you consider large transfers over long periods of time. This difference is a also higher in practice, considering TCP options and the fact that modern TCP/IP implementations tend to use larger headers (additional 12 bytes header space for Timestamps for example). Also, the above example uses best case scenario, not considering higher latency and congestion.
 
Final Thoughts
Generally, it's logical to assume larger packets are better, because of all the following factors:
  • network - reduced number of headers, as illustrated above
  • routers - less routing decisions
  • clients - less protocol processing and device interrupts
However, if pure throughput is not the ultimate goal, smaller packets might be more "responsive" since they take less time to travel throughout the network. That effect might be preferred in some applications and online gaming, at the expense of throughput.
Ultimately, packet size should be decided based on the type of the desired result, considering the underlying network as well, to avoid negative factors such as fragmentation of packets. Still one has to realize the fact that larger packets will still transmit more useful data than smaller packets, and that there is no single "best" solution for all applications.
Regards,
Philip Filipov

http://www.speedguide.net/articles/mtu-what-difference-does-it-make--111


16 Nov 2010

How to Hide “Open in Windows Explorer” option from List or Document Library in SharePoint 2007

Recently someone on one of the forums ran into some issue and he wanted to hide the “Open in Windows Explorer” option from the Actions menu in a document library.
So here’s how you can hide the “Open in Windows Explorer” option from the Actions menu.
Note: After successfully completing all the steps mentioned below only Site Owners will be able to see the “Open with Windows Explorer” option.


1. Make a copy of the DefaultTemplate.ascx located in the X:\Program Files\Common Files\Microsoft Shared\web server extensions\12\TEMPLATE\CONTROLTEMPLATES\.
2. Rename the copy to CustomDefaultTemplate.ascx

3.  Open the CustomDefaultTemplate.ascx in any text editor and Find the line ID=”OpenInExplorer “ (usually line 1812 ).

4. Change PermissionsString=”UseClientIntegration to PermissionsString=”ManageWeb and save the file.

5. Do an IISRESET
6. Now if any user, other than the Site Owner Logins into the SharePoint Site they will not be able to see the “Open with Windows Explorer” option.


http://thecommunicator.co.cc/2010/04/25/how-to-hide-%E2%80%9Copen-in-windows-explorer%E2%80%9D-option-from-list-or-document-library-in-sharepoint-2007/


http://slingeronline.wordpress.com/2008/02/11/hiding-open-with-windows-explorer-from-the-actions-menu/

Remove the Explorer View from a Document Library Template


If you are building a custom document library solution, there may be a time where you don't want users to use the Explorer View of the document library.  I am talking about the VIEW itself and not the Open with Windows Explorer action in this case.  The correct way to do is of course is to create your own custom document library template (I'll be covering that in a future post) and then modify the schema.xml file.  If you want to go crazy and unsupported, you can also modify the C:\Program Files\Common Files\Microsoft Shared\web server extensions\12\TEMPLATE\FEATURES\DocumentLibrary\DocLib\schema.xml of the built-in DocumentLibrary feature and accomplish the same result for the out-out-the-box document library.  Removing it is just a matter of removing the appropriate View element in the schema.xml file.  In this case, you are looking for an element similar to the one below.

<View BaseViewID="3" Type="HTML" WebPartZoneID="Main" DisplayName="$Resources:core,Explorer_View;" Url="Forms/WebFldr.aspx" SetupPath="pages\webfldr.aspx" RequiresClientIntegration="TRUE" ReadOnly="TRUE">

It will have a BaseViewId of 3 and a Display Name indicating that it is the explorer view.  Just delete this entire View element and reactivate the feature and this view will not be present on any new document libraries you create.  Again, I recommend creating your own document library template instead of modifying the built-in one.

It will only remove it on new document libraries created.  Any existing ones you would have to remove manually from each library.


http://www.dotnetmafia.com/blogs/dotnettipoftheday/archive/2008/05/29/how-to-remove-the-explorer-view-from-a-document-library-template.aspx

9 Nov 2010

Các khái niệm cơ bản về Proxy


Proxy cung cấp cho người sử dụng truy xuất internet với những host đơn. Những proxy server phục vụ những nghi thức đặt biệt hoặc một tập những nghi thức thực thi trên dual_homed host hoặc basion host. Những chương trình client của người sử dụng sẽ qua trung gian proxy server thay thế cho server thật sự mà người sử dụng cần giao tiếp.
Proxy server xác định những yêu cầu từ phía client và quyết định đáp ứng hay không đáp ứng, nếu yêu cầu được đáp ứng, proxy server sẽ kết nối tới server thật thay cho client và tiếp tục chuyển tiếp đến những yêu cầu từ client đến server, cũng như đáp ứng những yêu cầu của server đến client.
Vì vậy proxy server đóng vai trò như là cầu nối trung gian giữa server và client (vì vậy có thể ví proxy server giống như là một đường hầm tạo ra giữa client, ở đây được coi là máy tính người sử dụng, và server được xem là web server hoặc chat server …. đi xuyên qua server ISP)

Cách thức hoạt động của proxy

Proxy cung cấp cho người sử dụng truy xuất internet với những host đơn. Những proxy server phục vụ những nghi thức đặt biệt hoặc một tập những nghi thức thực thi trên dual_homed host hoặc basion host. Những chương trình client của người sử dụng sẽ qua trung gian proxy server thay thế cho server thật sự mà người sử dụng cần giao tiếp.
Proxy server xác định những yêu cầu từ phía client và quyết định đáp ứng hay không đáp ứng, nếu yêu cầu được đáp ứng, proxy server sẽ kết nối tới server thật thay cho client và tiếp tục chuyển tiếp đến những yêu cầu từ client đến server, cũng như đáp ứng những yêu cầu của server đến client.
Vì vậy proxy server đóng vai trò như là cầu nối trung gian giữa server và client (vì vậy có thể ví proxy server giống như là một đường hầm tạo ra giữa client, ở đây được coi là máy tính người sử dụng, và server được xem là web server hoặc chat server …. đi xuyên qua server ISP)

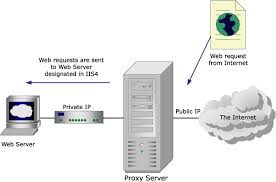
Vậy Tại Sao Ta Phải Cần Proxy? (xem hình dưới)

Khi quan sát hình trên bạn sẽ thấy rõ lý do tại sao ta phải sử dụng proxy. Ví dụ như hình trên bạn sẽ thấy firewall (được coi như là firewall do ISP-nhà cung cấp dịch vụ dựng lên chẳng hạn) đã chặn port 6667 (sử dụng trong chương trình chat IRC) tức là bạn không thể kết nối tới IRC server thông qua port 6667 để chat, mà ISP chỉ cho phép bạn truy cập dịch vụ web và gởi mail thông qua port 80 và 25 mà thôi.
Trường hợp nếu IRC server chỉ lắng nghe trên port 80 thì truy cập của bạn không có vấn đề gì, nhưng vấn đề ở đây lại không phải như vậy vì các IRC server thường chỉ lắng nghe trên các port mặt định từ 6666 -> 6668, và các dịch vụ khác cũng tương tự như thế chẳng hạn như dịch vụ FTP(dich vụ chuyển file) sử dụng port 21, pop3(truy cập nhận mail) thì qua port 110 …. vì vậy nếu bạn muốn kết nối đến các dịch vụ trên trong trường hợp ISP của bạn chỉ cho phép kết nối thông qua port 25 hoặc 80 thì chỉ còn một con đường là sử dụng proxy (xem hình dưới)

Có thể giải thích đơn giản như sau: bạn cần kết nối đến dịch vụ chat IRC thì chương trình chat của bạn sẽ chỉ định kết nối tới proxy server xác định (tức là bạn phải biết được chính xác địa chỉ cũng như là IP của proxy server cần sử dụng) thông qua port 80 và sau đó yêu cầu cho proxy server tạo kết nối tới IRC server và proxy server sẽ đóng vai trò như một máy trung gian giữa bạn và IRC server để thực hiện công việc chat mà vẫn được firewall của ISP cho phép (có thể gọi trường hợp bị khóa port này là bạn bị firewall chặn từ bên trong).
Một ví dụ nữa như khi bạn truy cập một trang web nào đó ví dụ như là www.abc.com (trang web abc là các trang web bạn tự hiểu ) chẳng hạn thì mỗi kết nối của bạn đi ra ngoài và từ ngoài vào đều phải thông qua firewall của ISP, và nếu như đặt trường hợp firewall này có chứa một danh sách “hồ sơ thần chết” gồm các IP hoặc Host name (danh sách các web server không được phép truy cập bao gồm IP hoặc HOST NAME) thì dĩ nhiên yêu cầu truy cập của bạn sẽ bị chặn ngay lặp tức (ta gọi đó là trường hợp bị chặn từ bên ngoài) và cách duy nhất để truy cập những trang web kiểu này là kết nối thông qua proxy server để đánh lừa ISP-firewall, và ISP-firewall của bạn chỉ biết một điều là bạn đang truy cập đến server hợp lệ mà không nghĩ rằng nó chỉ là một server trung gian.
Trở lại vấn đề bị động đất tại Đài Loan vừa rồi, nếu như bạn kết nối trực tiếp đến các trang web tại Mỹ chẳng hạn và do đường cáp quang bị đứt thì dĩ nhiên kết nối trực tiếp của bạn sẽ gặp khó khăn do dung lượng đường truyền cũng như là khó khăn trong việc sử dụng dịch vụ Yahoo Messenger. Trong khi đó đường kết nối của nước ta đi qua các nước khác chẳng hạn như Úc hoặc Nhật không bị ảnh hưởng thì dĩ nhiên khi bạn sử dụng các proxy server đặt tại các nước này để kết nối ra bên ngoài thông qua đường vòng thì vấn đề trên coi như đã được giải quyết.
Còn mấy ông Hacker nhà ta khi muốn quậy phá một trang web nào đó thì mấy ổng thường dùng proxy server để lỡ log web có ghi lại thì chỉ ghi lại được IP của proxy server mà mấy ổng sử dụng chớ không ghi lại địa chỉ IP thực mà ISP cấp cho mấy ổng ở nhà. Vì thế khó mà phát hiện (nhưng nếu sự việc nghiêm trọng thì người ta vẫn có thể truy ngược ra cái địa chỉ IP của proxy server đó và nếu như trong proxy server đó có lưu lại IP của mấy ông thì coi như tiêu đời. Nhưng mấy ổng có thêm một chiêu nữa là không sử dụng duy nhất một IP proxy mà sử dụng nhiều IP chồng chồng lớp lớp để dùng trong những việc “hệ trọng” thì việc truy ra IP thực giống như là việc mò kim đáy bể vậy đó .
Nói tóm lại là công dụng của proxy thì rất rất nhiều nên để đỡ tốn thời gian online của các bạn cũng như tôi cũng đỡ mỏi tay thì bây giờ chúng ta đi vào phần chính.
Làm cách nào tìm một con proxy ngon lành để sử dụng ?
Tôi xin thưa: câu châm ngôn “google là tất cả” với từ khóa “free proxy servers“
Còn trường hợp anh em nào muốn chơi sang thì bỏ tiền ra mua thì sẽ có ngay một con proxy ngon lành và tốc độ thì không thua gì con SH để anh em thoải mái vi vu.
Thiết lập và sử dụng proxy trong trình duyệt:
+Chương trình IE:
-Đầu tiên Mở Menu Tool ==> Internet Option ==> Connections ==> chọn Setting (nếu là Dial up) hoặc Lan Setting
-Sau đó bạn sẽ thấy mục “Use the proxy server for this connection” (nếu là Dial up) hoặc “Use the proxy server for your Lan” bạn đánh dấu chọn vào đó.
-Cuối cùng là gõ địa chỉ IP của proxy server mà bạn muốn sử dụng nhớ kèm theo phần port nữa vì mỗi proxy server có kèm port đi theo.
-Thế là xong bây giờ bạn có thể vi vu lướt web
Lưu ý: nếu proxy nào không sử dụng được bạn phải đổi cái khác vì vụ này là thường xuyên nếu như bạn là con nhà nghèo (vì xài chùa mà và cái gì chùa thì thường không ổn định ). Và các bạn cứ việc lại nhờ vả tới anh Google nhà ta mà anh ta thì không bao giờ biết phàn nàn bạn cả (ngoại trừ cúp điện).
Thiết lập proxy trong yahoo messenger:
+Mở Yahoo Messenger ==> vào Menu Messenger ==> chọn Connection Preferences.
+Đánh dấu vào mục chọn “Enable HTTP proxy“
+Sau đó gõ vào IP của proxy server và port đi kèm.
+Trường hợp bạn cũng có thể sử dụng Socks proxy.
Ngoài 2 cách thiết lập việc sử dụng proxy như tôi vừa giới thiệu ở trên đây, các bạn cũng có thể sử dụng và thiết lập proxy trong các chương trình khác như các chương trình hổ trợ download, các web browser … đều có mục để cho bạn sử dụng thông qua proxy. 

15 Oct 2010

Move WSS3.0 from one to another server

Move WSS3.0 from one to another server

Configuration:

Source: SQL 2000 Std Server SP4+Win 2003 Server SP+WSS3.0
Destination: SQL 2005 Std Server+Win 2003 Server SP2 +WSS3.0

STEP1: BACKUP:

1. On Source SQL Server: Backup SharePoint Content databases.
  • Open SQL Server Enterprise manger
  • Right Click a database (For ex: WSS_Content)->All Tasks->;Backup Database->Database Complete->Backup to disk->Add->Filename->Provide a path &; filename->Ok->Ok
  • Repeat above procedure for all SharePoint databases (Sharepoint_AdminContent_xxx, Sharepoint_Config) however we will not restore all of them.
  • (Do not restore database Sharepoint_AdminContent_xxx, Sharepoint_Config on new SQL Server)

How to find name of Content databases:
Central Admin->Application Management->Content databases->Select web application from Right Hand Side Top drop down list. Database name will be displayed

-------------

2. On SharePoint Server: Take screenshots of all configured setting on Central administration page

  • Central Admin->Operations->Global Configuration->Alternate access mappings
  • Central Admin->Operations->Outgoing email settings
  • Central admin->Application management->Define managed paths
  • etc.

--------------

STEP 2: PREPARE DESTINATION SQL SERVER
  • We must install either same or later version than source SQL Server
  • Open SQL Server Enterprise manger
  • Security->Logins->Right Click->New Login
  • Add SharePoint Service Account in Domain\user format
  • This account must be either Domain admin or Domain user with Local admin rights on SharePoint server.
  • Security->Logins->Right Click Service Account->Properties->Server Roles Tab
  • Check Security Administrators & Database Creators
  • Click Ok

STEP 3: RESTORE CONTENT DATABASE TO DESTINATION SERVER
  • Copy backup Content database files to Destination SQL Server
  • Open SQL Server Enterprise manger
  • Databases->Right Click->All Tasks->Restore database->Restore as Database->Type name of Content Database->From device->Select device->disk->Add->Browse to backup files->Ok->Ok
  • Similarly restore all Content databases from backup
  • Security->Logins->Service Account->Database Access Tab->In upper pane select Content database->In lower pane check DB_OWNER checkbox->Click Ok
Pls noted that the restore process may take hours to complete depends on database size and how powerful your SQL server is. Mine is Proliant ML370G5 Quad Core Xeon, 4GB RAM takes 4 hours to restore 10GB database :-(

    STEP 4: INSTALL WSS ON NEW SERVER
    Install WSS3.0 on new server

    STEP 5: CONNECT TO NEW SQL SERVER
    • Run SharePoint Products and Technologies Configuration (PSCONFIG ) Wizard
    • Select No, I want to create a new server farm

    • Database Server: Give Destination SQL Server name (same sql server name or instance as in step 2)
    • Database Name: Type new Config Database Name
    • Username: Use same Service account as used in existing old server
    • Password: Password for that account

    • We should get configuration successful message.
    • After PSCONFIG finishes successfully Central admin page will open automatically.

    STEP 6: RESTORING SITES FROM DATABASES

    Create a new web application http://app on port 80 with content database name WSS_Content_TEST
    • Go to V3 Central Administration Page->Application Management->Create or extend Web Application
    • Click on Create a new web application
    • Choose any unused port number
    • Enter Database Server Name and enter Database name as WSS_Content_TEST
    • Wait for operation to complete
    • After application is created create a site collection
    • Fill the details and select Team site template click Ok
    • Browse to test site http://app
    • Check if it is working

    To remove dummy_content_db (WSS_Content_TEST) from a web application

    • Click on Content Databases
    • On right hand side select the newly created web application if not already present
    • Click on Database name WSS_Content_TEST
    • Check remove content database checkbox and click OK

    To attach restored content database to a new web application:
    • Go to V3 Central Administration Page->Application Management->Sharepoint Web Application management->Content Databases->Add a content database->Enter database server and database name (WSS_Content)-> Click OK


    Now browse to http://app and check if it is working
    Similarly add content databases for other web applications.


    NOTE:
    =====
    Do NOT discard Source SQL Server and Databases until the functionality of New SQL Server and WSS3.0 is tested and confirmed.

    12 Oct 2010

    Copy A WSS 3.0 Site to Another


    This is a method I use for small business customers to provide them with a 'sandbox' environment they can play in. But this applies to you as well.  

    Your 'Production' environment would be the old site/server, the 'sandbox' site would be your new server/site -- http://blog.brainlitter.com/archive/2009/03/09/how-to-refresh-a-sharepoint-sandbox-collection-with-production.aspx

    However, if you aren't moving a whole site collection, here's your solution for moving just a subsite with all the various bits and bobs (there are other methods like save site as template, etc. but they have severe limitations, like 10MB, etc.)  http://blog.brainlitter.com/archive/2009/05/10/save-sharepoint-list-as-template-with-content-maxes-out-at-10mb-%e2%80%93-but-i-want-more%e2%80%a6.aspx


    ~~~~~~~~~~~~~~~~~~~~~~~~

    How to Refresh a SharePoint Sandbox Collection with Production 


    This guide has been created to provide the necessary steps to 'refresh' a Sandbox Collection (Different Web Application) with Production Data, so that it can be 'played with' without breaking the Production Implementation.
       
    Note on Authentication/Permissions: Ensure you perform these tasks with an account that has full SharePoint Administrative privileges such as an 'SPSAdmin' account.
       
    • First, determine the Web Applications for the Source (Production) Web Application/Site Collection and the Destination (Sandbox) Web Application/Site Collection.
      • Open Central Administration and choose the "Application Management" tab
         
           
      • Open the Web Application List
         
      • Make note of the URL's
         
      • Document the URL's in the table below
         
       Application URL Collection Description
    Source http://harvey:56000 Production Portal
    Destination http://harvey:56001 Sandbox
       
    • Perform a current Backup of the Production Site Collection
      • Go to a DOS Prompt and if the path to the STSADM.EXE application is not already in your System Path (a good idea for convenience), then change to the appropriate directory in order to run the utility.
        • cd %COMMONPROGRAMFILES%\Microsoft shared\Web server extensions\12\Bin
      • Perform the following command, using the URL of the SourceD:\TOP\ProductionToSandBoxTransfer\March-3-2009-Backup.bak Collection and modify your Output destination of the backup file, to suit (in this example, the path is going to be
        • stsadm -o backup -url http://harvey:56000 -filename D:\TOP\ProductionToSandBoxTransfer\March-3-2009-Backup.bak
      • Ensure the backup completed successfully. Your result should look something like this:


    • Restore your latest backup over your existing Sandbox Web Application (the assumption is you have one in place already), being sure to use the -overwrite option. Note that the restore typically takes much longer than the backup, to complete.
      • Go to a DOS Prompt (if you aren't there already) and if the path to the STSADM.EXE application is not already in your System Path (a good idea for convenience), then change to the appropriate directory in order to run the utility.
        • cd %COMMONPROGRAMFILES%\Microsoft shared\Web server extensions\12\Bin
      • Perform the following command, using the URL of the DestinationD:\TOP\ProductionToSandBoxTransfer\March-3-2009-Backup.bak Collection and utilizing the file you created in step 2 -
        • stsadm -o restore -url http://harvey:56001 -filename D:\TOP\ProductionToSandBoxTransfer\March-3-2009-Backup.bak -overwrite
      • Ensure the restore completed successfully. Your result should look something like this:


    • Login and test that the application is healthy
    • Finally, if you have any customizations to perform, such as modification of the Quick Launch or Top Link Bar (hard coded URL references to the Production Site), be sure to make those now. As well, we always recommend setting the 'Theme' for the Sandbox site to a different colour scheme. This is a simple solution for ensuring that you know when you are working in the Sandbox and when you are working in production (I often go for the 'lime green' look, as it is especially eye catching and ugly).
      • To change the theme to Lime Green
        • Login to the Sandbox Site
        • Choose Site Actions, Site Settings


        • Choose Site Theme, under Galleries
           
        • Select the Verdant Theme and click Apply


    • Repeat Step 5 for any remaining sub sites (For example our test site has Manufacturing and Quality Assurance Sites)
    ~~~~~~~~~~~~~~~~~~~~~~


    Save SharePoint List as Template (with Content) maxes out at 10MB – But I want more… 


    I'm often shuttling around content that a client wanted in a new location and sometimes, Saving a SharePoint list as a template (with content) fits the bill nicely. But with a (default) 10MB limit, this can be quite obtrusive. Thankfully, this can be modified (up to a maximum of 500MB) with the following syntax (note that this applies to List AND Site Template saves.

    Note: when you try to save a list as a template with content that exceeds the default of 10MB, you'll get this…
    The list is too large to save as a template. The size of a template cannot exceed 10485760 bytes

    How to increase the List (and Site) save as Template limit


    To increase the maximum size, simply run the following stsadm command (from the C:\Program Files\Common Files\Microsoft Shared\web server extensions\12\BIN directory) replacing the propertyvalue to the new maximum size (in bytes). Note, in this example, we are changing it from 10MB to roughly 100MB:

    stsadm -o setproperty -propertyname max-template-document-size -propertyvalue 100000000

    ~~~~~~~~~~~~~~~~~~~~~~


    29 Sept 2010

    How to Change Windows XP Version Between Retail, OEM and Volume License Channel


    Each piece of Windows XP CD disc media or ISO image has been created for specific channel of distributions, namely retail, OEM or volume licensing. Each channel has specific installation CD and product key or CD key that required to register and activate the installed system. Activation with product serial keys from other channel version are simply not accepted, causing end-user to encounter problem when installation as a CD-key is not accepted even though it’s genuine, valid and correct.

    The main problem is that not many people may be aware there is difference between various Windows XP media and the Windows XP product key that they’re having, especially users who download Windows XP images (popularly in ISO, IMG or BIN format) from Internet through file sharing sites or BT (BitTorrent) torrents. These images may not be labeled properly by indicating it’s Windows XP retail, OEM or volume licensing version. Besides, the downloaded image is mostly for Windows XP VL edition, and is not suitable for OEM product key, which pasted on COA sticker on PC. Even for IT professionals who legitmatelly download Windows XP and obtain serial numbers from MSDN or TechNet subscriptions, the ISO images and product keys may get mixed up between OEM, retail or volume license (VL) version if not been labeled or managed properly.
    For users who have an incorrect edition of Windows XP CD or have installed an incorrect version of Windows XP, here are two tricks or hacks to change a live version of Windows XP installation, and change the version of Windows XP installation files. Why? Well, because end-user cannot change their product key easily, that’s why the only possible way to properly activate is to change the channel version of Windows XP.

    How to Change the Distribution Channel Version of Existing Windows XP Installation
    1. Boot up the computer
      using the CD of the Windows XP edition (retail, OEM or volume licensing) that user wants to upgrade or convert the existing installation
      to. Note: User may have to change the boot device priority or sequence in BIOS.
    2. Windows XP setup wizard will launch and ask user to setup Windows XP, press Enter. Note: Do not press R or select the option “To repair a Windows XP installation using the Recovery Console, press R” option.
    3. Accept the License Agreement.
    4. Then, select the Windows XP installation you want to repair (change the channel) from the list and press R to start the repair process.
    5. Setup will copy some files.
    6. Reboot the computer.
    7. Windows XP installation is now properly changed for retail, OEM or volume license according to the version of CD been used.
    How to Change the Distribution Channel Version of A Windows XP CD
    Tip: A more easier way is probably to download a new Windows XP with SP3 ISO image.
    Note: This step can be used to check or verify the channel version of a Windows XP CD or image too. And it does not convert CD or image to royalty OEM Windows XP, which requires some OEM files to be existed.
    1. Copy all content of Windows XP CD to hard disk drive, or extract Windows XP disc image to a folder.
    2. Open the file \i386\setupp.ini in any text editor such as Notepad.
    3. Inside the setupp.ini, there is a “Pid” parameter with [Pid] header. The Pid variable consists of 2 parts. The first 5 digits is Microsoft product code (MPC) which determines the version of Windows XP that will be installed, the last 3 digits is channel ID that determines which CD-keys or product keys that the installation wizard will accept. Some example of standard combination for Pid for various editions of Windows XP: Windows XP RTM
      Retail: 51882335 (Retail edition accepting Retail CD keys)
      Volume License: 51883270 (Volume License edition accepting Volume License keys or VLK)
      OEM: 82503OEM (OEM edition accepting OEM keys or COA keys)

      Windows XP SP2
      Retail: 55274335
      Volume License: 55274270
      OEM: 55277OEM

      Windows XP SP3
      Retail: 76487335
      Volume License: 76487270
      OEM: 76487OEM

    4. The first 5 digits of Pid is normally stayed the same for same version of Windows XP (i.e. RTM, SP1, SP2 or SP3). Thus, only the last 3 digits of Pid needs to be modified according to example above. Generally, channel ID for retail is 335, OEM is OEM, and volume licensing is 270.
    5. Use nLite or other disc imaging program to re-create or re-burn the modified Windows XP installation disc media or image.
    Note: Newer Windows XP discs may check whether the CD’s volume label matches the type of CD too. In this case, the wrong volume label may still render the disc unworkable. Here’s a brief list of known English version of Windows XP CD volume labels.
    XP Home and Professional Combo = WXPHFPP_EN
    XP Home Retail = WXHFPP_EN
    XP Home Retail with SP1 = XRMHFPP_EN
    XP Home Retail with SP1a = X1AHFPP_EN
    XP Home Retail with SP2 = VRMHFPP_EN
    XP Home Upgrade = WXHCCP_EN
    XP Home Upgrade with SP1 = XRMHCCP_EN
    XP Home Upgrade with SP1a = X1AHCCP_EN
    XP Home Upgrade with SP2 = VRMHCCP_EN
    XP Home OEM = WXHOEM_EN
    XP Home OEM with SP1 = XRMHOEM_EN
    XP Home OEM with SP1a = X1AHOEM_EN
    XP Home OEM with SP2 = VRMHOEM_EN
    XP Home Volume = WXHVOL_EN
    XP Home Volume with SP1 = XRMHVOL_EN
    XP Home Volume with SP1a = X1AHVOL_EN
    XP Home Volume with SP2 = VRMHVOL_EN
    XP Professional Retail = WXPFPP_EN
    XP Professional Retail with SP1 = XRMPFPP_EN
    XP Professional Retail with SP1a = X1APFPP_EN
    XP Professional Retail with SP2 = VRMPFPP_EN
    XP Professional Upgrade = WXPCCP_EN
    XP Professional Upgrade with SP1 = XRMPCCP_EN
    XP Professional Upgrade with SP1a = X1APCCP_EN
    XP Professional Upgrade with SP2 = VRMPCCP_EN
    XP Professional OEM = WXPOEM_EN
    XP Professional OEM with SP1 = XRMPOEM_EN
    XP Professional OEM with SP1a = X1APOEM_EN
    XP Professional OEM with SP2 = VRMPOEM_EN
    XP Professional Volume = WXPVOL_EN
    XP Professional Volume with SP1 = XRMPVOL_EN
    XP Professional Volume with SP1a = X1APVOL_EN
    XP Professional Volume with SP2 = VRMPVOL_EN
    XP Professional Tablet PC with SP1 Disc1 = XRMPFPP_EN
    XP Professional Tablet PC with SP1a Disc1 = X1APFPP_EN
    XP Professional Tablet PC with SP2 Disc1 = VRMPFPP_EN
    XP Professional MSDN = WXPFPP_EN
    XP Professional MSDN with SP1 = XRMPFPP_EN
    XP Professional MSDN with SP1a = X1APFPP_EN
    XP Professional MSDN with SP2 = VRMPFPP_EN
    XP Professional Evaluation = WXPEVL_EN


    http://www.mydigitallife.info/2009/08/16/how-to-change-windows-xp-version-between-retail-oem-and-volume-license-channel/

    Total Pageviews