23 Jun 2010

Recover DC Domain password

Mất password Admin Domain ư !!!. Điều đáng tiếc này có thể xảy ra khi Admin tiến hành thay đổi password mới theo định kỳ nhằm tăng cường hơn nữa an toàn cho hệ thống, nhưng đáng tiếc ví một lý do nào đó, họ đã quên password mới của mình. Và kết quả là họ không còn log-on vào Domain Controller của mình được nữa, và họ cũng không tạo bất cứ một backup admin account nào dự phòng cho việc quên password này...

Một vài thủ thuật và công cụ đã được công bố giúp reset lại Domain Admin Password trên Windows 2000 Server đã không còn bất ký tác dụng nào trên Windows 2003 Server. Lý do, Microsoft đã áp dụng tăng cường mọi mặt các tính năng bảo mật trên Windows 2003 Server, và những thủ thuật nà đã trở nên vô tác dụng.

Sau đây là cách thức thiết lập lại Domin AdminPassword account. Và trước khi các bạn tiến hành nó, hãy chú ý kỹ tất cả các yêu cầu bắt buộc dưới đây :

Khuyến cáo:
Tài liệu hướng dẫn này chỉ để giúp Admin khắc phục sự cố do chính mình gây ra. Tài liệu không phục vụ cho bất kỳ ý đồ bất minh nào để thực hiện xâm nhập vào hệ thống !
Các yêu cầu bắt buộc :

Bạn cần đáp ứng các yêu cầu sau:
1/ Truy cập cục bộ-Local access vào máy chủ Domain Controller (DC).
2/ Có được Local Administrator password (đây chính là Active Directory Restore mode password bạn xác lập trong quá trình tiến hành nâng một Server 2003 lên thành Domain Controller 2003, password này hoàn toàn khác với password điều khiển hoạt động của máy chủ DC và Domain- password mà bạn đã quên).

3/ Có 2 công cụ được cung cấp bởi Microsoft trong bộ Resource Kit: SRVANY và INSTSRV. Download ở đây
http://www.microsoft.com/downloads/details.aspx?FamilyID=9d467a69-57ff-4ae7-96ee-b18c4790cffd&DisplayLang=en.


Tất cả các bước tiến hành này đều thực hiện trên một domain với một máy chủ Domain Controller 2003. Nếu domain của bạn có nhiều DCs, có thể chọn bất kỳ Domain Controller nào để thực hiện.

Tiến hành:

1. Khởi động lại DC Windows 2003 trong chế độ Directory Restory Service Mode.
Khởi động lại máy,tại thời điểm startup, nhấn F8và chọn Directory Restore Service Mode. Khi vào chế độ này hoạt động của Active Directory sẽ bị disable.

Khi màn hình login xuất hiện, log on vào với tài khoản Local Administrator. Và bạn đã có toàn quyền truy cập Local Computer này nhưng không thể can thiệp vào bất cứ vấn đề gì thuộc Active Directory.

2 Tiến hành cài đặt SRVANY.
Tiện ích này vận hành Windows NT Service. Và điều thú vị ở đây là chương trình sẽ có các đặc quyền hệ thống- SYSTEM privileges. Và điều này là cần thiết để có thể reset Domain Admin password. Bạn sẽ thực hiện cấu hình SRVANY để khởi hoạt command prompt (sẽ giúp bạn chay các lệnh net user).

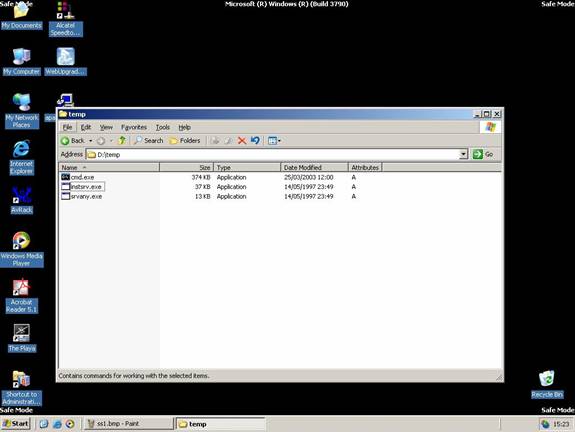
Copy SRVANY và INSTSRV vào một folder tạm thời, ví dụ d:temp. Cũng Copy cmd.exe vào folder này (cmd.exe chình là command prompt, thường nằm ở %WINDIR%System32, ví dụ như : C:WindowsSystem32).
Khôi phục mật khẩu Admin Domain Controller trên Windows 2003


Click vào cmd.exe để khởi hoạt command prompt, gõ lệnh Cd D:temp nhấn Enter , Gõ tiếp lệnh instsrv PassRecovery "d:tempsrvany.exe" nhấn Enter

Cấu hình SRVANY.
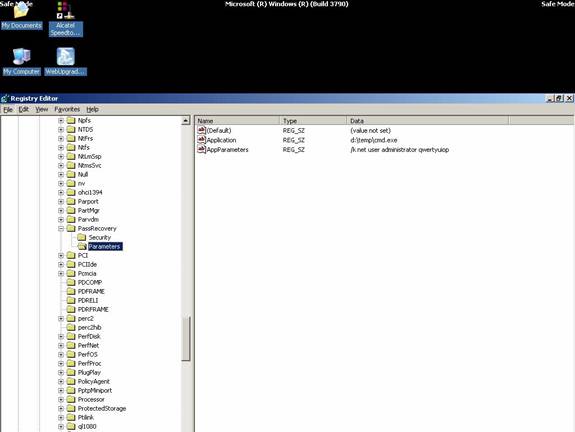
Tại Run gõ lệnh regedit, mở Registry Editor và tìm đến Key
HKEY_LOCAL_MACHINESystemCurrentControlSetServicesP assRecovery

Right-click vào key PassRecovery và tạo một Key con Parameters và add vào 2 values mới như sau:

name: Application
type: REG_SZ (string)
value: d:tempcmd.exe

name: AppParameters
type: REG_SZ (string)
value: /k net user administrator new_password
Khôi phục mật khẩu Admin Domain Controller trên Windows 2003


Cẩn thận:
'net user username password' chính là command line để xác lập một new password. Thay thế new_password với password thực sự mà bạn muốn đặt mới. Ghi nhớ rằng một số chính sách của domain- domain policies, có thể yêu cầu bạn phải đặt password phức hợp( complex passwords), do vậy bạn phải đặt password phức hơp thường gồm có chữ Hoa, thường, Số và các ký tự đặc biệt, ví dụ : p@ssW0rd!#$

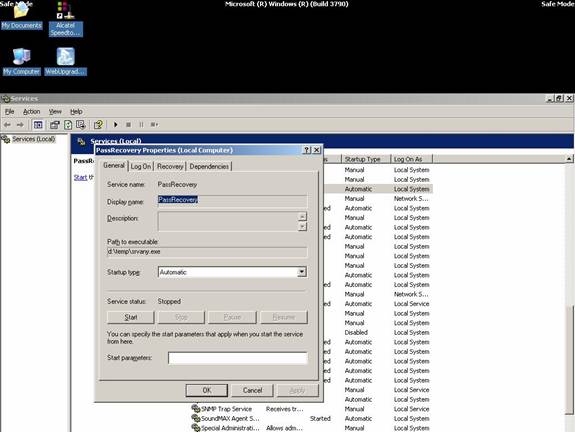
Tiếp theo tại Run, gõ lệnh Services.msc hoặc vào Control PanelAdministrative ToolsServices sẽ mở bảng điều khiển các dịch vụ vận hành trên hệ thống. Tìm đến Service có tên PassRecovery, right-click chọn property tab. Kiểm tra start mode phải là Automatic.
Khôi phục mật khẩu Admin Domain Controller trên Windows 2003


Mở Log On tab và check vào lựa chọn Allow service to interact with desktop. Tại thời điểm này bạn có thể restart Windows, và SRVANY se chạy lệnh netuser command để tiến hành reset lại domain admin password.

3 Khởi động lại Windows ở chế độ thường -normal mode
Chờ khi màn hình login xuất hiện. bạn sẽ không nhận thấy command prompt xuất hiện khi thực hiện lệnh net user command. Nhưng đừng lo lắng, command vẫn được thực thi bên trong hệ thống -background.

Log on với tài khoản Administrator, password bạn vừa xác lập mới ở trên. Hệ thống sẽ ban đầy đủ quyền truy cập cho bạn. Nếu không quay lại bước 2 và đảm bảo rằng bạn không quên password mới đã xác lập hoặc xác lập sai các values khác.

Khi desktop xuất hiện, bạn sẽ thấy command prompt. Command prompt được khởi động bởi SRVANY.
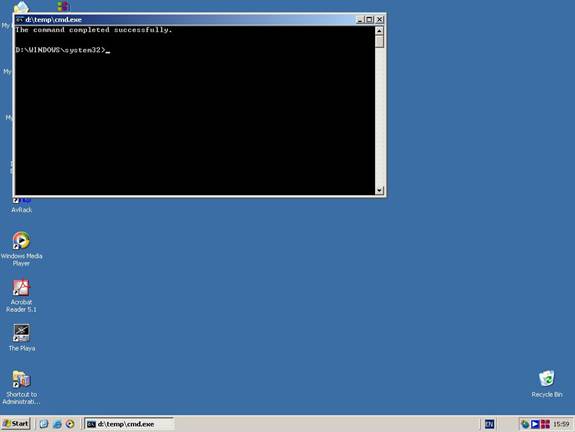
Khôi phục mật khẩu Admin Domain Controller trên Windows 2003


Đến đây đã đạt được mục đích, tiến hành gỡ bỏ SRVANY:

Thực hiện các lệnh:

net stop PassRecovery
sc delete PassRecovery

Xóa tiếp folder d:temp đã tạo. Finished !


(Tham khảo QTM)

21 Mar 2010

Restore System State by Veritas Exec Backup 10d

Sympton:
An "Access denied" error is received, and the system goes to Unavailable and cannot be chosen as a restore target during the restore of System State on an Active Directory server.

Details:
After submitting a restore of System State for an Active Directory server, the job starts and if necessary it moves the appropriate "System State.dat" file back to the business server. The recovery part of the restore of system state fails because Active Directory is online and the following alert is returned:

"In order to complete the restore of System State information, restart the computer in Directory Services Restore Mode and run Symantec DSRM System State Restore." The restore job then completes.

This step is normal and MUST be run with the business server in "normal" mode (not Directory Services Restore Mode) so that communications between the business server and the Continuous Protection server work as expected. At this point in time the correct "System State.dat" file is on the business server and other system state jobs are prevented from running, which stops the correct "System State.dat" file from being overwritten. You would see the following alert if another system state backup job is submitted:
"CPS is unable to backup System State while a DSRM restore of System State is pending."
Note: Non-system state jobs should run without any problem.

To continue the recovery, follow these steps:

1. Reboot the business server and enter Directory Services Restore Mode.
2. Login as the "Administrator"
3. Navigate to "C:\Program Files\VERITAS\Continuous Protection Server" (or wherever CPS is installed ) with Windows Explorer.
4. Locate the file "Symantec DSRM System State Restore.bat" and launch the file by double-clicking on it. The restore is started again, but this time it will succeed because the machine is in DSRM and no communications with any other CPS component is required.
Once the restore completes the window closes and the batch file is deleted.
5. Reboot the computer, but do not enter DSRM and the "restored" system state information will be "active".

http://seer.entsupport.symantec.com/docs/278653.htm


How to perform a restore of an Active Directory Domain Controller using Backup Exec Continuous Protection Server (CPS)


How to perform a restore of an Active Directory Domain Controller using Backup Exec Continuous Protection Server (CPS)

http://seer.entsupport.symantec.com/docs/278898.htm

Details:

To restore an Active Directory Domain Controller, perform the following steps:

1. Do NOT boot into Directory Services Restore Mode (DSRM), on the navigation bar select Restore.
2. In the task pane, select the computer.
3. In the selections pane, select the System State files.
4. In the task pane, under Restore Task, select Restore Files.
5. Define the appropriate options: Job Name, Description.
6. Click OK.
7. Click OK to clear the confirmation message.
8. The Job should complete with an alert "Unable to restore System State." The alert displays the following dialog, "In order to complete the restore of System State information, restart the computer in Directory Services Restore Mode and run Symantec DRSM System State restore."
9. At this point, boot the system into Directory Service Restore Mode.
10. Enter the DSRM password and log into the system.
11. On the desktop there will be a batch file named Symantec DRSM System State restore.dat, run it by double-clicking on it.
12. A command window will appear and the restore will begin.
13. After the restore has completed the command box will disappear, and a reboot countdown dialog will be displayed.

At this point, follow the steps in the following technote to use FixServer:
http://support.veritas.com/docs/277853
This will eliminate the duplicate entries of the business server in the Servers folder.

http://support.veritas.com/docs/277853

13 Mar 2010

Backup và Restore Exchange 2003 với Recovery Storage Group

Backup và Restore Exchange 2003 với Recovery Storage Group

Mọi quản trị viên hệ thống Exchange cần phải có một phương pháp khôi phục dữ liệu tối ưu để có thể sử dụng trong trường hợp máy chủ bị lỗi hay tình cờ xóa đi các email.
Backup và Restore Exchange 2003 với Recovery Storage Group
Bài viết này sẽ hướng dẫn các bạn một phương pháp khác đó là sử dụng kết hợp Recovery Storage Group với một công cụ backup và restore. Cụ thể chúng ta sẽ đi tìm hiểu phương pháp cài đặt Recovery Storage Group trong Exchange Server 2003 và sử dụng chúng để khôi phục các email cũng như hòm thư. Bạn có thể sử dụng công cụ này để thực hiện backup trước khi nâng cấp hệ thống Exchange Server 2003 lên Exchange Server 2007.

Giả sử bạn với vai trò là một quản trị viên hệ thống Exchange Server gặp phải hai tình huống sau: Khi đi nghỉ bạn nhận được yêu cầu từ người quản lý yêu cầu quay trở lại công ty để khôi phục lại một email đã bị xóa cách đây hai tháng. Email này đã được xóa bởi chính sách khôi phục những mục xóa.Tuy nhiên, sau khi bạn trở lại công ty thì hệ thống Exchange đã bị sập hai ngày trước đó, gây lỗi một số hòm thư hay tự động xóa một số lượng mail lớn của một số người dùng.

Bạn không nên quá lo lắng vì nếu đã lên lịch backup cho máy chủ thì bạn có thể dễ dàng tìm lại những thông tin này.

Recovery Storage Group khá hữu dụng, nó cho phép người dùng khôi phục dữ liệu trực tiếp mà không gây gián đoạn phiên làm việc của end user.

Lưu ý: Ít nhất bạn phải cài đặt bản Exchange Server 2003 Service Pack 1 (SPI) để có thể truy cập vào công cụ Recovery Storage Group.

Một số công cụ backup và restore thường được các quản trị viên sử dụng bao gồn: NTBACKUP, Symantec Backup Exec, EMC Retrospect hay CA ArcServe Backup, … Bài viết này sẽ kết hợp sử dụng Recovery Storage Group với Symantec Backup Exec 11d.

Cài đặt một Exchange Recovery Storage Group

Để sử dụng công cụ Recovery Storage Group bạn cần thực hiện các thao tác sau:

1. Mở Exchange System Manager rồi tìm trong nhóm quản trị cho đến khi thấy đối tượng máy chủ chứa thông tin lưu trữ mà bạn muốn khôi phục dữ liệu từ đó.

2. Phải chuột cào máy chủ này rồi chọn New | Recovery Storage Group như trong hình 1. Đảm bảo rằng bạn thực hiện thao tác này trong cùng nhóm quản trị chứa dữ liệu gốc. bạn không thể sử dụng phương pháp này để khôi phực dữ liệu giữa nhiều nhóm quản trị khác nhau.


Hình 1: Click vào đối tượng máy chủ để tạo mới Recovery Storage Group.
3. Để bổ sung một cơ sở dữ liệu để khôi phục, phải chuột vào Exchange Storage Group mới tạo rồi chọn Add New Database to Recover như trong hình 2. Màn hình tiếp theo sẽ hiển thị một danh sách vùng lưu trữ hòm thư hòm thư trên máy chủ này.


Hình 2: Bổ sung cơ sở dữ liệu muốn khôi phục.
4. Lựa chọn vùng lưu trữ chứa những hòm thư cần khôi phục rồi nhấn OK.


Hình 3: Lựa chọn cơ sở dữ liệu muốn khôi phục.
Lưu ý: Mặc định vùng lưu trữ hòm thư này bị gỡ bỏ như trong hình 4.


Hình 4: Mặc định vùng lưu trữ hòm thư này bị gỡ bỏ trong folder Recovery Storage Group.
5. Để xem thuộc tính của vùng lưu trữ này, bạn hãy phải chuột lên nó rồi chọn Properties. Cơ sở dữ liệu Recovery Group sẽ nằm trong thư mục riêng trong file hệ thống. Mặc định tùy chọn This database can be overwritten by a restore (Cơ sở dữ liệu này có thể bị một vùng lưu trữ ghi đè) đã được kích hoạt (hình 5).


Hình 5: Cửa sổ thuộc tính của vùng lưu trữ hòm thư.
6. Khi sử dụng phần mềm backup, bạn có thể chạy tiến trình khôi phục trên những thông tin lưu trữ hay những hòm thư riêng biệt chứa dữ liệu muốn khôi phục. Symantec Backup Exec sẽ cho phép bạn khôi phục mọi vùng lưu trữ thông tin như một vùng lưu trữ hay những hòm thư riêng biệt. Quá trình khôi phục những hòm thư riêng biệt không yêu cầu phải backup từng phần, đây là một tiến trình được tích hợp sẵn để khôi phục dữ liệu sử dụng công cụ này (hình 6). Công cụ Backup Exec 11d đủ khả năng để nhận ra sự có mặt của Recovery Storage Group, và nó sẽ không cố gắng khôi phục dữ liệu tới một vũng lưu trữ thông tin đang hoạt động.


Hình 6: Cửa sổ Restore Job Properties.
Khôi phục dữ liệu tới vùng lưu trữ thông tin đang hoạt động

Bạn có thể sử dụng Exchange System Manager hay ExMerge để di chuyển dữ liệu từ vùng lưu trữ hòm thư của Recovery Storage Group tới vùng lưu trữ thông tin đang hoạt động. Sử dụng Exchange System Manager dễ dàng hơn nhiều so với sử dụng ExMerge vì nó không yêu cầu bất kì giấy phép bổ sung nào để có thể sử dụng, và bạn sẽ không phải làm việc với các file .PST.

Tuy nhiên, Exchange System Manager tích hợp ít chức năng hơn so với ExMerge. ExMerge có thể cho phép bạn lọc những dữ liệu muốn khôi phục. Cho dù đang sử dụng công cụ nào thì trước tiên bạn vẫn phải đảm bảo rằng tài khoản người dùng sở hữu dữ liệu mà bạn đang khôi phục phải tồn tại trong Active Directory, nếu không bạn sẽ phải tạo lại nó trước khi tiếp tục.
Sử dụng Exchange System Manager

Trong Exchange System Manager, bạn hãy cài Exchange Recovery Storage Group vừa tạo và lưu trữ nó với các hòm thư. Thực hiện các thao tác sau:

1. Phải chuột lên vùng lưu trữ hòm thư, chọn Mount Store như trong hình 7.


Hình 7: Lựa chọn Mount Store để cài Recovery Group mới tạo.
2. Tiếp theo phải chuột lên vùng lưu trữ này một lần nữa rồi chọn Refresh để hiển thị danh sách các hòm thư trong bảng bên phải.


3. Phải chuột lên hòm thư muốn khôi phục rồi chọn Select Task (hình 8). Sau đó Exchange Task Wizard sẽ được khởi chạy như trong hình 9.


Hình 8: Lựa chọn hòm thư muốn khôi phục.

Hình 9: Exchange Task Wizard sẽ khôi phục dữ liệu hòm thư.
4. Trên trang Recover Mailbox Data bạn sẽ thấy hai tùy chọn bao gồm:
  • Merge Data: Cho phép trộn hòm thư được khôi phục với một hòm thư đang hoạt động và bỏ qua việc nhân bản email.
  • Copy Data: Tùy chọn này sẽ copy mọi dữ liệu trong hòm thư đang hoạt động rồi tạo ra các bản sao của các email (hình 10).


Hình 10: Lựa chọn tùy chọn Merge Data hoặc Copy Data trong Exchange Task Wizard.
5. Sau đó hoàn thành các bước còn lại trên Wizard này và xác nhận rằng mọi email đã nằm trong đúng hòm thư của nó.
Sử dụng ExMerge

Có thể bạn đã khá quen thuộc với ExMerge và các thao tác cấu hình cấp phép. Tốt nhất bạn nên sử dụng phiên bản ExMerge được tích hợp trong bản Service Pack của bản Exchange Server đang sử dụng. Nếu không một tiến trình nào đó có thể thất bại.

Khởi chạy ExMerge như bình thường, nhưng lưu ý rằng khi đó bạn sẽ thấy một màn hình hiển thị vùng lưu trữ hòm thư của Recovery Storage Group như những vùng lưu trữ hòm thư khác (hình 11).


Hình 11: ExMerge hiển thị những vùng lưu trữ hòm thư của Recovery Storage Group
và những vùng lưu trữ hòm thư thông thường.

Để khởi chạy ExMerge bạn cần thực hiện các thao tác sau:

1. Lựa chọn vùng lưu trữ của Recovery Storage Group rồi tiếp tục khôi phục dữ liệu sang một hoặc nhiều file .PST. Khi đã khôi phục dữ liệu sang file .PST, bạn có thể import file này vào hòm thư đang hoạt động sử dụng Microsoft Outlook.

2. Sau khi đã khôi phục dữ liệu, bạn có thể gỡ bỏ vùng lưu trữ hòm thư trong Recovery Grouplưu trữ dữ liệu này tại đó, hay sử dụng Exchange System Manager để xóa bỏ cả dữ liệu Recovery Storage Group.

Lưu ý: Để tiết kiệm dung lượng ổ cứng, bạn có thể xóa thủ công những file khôi phục được lưu trữ trong folder Recovery Storage Group của file hệ thống.

12 Mar 2010

Recovery Storage Group Restore with Backup Exec

Details:
The Recovery Storage Group (RSG) feature in Exchange 2003 allows you to mount a second copy of an Exchange mailbox store on any Exchange server in the same Exchange Administrative Group as the original, while the original store is still running and serving clients. This allows you to recover data from an older backup copy of the store without disturbing client access to current data. After the RSG is created and one or more stores are added to it, you can restore online backup sets to it. Then use the Exchange Server 2003 version of Microsoft Exchange Mailbox Merge Wizard (Exmerge.exe) to extract mailbox data from the stores into .PST files, and optionally merge the extracted data back into the online stores.
Note: Only Exchange mailbox stores from Exchange 2000 Service Pack 3 (SP3) or later can be restored to the RSG. Restored mailbox stores are upgraded to the store version currently running on the RSG server.

The following are requirements for restoring Microsoft Exchange 2003 data using the Recovery Storage Group (RSG):
  • Mailbox stores in the RSG must come from the same storage group. You cannot add mailbox stores from different storage groups to the RSG at the same time.
  • The mailbox store that you are adding to the RSG has to be located on the same server that you are restoring to if performing a redirected restore of a Mailbox Store from another server.
  • Public folder stores are not supported for restore using the RSG.
  • Do not mount mailbox stores in the RSG before the restore. If you do mount the stores before the restore, then you must dismount them and select "This database can be overwritten by a restore" on the database property page in Exchange System Manager prior to restoring them.
  • On the server that hosts the RSG, there must be a storage group with the same name as the original storage group for the data you are restoring. If no such storage group exists on the server, then you must create the storage group name as it existed originally during the backup and the mailbox store name that the RSG references must have the same name as the backed up version. (In 11.x and later versions, the RSG can exist on any server in the Forest and there does not have to be a regular SG with the name of the original SG present.)
  • The Active Directory topology of the Exchange system must be intact and in the same state it was in when the backup was made. You cannot restore mailbox stores that were deleted and recreated. In addition, you cannot recover mailboxes from stores if the mailboxes were deleted and purged from the system or moved to other servers or mailbox stores.
  • When the RSG exists on a server, the mailbox stores that it contains are the only stores that can be restored on that server by default. Symantec recommends that you create the RSG only when you intend to recover data using it, and remove the RSG from the server after the data recovery is complete.
· ·
Refer to your Microsoft Exchange Server 2003 documentation for more information on the requirements and restrictions of recovering Exchange data using the RSG or you may reference Microsoft Knowledge Base Article - 824126.

To create a Recovery Storage Group:

1. Start Exchange System Manager. Expand Administrative Groups (if appropriate), expand the Administrative Group Name (if appropriate), and then expand Servers
2. Right-click ServerName, point to New, and then click Recovery Storage Group.
3. In the Name box, type a name for the Recovery Storage Group. Try to use the same name that you used for the original storage group when you specify a name for the Recovery Storage Group. If you receive an error message that is similar to the following and Figure 1 when you do so, use a different name for the Recovery Storage Group:

The object StorageGroupName already exists.

Figure 1

4. Enter a unique directory name for this object. In the Transaction log location and in the System path location boxes, specify a location for the transaction log files and for the system path. Make sure that the location that you specify for the transaction log files for the Recovery Storage Group is different from the location that is specified for the transaction log for the original storage group. Click OK.

5. Right-click the Recovery Storage Group that you created, and then click Add Database to Recover (Figure 2)

Figure 2

6. In the Select database to recover dialog box, click the mailbox store that you want to add to the Recovery Storage Group, and then click OK. In the Mailbox Store Properties dialog box, review the properties of the mailbox store, and then click OK (Figure 3).

** Important ** Make sure that while reviewing the Mailbox store information, if you have multiple Exchange servers in your configuration, the name and location match the Mailbox store that you intended to attach to the RSG.

Figure 3

Do we need to mount storage??????????????????????????????????????????

To restore Exchange 2003 databases using the Recovery Storage Group:

1. On the navigation bar in Backup Exec, click Restore. On the Properties pane, under Source, click Selections. In the restore selections list, select the backup sets you want to restore (Figure 4).
Note: make sure you select the mailbox store only. Public Folder stores are not supported for restore using the RSG.

Figure 4

2. On the Properties pane, under Settings, click Exchange. Select the appropriate options.

Note: Do not select the Commit after restore completes checkbox and the Mount database after restore checkbox on the Restore Job Properties dialog box for Exchange unless your selections include the last backup set to be restored. These selections direct the Exchange server to replay transactions, roll back uncommitted transactions, and mount the databases after the restore.

3. If the RSG resides on a different Exchange server than the databases you are restoring, you can redirect the restore by selecting Exchange Redirection (Figure 5)

Figure 5

4. Start the restore job

5. When the restore is complete, use the EXMerge utility in Exchange 2003 to extract the mailbox data you need from the restored mailbox stores and optionally merge the data back into the online stores (Figure 6)

Figure 6

9 Mar 2010

Reset admin password SEP Manager

If you have lost the password to login to the SEPM then Run the RESETPASS.bat file from the command prompt In the command prompt go to
c:\program files\Symantec\Symantec Endpoint Protection Manager\tools\resetpass
When you'll hit enter you'll see ENGLISH
Close the command prompt Try logging into the SEPM username:admin
password:admin
Then you will get a promt to change the password

20 Nov 2009

Shrink SQL 2000 log file


BACKUP LOG MyDatabaseName WITH TRUNCATE_ONLY


DBCC SHRINKFILE(MyDatabaseName_log, FileSize)

(where MyDatabaseName_log is the logical file name, and is the target size in MB)

The log file has now been shrunk.

Note that the log file will start expanding in normal operation, depending on the way the database is defined. Make sure that the transaction log file is big enough to store all transactions for the normal period between backups. Makes sure that you take peak system loads into consideration when determining the target size.
 

Regular log file maintenance
In normal operation, you would normally never shrink the log file. Regularly backing up the log file will remove the data used in it, and maintain free space for new transaction.

22 Oct 2009

Sharepoint - How to change the Maximum File Upload Size

How to change the Maximum File Upload Size

By default SharePoint allows a maximum file size of 50MB that can be uploaded into any document library. This might be too much as you might not want users downloading 50MB files over your LAN/WAN. To change the maximum file size
1. Goto SharePoint Central Administration > Configure Virtual Server Settings from Virtual Server List Page.
2. Select your server
3. Goto Virtual Server General Settings (in Virtual Server Management)
4. Change the value of the Maximum Upload Size in MB's.

If you increase the file size limit, your site might occassionally time out for users while they are uploading files. To accomodate this increase the default time out property for IIS.

17 Oct 2009

Virtualize a Windows system with VMware vCenter Converter

Virtualize a Windows system with VMware vCenter Converter

August 17th, 2009 by Luis Ventura
The title should have been transition from bare metal to virtual with VMware vCenter Converter. VMware foresaw the existence of server configurations that were either too complex or labor intensive to be recreated from scratch, that’s why they came up with VMware vCenter Converter. What it does is convert a bare-metal system in to a VMware virtual machine ready to be used.
  • VMware vCenter Converter is available for free from the VMware website.
  • Keep in mind you will need another drive or remote storage to store the new virtual machine.

How-To

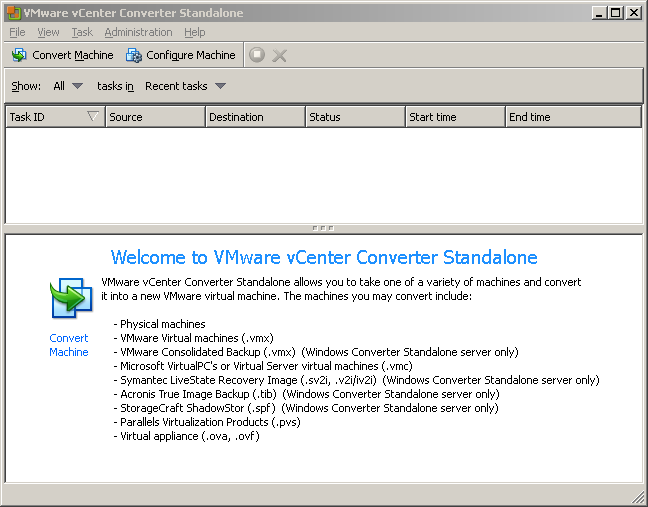
  • Start VMware vCenter Converter and click on Convert Machine.

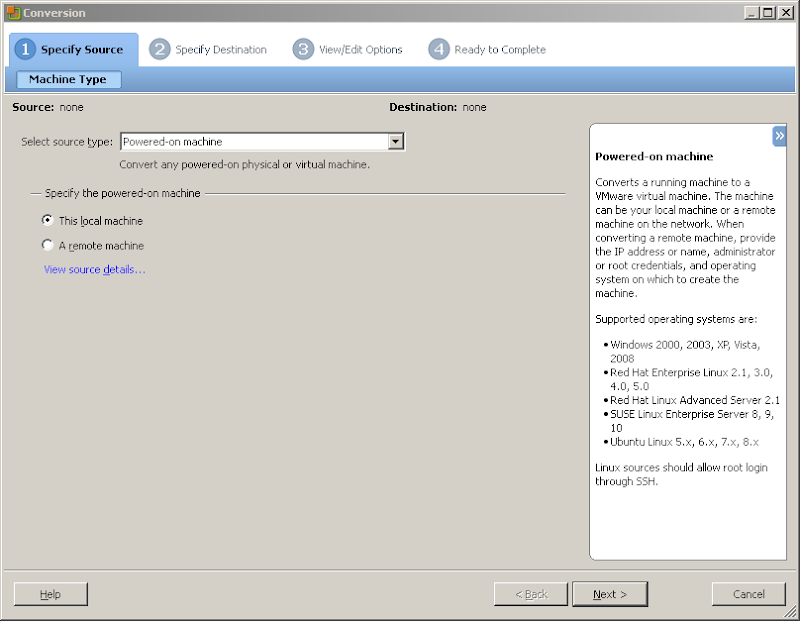
  • Select source type: – This is where you get to choose the system you wish to convert. I choose Powered-on machine, to convert the local system.
  • Specify the powered-on machine – Obviously, select This local machine.

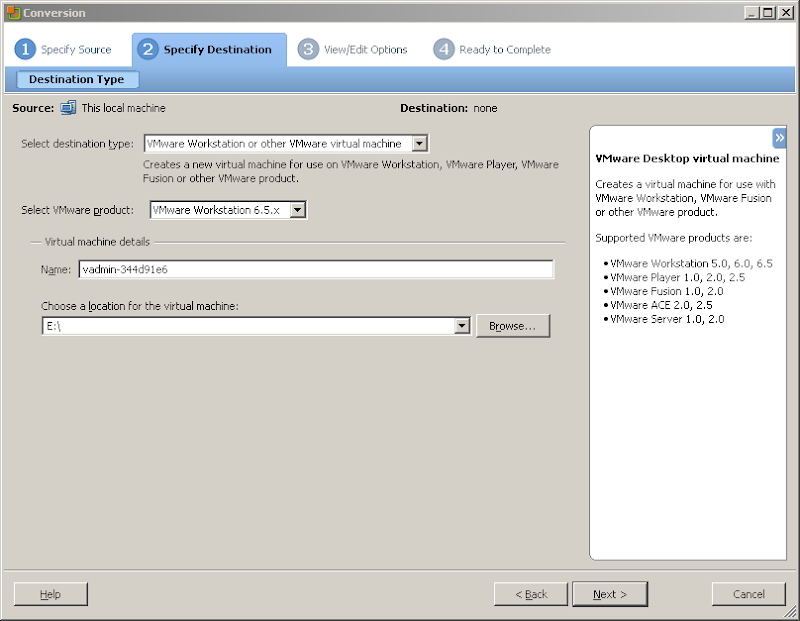
In this window you will need to provide the following:
  • Select destination type – this option will create a virtual machine for use on VMware virtual infrastructure virtual machine or VMware Workstion or other VMware virtual machine.
  • Select VMware Product – Because I selected VMware Workstion or other VMware virtual machine in the option above, I have to specify the version of Vmware Workstation the virtual machine will be compatible with.
  • Name: – Give a name to the virtual machine or use the suggested one.
  • Choose a location for the virtual machine – Select the location where VMware Converter can output the new virtual machine to be created.
  • And then hit Next to continue.
Remember, you need a second disk where VMware Converter can output the virtual machine while it’s being created. You can not use the same disk you wish to virtualize to stored the vm.

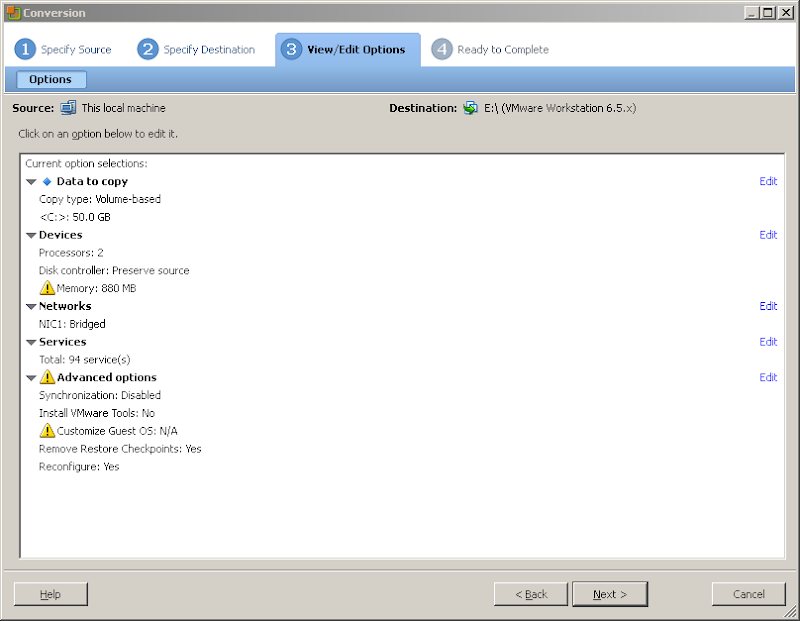
  • In this windows you can change some aspect of the future virtual machine. Among the possible changes you can change: the allocated RAM, number of processors, and number of NICs. If you do not wish to make any changes hit Next to continue.

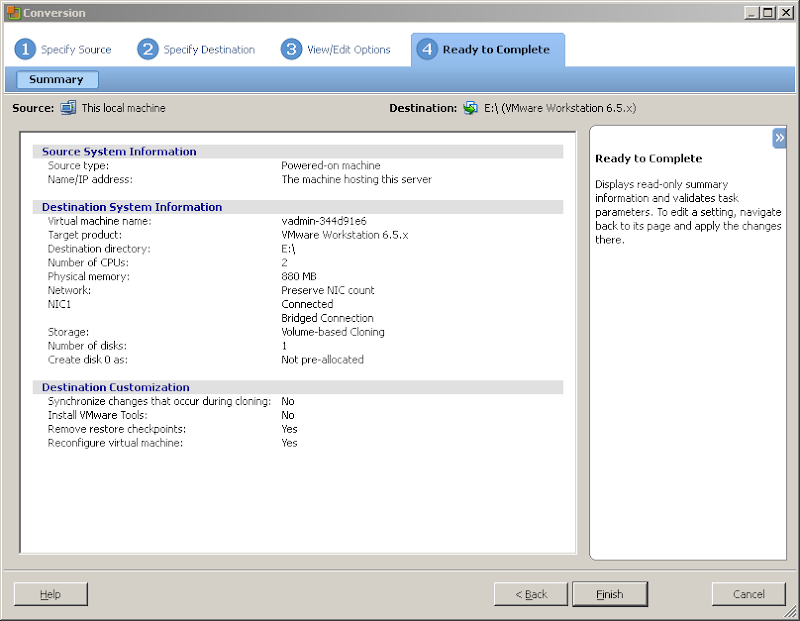
  • VMware vCenter Converter will present with an overview of the setting for the new virtual machine.

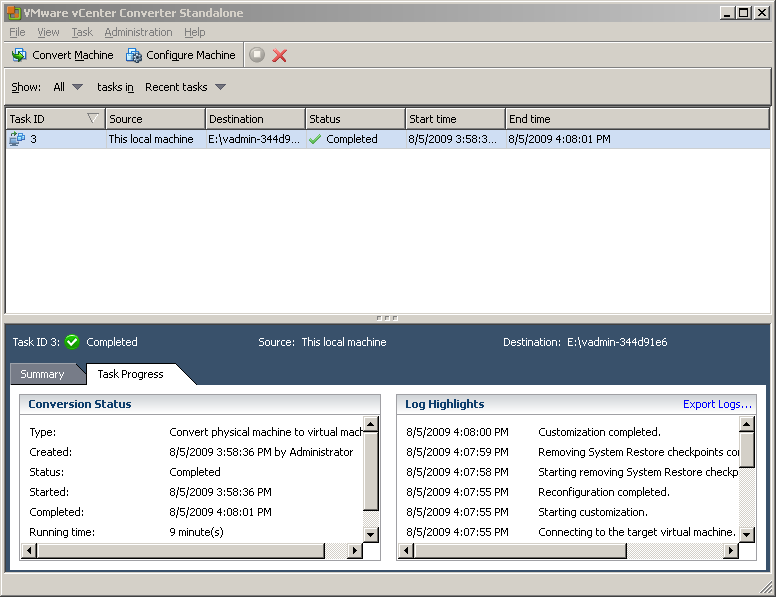
  • VMware Converter will present you with a display of the progress being made. Allow for a considerable amount of time for the conversion to complete.

  • After the process is done check on the drive or location where virtual machine was to be stored during the process.

Congratulations, you now have a virtual machine. Try it out to find out how the process went.
~~~~~~~~~~~~~~~~~~~~~~~~~~~~~~~~~~~~~~~~~~~~~~~~~~~~~

Using VMware vCenter Converter 4 to create a Virtual Center Template

February 20, 2009
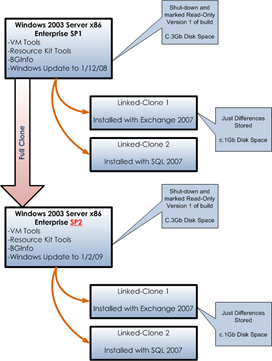
I have a set of standard template Virtual Machines under VMware Workstation 6.5 that I use to spin up VMs, Workstation doesn’t have a native template feature but I get a VM to a point where I’m happy with the build, VM tools installed, Windows updates done etc. and then I sysprep it and shut it down.
At this point I mark it read-only and when I want to create a new Windows virtual machine I just right-click it and create a linked-clone.
This is handy for me as each VM only consumes small amounts of space as they are all just differential snapshots.
however, if I want to change the base template (for example to update from SP1 to SP2) this does present an issue as it has lots of children which depend on it so I can’t change the parent VM, in this instance I create a full clone of the base VM and update it and create further linked clones from it (essentially creating a “fork”).
image
I also have an ESX server farm in my lab and I like to keep my standard images consistent between workstation and ESX/VC to to save me creating and patching multiple templates.
I recently created the following templates and wanted to get a consistent copy on both my lab ESX system and my laptop VM Workstation system, I noted VMware Convertor 4.0 had been released so thought it would be an ideal time to use it to get a fresh set of images with all the current Windows updates applied.
  • Windows Server 2008 x64 as a virtual centre template on my ESX farm
  • Windows Server 2003 Ent, x86, SP2 as a read-only VM on VMware Workstation 6.5.
1st task is to import the Windows Server 2003 image from Workstation to ESX/VC using VM Converter 4.0;
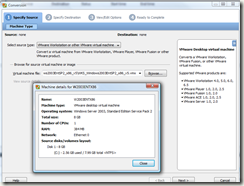
Note the source machine options.
image
VM Workstation VM Information
image
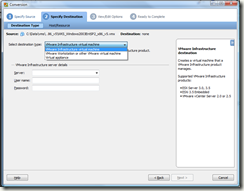
Select appropriate target – in this instance it was an ESX farm, controlled by Virtual Center so I chose VMware Infrastructure Virtual Machine and put the hostname and credentials for my Virtual Center host, you can of course go direct to each ESX host if you don’t have VC.
image
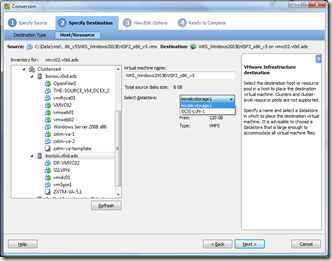
This is a new feature, you get shown all the VM’s and can choose the appropriate storage group to on each host because it queries VC
image
It checks it out against the host and VC image
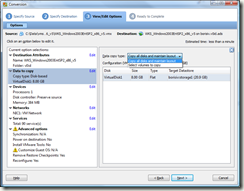
Some better laid out options for the conversion (reminds me of the PlateSpin UI)
image
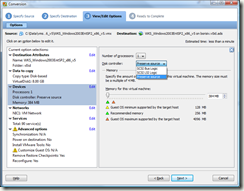
Options to change CPU count and SCSI controller
image
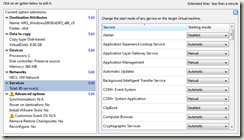
Options to customize service start-up options post-conversion, for example if you have an application that you don’t want to start-up until you’ve checked the target VM is ok (not applicable in this case as it’s a vanilla template, but handy to know).
image
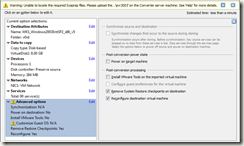
These are the new sync options – and a warning that I don’t have sysprep pre-loaded in this VM – not required at this stage as the VM already has sysprep applied within (will change this once its on the target as i can apply a customization template)
image
Note – I chose to install VM tools, as the ESX version is likely to be different from my Workstation version that is included in the image.
image
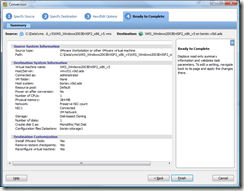
Usual summary screen… much nicer UI than previous versions
image
Running the conversion process, this is over a GbE network connection.
image
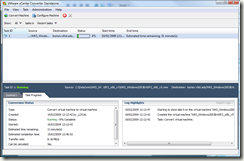
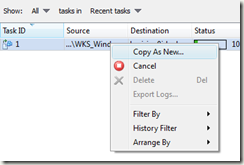
Note new job copy option.. very handy in previous versions you had to do it from scratch each time.
image
All done in about 20mins, although it did sit at 95% 1 minute remaining for about 10mins :)
image
And it shows up in Virtual Center as a normal VM
image
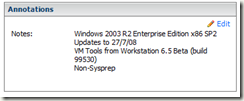
Worth remembering to use the ‘notes’ field in both workstation and ESX, Converter brings them across so you’ll always know this VM’s history
image
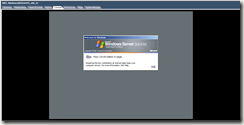
Now, running under ESX
image
at 1st logon its detecting newly installed hardware drivers and running deploypkg.exe, which I assume converter injected to do post-conversion tasks
The auto-install of VMtools threw up some errors over unsigned drivers, so had to manually ok the dialog boxes and then it rebooted itself, wonder if I hadn’t logged on manually it may have done all this in the background automatically.
Once the VM was across I got a service failure on boot up, after I did some digging, it turns out it is something related to VMware tools the vmhgfs service failed to start due to the following error: Cannot create a file when that file already exists – I guess this is a left over from the Workstation version of VM Tools as a bit of digging revealed that this driver is related to host/guest shared networking which isn’t in ESX. – in this instance I removed the registry key relating to the driver and all was good (do this at your own risk!)
image
I also had a failed device in device manager, I right clicked on the VMware Replay Debugging Helper and chose uninstall and all was well, maybe I could have uninstalled/reinstalled VM Tools instead.
image
image
A reboot and all was running ok, I then shutdown the newly cleaned up VM and converted it to a Virtual Center template and was able to apply my normal customization templates (see this post for more info on that).
Next part of this article will be to convert the Windows 2008 x64 template I have in ESX into a VMware Workstation image and all my templates will be consistent.

Total Pageviews