24 Oct 2013

Get SP2010 feature name from feature ID

get-spfeature GUID

23 Oct 2013

Increase size of SP template

To increase the maximum size, simply run the following stsadm command (from the C:\Program Files\Common Files\Microsoft Shared\web server extensions\12\BIN directory) replacing the propertyvalue to the new maximum size (in bytes):
stsadm -o setproperty -propertyname max-template-document-size -propertyvalue 150000000

15 Aug 2013

Giai nhat

Ðánh bại 12 đối thủ trong vòng thi chung kết "Ứng đáp lịch sự lần thứ 35" được tổ chức tối qua tại VN với câu hỏi quyết định "Giả sử trong một bữa ăn tối với một người bạn gái mới quen mà bạn muốn đi toilet thì phải nói cách nào cho lịch sự nhất" một thí sinh người Pháp - một đất nước nổi tiếng về tính gallant của phái nam - đã đoạt giải nhất tuyệt đối với câu trả lời:
"Xin lỗi cô tôi phải ra ngoài một lát để giúp đỡ một người bạn nhỏ của tôi người mà tôi hy vọng sẽ trang trọng giới thiệu với cô trong một ngày gần đây"

12 Aug 2013

Use list in parent site in custom list lookup field

What you need to do is create a site column at the top level site (IT) which is a lookup to your XXX list, then in your sub site you add the site column into your custom list.
From the parent site (the top level site where the list resides)
Go to Site Actions > Site Settings
Under Galleries select Site Columns
Click Create at the top of the list
Give the column a title you will reference in your "child" lists
Select Lookup as the column type
Select the site's column group to categorize the new column
Select the list to lookup from the "Get information from" dropdown
Select the column of the lookup list you want to reference as the key in your "child" lists
(I selected "Title (linked to item)" so that you can easily reference the parent item from your child list item)
Click OK

From the sub-site (site that you need to create the child list)
From the All Items list vies, select Settings > List Settings
At the end of the Columns list select Add from existing site columns
You can filter the selections by selecting the group you associated the parent column with from the dropdown
Select the site column you created above and click the Add button
Click OK and there you have it.

1 Aug 2013

Moving Exec Backup to new server

http://www.symantec.com/connect/blogs/backup-exec-install-blog-upgrades

So, your backup server is a few years old and you find yourself in need of a newer, bigger, better, faster one. Just one problem, you want/need to keep your data from Backup Exec for compliance reasons. You have the perfect server that is ready to take on this new role. It is some new 64 bit monster with Windows 2008 R2, tons of I/O capacity, memory, disk space and more. Then you ask yourself, how do I move Backup Exec’s data from the old server to the new server and keep everything in working order? Time to check the technote database! So you head off to http://support.symantec.com and start doing some queries. You may find this technote:
How to migrate (move) Backup Exec from one system to another with the same version of BE, Windows and same or different computer names.
http://www.symantec.com/business/support/index?page=content&id=TECH67768
In the last 10 years, there have been many who have followed this technote, for just this purpose. When you start reading it, there are some bold statements, and some restrictions. However, lets first review some of the components this technote will cover.
  1. The Backup Exec Database (BEDB).
  2. The Backup Exec Data (Job histories stored on disk, reports, and more).
  3. The Backup Exec Catalogs (Catalog folder on disk).
Today the SQL instance that hosts the BEDB is Microsoft SQL Server Express 2005 SP3. This version happens to be a 32 bit version when installed on either a 32 bit server, or on a 64 bit server. That is good news for customers who want to migrate from 32 bit operating systems, to 64 bit operating systems. That means there is really no difference in the database mounted on a 32bit OS, or a 64 bit OS, so you can carry it forward to a 64 bit OS without any compatibility issues. Furthermore, the Backup Exec Data and Catalogs on disk are files that are obviously transferrable between OS’s as well. The technote above is written to help move these three items between an old and new server. However, there are a few remaining items to consider.
One of the main items to consider is the configuration of the old and new server. The steps in the technote guide you through creating a matching configuration on the new server. If it is the same operating system as the previous install, then the same components and configuration items for that operating system will get laid down by the install. This should give a relatively similar configuration. The restriction at the top of the technote mentions operating systems of different versions. This is most likely for customers who tried to go backwards. Some examples where this would be broken would be:
  1. Customer installed the Deduplication option on Windows Server 2008 (64 bit), then tries to move to Windows 2008 (32 bit). This option does not install the same on Windows 2008 (32 bit), so this will cause issues.
  2. Customer has Microsoft Exchange (64 bit). Tries to move their data back to a Windows Server 2003 (32 bit) machine. Selections lists in the database would fail to protect these servers since they require tools that can only be present on a 64 bit machine. 
These are just a couple examples of how this could lead to possible compatibility/supportability issues. There may also be additional issues when migrating from 32 bit to 64 bit operating systems of different operating system versions, though I am not personally aware of any. I know of customers who have successfully migrated this way, but it not a supported upgrade path as is called out in this technote:
How to migrate Backup Exec to another server with a different Windows OS version.
http://www.symantec.com/business/support/index?page=content&id=TECH129826
There is also the added difficulty of having to move to a newer version of the product, and not being able to upgrade to the current version. Here is an example. A customer has Backup Exec 12.5 installed on a Windows 2000 Server. They would like to migrate to Backup Exec 2010 R3. However, Backup Exec 2010 R3 does not support installing on Windows 2000. In a situation like this, the only upgrade path is the following technote:
How to use BEMIG to manually upgrade the Backup Exec database from a previous version
http://www.symantec.com/business/support/index?page=content&id=TECH50537
Again this technote lists similar restrictions as the previous technote. Most if not all of the restrictions have very valid reasoning. Primarily because of the work that is done during the install, with respect to these items. The Backup Exec Installation will often make some database changes in coordination with the migration scripts. It’s a carefully orchestrated flow to carry the configuration forward to the new version. Trying the steps in the technote against a server that meets the restrictions will be hit or miss. Mostly depending on the database version being migrated, and changes made in each version of the product after that version. For example, trying to migrate a database that is from the 12.5 product, using the migration(BEMIG) scripts in our 2010 R3 release will yield failures when the “Shared Storage Option” is installed. This is because the install does some of the work, and the scripts do the rest of the work during the migration sequence. The only reliable way to get upgraded when you meet the restrictions is through operating system upgrades, and the supported Backup Exec Install upgrade paths. Now, if you don’t meet the restrictions, then you are essentially using the migration scripts in the newer version of the product, to migrate your database to the new version. This is the same sequence that the Backup Exec Installer uses to migrate the database between versions. However, you should also be careful that the old configuration and new configuration match as closely as possible. Doing so will save you many hours of frustration and issues that could be avoided!
Another question I received, asked about lingering server/devices post upgrade, that are un-removable in the Backup Exec 2010 UI. This issue may happen when migrating to a server with a different server name and different hardware. It’s a difficult issue to solve for our support team, and usually requires their intervention to fully remove. For this reason, it is recommended that you migrate to a server with the same name, and similar configuration. It saves many hours of resolving configuration issues when you do. If you decide change your server name, you will not be able to carry forward a deduplication folder, or its associated jobs. You may also decide to recreate your selection lists for proper viewing. There may even be more items you find needing your attention when you do. Save yourself the headache and keep the same server name. Follow the technote and copy the data to the network, take the server offline, bring up the new server with the same name, and finish followng the technote. You will be glad you did!

25 Jul 2013

Increase the SharePoint 2010 Upload File Size Limit

http://angler.wordpress.com/2012/03/21/increase-the-sharepoint-2010-upload-file-size-limit/

The Problem.
For teamsites and collaborations, sometimes it can be useful to upload big file size documents – which is allowed only partially by SharePoint and IIS. They both have different default settings for the maximum upload file size of a single document or file. They are:
  • SharePoint Server 2010: 50 MB
  • IIS7: ~30 MB
So, when trying to upload a big document, this results in the following error:
image
85 MB is simply too much for the above mentioned settings. Now, the solution section will show you how to fix this.
The Solution.
The good news is: This can be custom tailored to your needs, by simply following 3 steps. Here comes the first step:
1. Increase the SharePoint Upload Limit via Central Administration
First, you must increase the SharePoint 2010 upload limit.
  • Central Administration
  • “Manage Web Applications”
  • Select desired web application row (don’t click on the title, just select)
  • “General Settings” in the ribbon
  • Under Maximum Upload Size, change the setting to the desired value (e.g. 200 MB in our example)
  • “OK”

image
Now, the web app is equipped for receiving large files, but IIS7 will still prohibit it, resulting in the same error message as above. So, let’s move on to step 2.

2. Increase the IIS7 request length
Use the following command on the machine you are running the IIS 7:
%windir%\system32\inetsrv\appcmd set config -section:requestFiltering -requestLimits.maxAllowedContentLength:valueInBytes
In our case, we’ll simply put 200x1024x1024=209715200 bytes.
You will receive a confirmation message after applying the command. Please bear in mind that you will need to run the cmd.exe in administrator mode.
image
3. Increase the IIS7 connection timeout length (optional)
One more thing to keep in mind is the connection timeout settings: When you upload large files, depending on your connection speed it can happen that the connection times out. If you want, you can increase the connection timeout to a larger value. The standard is 120 seconds. This step is optional, but can become required if you have users with low speed internet connections.
image
  • Open IIS
  • Select the Web Application
  • Click on Advanced Settings
  • Expand Connection Limits
  • Set the new value for Connection Time-out (seconds)

This is it – all done!
You users will now be able to upload larger files:
image
As usual, test any commands, configuration and settings on a test environment before applying them in production. Applying request lengths bears also some security implications to keep in mind. Use any advices and configurations at your own risk and evaluate risks before applying them.

7 Jun 2013

IIS 7.5 and ASP.NET 2.0 class

Introduction

We currently use Windows XP with IIS 5 on our development machine. Recently, I needed to work on the project at home, and I decided to use my laptop instead of having to bring my desktop home. Problem is, my laptop is configured with Windows Server 2008 R2 and IIS 7.5. After getting my laptop ready for use, I needed to attach my ASP.NET website project to IIS 7.5. After timeless searching on Google, reading thousands of articles, I found no answer. I decided to do it myself (which often is the best option) and got it working in almost no time. I wrote this article to help anyone out there who either (a) struggles to get it working or (b) needs to do this in the future. Use it, don't use it, it's up to you. I suggest that you adapt this article if you are not using Windows Server 2008 R2. Google is usually helpful here.

Installing IIS 7.5

At this point, I assume you already have your website project and all related technologies on the target system. Click Start, then point to Administrative Tools and select Server Manager. On the left-hand side, you will see a list of items. Select right-click on Roles and select Add Roles. If the welcome page shows, click Next. Then you will be presented with a dialog that asks you to select all the roles of your choice ("Select one or more roles to install on this server."). Select the Web Server (IIS) option.
IMPORTANT: Ensure that all sub-items under Web Server (IIS) are also selected. Click Next/Install. Your system will require a restart to continue the IIS Installation.

Configuring IIS 7.5

Now that you have restarted your computer, click Start > Administrative Tools > Internet Information Services (IIS) Manager. Expand your server name, then expand Sites. Right-click on Default Web Site and select Add Virtual Directory.
IIS Manager 
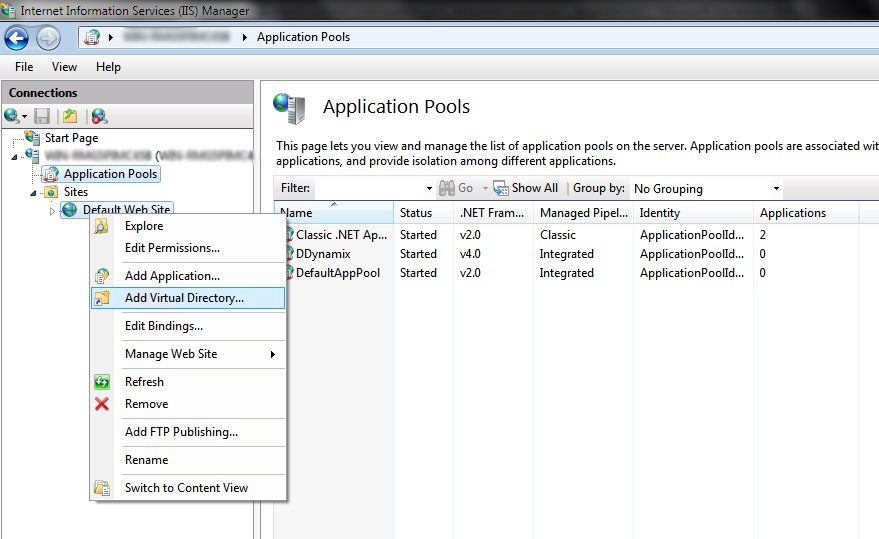
Now type in an alias (it will appear as localhost/(youralias) when browsing), then select the actual path of your website. It is highly recommended to keep all hosted websites within one folder located 
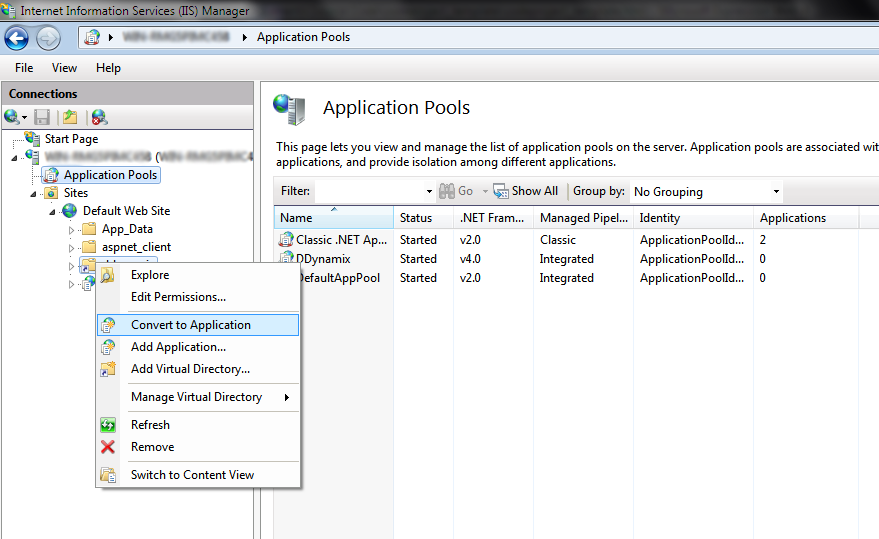
in C:\ (e.g. C:\Websites\Website1). This way, some privilege issues will not occur when running the application on a Windows 7/2008 R2 machine.
Expand the Default Web Site. Right-click on your newly created website and select Convert to Application.
Convert to Application

Configuring Access Permissions

With the introduction of enhanced UAC in Windows Server 2008 R2, you will already know by this time that at some point there will be an access privilege issue. First, we will configure IIS to use an impersonation account instead of the default IISPool account.
Authentication 
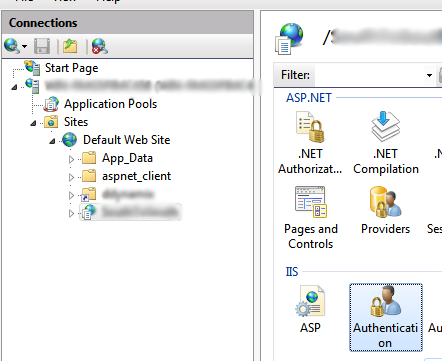
Click on your website in the connections view. On the right-hand side, a page will open presenting you with a lot of options. In the IIS section, double-click on Authentication.
Once the Authentication page is open, right-click on ASP.NET Impersonation and select Enable. Now you have successfully configured IIS and its authentication method. Now, we need to configure SQL Server to allow this impersonated account to access the databases. First, open SQL Server Management Studio.
Expand the Security item listed in the Object Explorer (all images relates to SQL Server 2008 R2).
SQL Server 
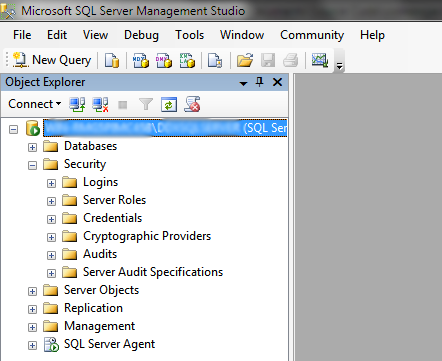
Right-click on Logins and select New Login. In the dialog that just opened, click Search. Within the Object Search dialog, select Advanced. Now click Find Now.
Select User Account 
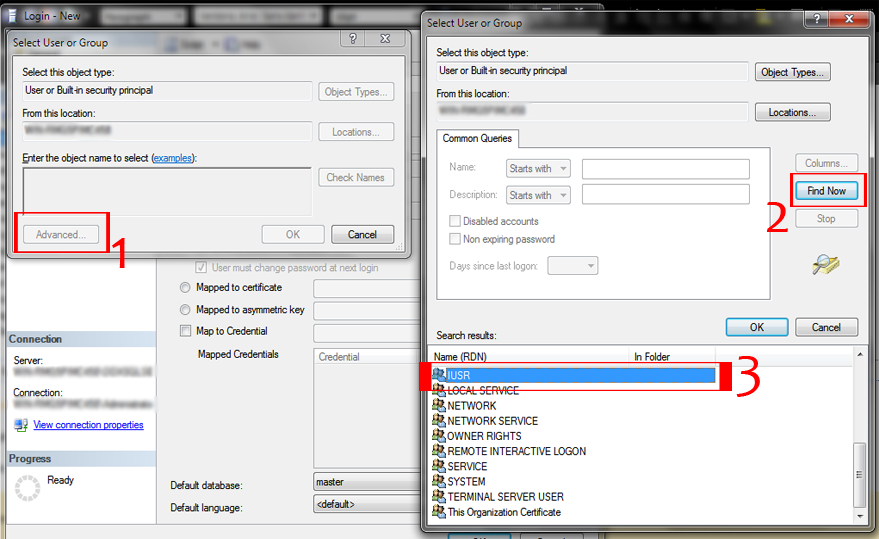
Select IUSR and click OK. Click OK once again. If, at the end of this article, you still experience SQL Login problems, try adding more Server Roles in the Server Roles tab.
Click on the User Mappings tab. Select all the databases listed and finally, select the database your application uses. In the option box below it, select all the role options listed. Now click OK.
Open your favorite browser, and type in the address bar localhost/(youralias). Voila!

License

This article, along with any associated source code and files, is licensed under The Code Project Open License (CPOL)

http://www.codeproject.com/Articles/290238/Getting-Started-with-IIS-7-5-and-ASP-NET-2-0-Class
 

3 Jun 2013

AD Replication ports

http://social.technet.microsoft.com/wiki/contents/articles/584.active-directory-replication-over-firewalls.aspx


AD Replication ports (http://thetechnologychronicle.blogspot.com/2012/05/list-of-ad-replication-ports.html)

RPC endpoint mapper
135/tcp, 135/udp
Network basic input/output system (NetBIOS) name service
137/tcp, 137/udp
NetBIOS datagram service
138/udp
NetBIOS session service
139/tcp
RPC static port for AD replication
1111/TCP
RPC static port for FRS
2347/TCP
Server message block (SMB) over IP (Microsoft-DS)
445/tcp, 445/udp
Lightweight Directory Access Protocol (LDAP)
389/tcp
LDAP ping
389/udp
LDAP over SSL
636/tcp
Global catalog LDAP
3268/tcp
Global catalog LDAP over SSL
3269/tcp
Kerberos
88/tcp, 88/udp
Domain Name Service (DNS)
53/tcp, 53/udp
MOM
TCP/UDP 1270
NTP
123/udp
Remote Desktop
3389/tcp

Total Pageviews