17 Nov 2010

MTU, what difference does it make ?


Packet size, often referred to as MTU (Maximum Transmission Unit) is the greatest amount of data that can be transferred in one physical frame on the network. For Ethernet, the MTU is 1500 bytes, for PPPoE 1492, dial-up connections often use 576.
Each transmission unit consists of header and actual data. The actual data is referred to as MSS (Maximum Segment Size), which defines the largest segment of TCP data that can be transmitted. Essentially,
MTU=MSS + TCP & IP headers.

For the purposes of this article and all comparisons I'll make the following assumptions:
  • MSS=MTU-40 <-- a standard 40 byte header (20 byte IP and 20 byte TCP)
  • packets are not being fragmented
  • no packet loss
  • no router congestion
  
Packet size vs. latency
Let's examine a transfer of 1,500,000 bytes of data using different packet size over a T1 line (T1=1,544,000 bits/sec) using the following formula:
  ( MSS + header ) * 8 bits/byte---------------------------------- = latency (per hop)          1,544,000 bits/sec.
Then, using different MTU values, we can calculate the relevance of packet size to latency.
If MTU = 1500, then: (1460+40) * 8 / 1,544,000 = 7.772 ms delay per hop
If MTU = 576, then: (536+40) * 8 / 1,544,000 = 2.924 ms delay
Assuming a transfer over 10 hops, the 1500 MTU would wield 77.72 ms delay, while a 576 MTU would take 29.24 ms to transfer over a T1 line.
It is obvious then that smaller packets will be transmitted faster, simply because of the throughput limitation of the line. It's however somewhat moot point in large transfers, all that's illustrated above is the fact that transferring more data takes more time :)
 
Throughput vs. packet size
Using the same formula from our previous example, let's assume we need to transfer 1 MByte file over the same T1 line.
1MByte = 1024 KB = 1,048,576 bytes.
If MTU = 1500, then: (1460+40) * 8 / 1,544,000 = 7.772 ms delay per hop1 MByte / MSS = 1,048,576 bytes / 1460 = 718.2, or effectively 719 packets to transfer 1 MByte.Then, to transfer 1Mbyte: 719 packets * 7.772 ms delay per hop = 5588.068 ms, or 5.588 seconds per hop.If we are transferring our 1 MByte file over 10 hops, it will ideally take us:(1st packet * 10 hops * 7.772ms delay) + 718 * 7.772 = 5.658 seconds.

If MTU = 576, then: (536+40) * 8 / 1,544,000 = 2.924 ms delay per hop.1 MByte / MSS = 1,048,576 bytes / 536 = 1956.3, or effectively 1957 packets to transfer 1 MByte.Then, to transfer 1 MByte: 1957 packets * 2.924 ms delay per hop = 5722.268 ms, or 5.722 seconds per hop.If we are transferring our 1 MByte file over the same 10 hops:(1st packet *10 hops * 2.924ms delay) + 1956 * 2.924 = 5.748 sec.

The difference comes from the fact that when using larger packets the overhead is smaller. To transfer 1 MByte, if using MTU of 1500 there are 719 * 40 = 28,760 bytes of overhead, while if using MTU of 576 1957 * 40 = 78,280 bytes, additional 49,520 bytes of headers transferred each MByte. For our 10-hop transfer, the additional overhead accounts for just a fraction of a second, however it makes a difference if you consider large transfers over long periods of time. This difference is a also higher in practice, considering TCP options and the fact that modern TCP/IP implementations tend to use larger headers (additional 12 bytes header space for Timestamps for example). Also, the above example uses best case scenario, not considering higher latency and congestion.
 
Final Thoughts
Generally, it's logical to assume larger packets are better, because of all the following factors:
  • network - reduced number of headers, as illustrated above
  • routers - less routing decisions
  • clients - less protocol processing and device interrupts
However, if pure throughput is not the ultimate goal, smaller packets might be more "responsive" since they take less time to travel throughout the network. That effect might be preferred in some applications and online gaming, at the expense of throughput.
Ultimately, packet size should be decided based on the type of the desired result, considering the underlying network as well, to avoid negative factors such as fragmentation of packets. Still one has to realize the fact that larger packets will still transmit more useful data than smaller packets, and that there is no single "best" solution for all applications.
Regards,
Philip Filipov

http://www.speedguide.net/articles/mtu-what-difference-does-it-make--111


16 Nov 2010

How to Hide “Open in Windows Explorer” option from List or Document Library in SharePoint 2007

Recently someone on one of the forums ran into some issue and he wanted to hide the “Open in Windows Explorer” option from the Actions menu in a document library.
So here’s how you can hide the “Open in Windows Explorer” option from the Actions menu.
Note: After successfully completing all the steps mentioned below only Site Owners will be able to see the “Open with Windows Explorer” option.


1. Make a copy of the DefaultTemplate.ascx located in the X:\Program Files\Common Files\Microsoft Shared\web server extensions\12\TEMPLATE\CONTROLTEMPLATES\.
2. Rename the copy to CustomDefaultTemplate.ascx

3.  Open the CustomDefaultTemplate.ascx in any text editor and Find the line ID=”OpenInExplorer “ (usually line 1812 ).

4. Change PermissionsString=”UseClientIntegration to PermissionsString=”ManageWeb and save the file.

5. Do an IISRESET
6. Now if any user, other than the Site Owner Logins into the SharePoint Site they will not be able to see the “Open with Windows Explorer” option.


http://thecommunicator.co.cc/2010/04/25/how-to-hide-%E2%80%9Copen-in-windows-explorer%E2%80%9D-option-from-list-or-document-library-in-sharepoint-2007/


http://slingeronline.wordpress.com/2008/02/11/hiding-open-with-windows-explorer-from-the-actions-menu/

Remove the Explorer View from a Document Library Template


If you are building a custom document library solution, there may be a time where you don't want users to use the Explorer View of the document library.  I am talking about the VIEW itself and not the Open with Windows Explorer action in this case.  The correct way to do is of course is to create your own custom document library template (I'll be covering that in a future post) and then modify the schema.xml file.  If you want to go crazy and unsupported, you can also modify the C:\Program Files\Common Files\Microsoft Shared\web server extensions\12\TEMPLATE\FEATURES\DocumentLibrary\DocLib\schema.xml of the built-in DocumentLibrary feature and accomplish the same result for the out-out-the-box document library.  Removing it is just a matter of removing the appropriate View element in the schema.xml file.  In this case, you are looking for an element similar to the one below.

<View BaseViewID="3" Type="HTML" WebPartZoneID="Main" DisplayName="$Resources:core,Explorer_View;" Url="Forms/WebFldr.aspx" SetupPath="pages\webfldr.aspx" RequiresClientIntegration="TRUE" ReadOnly="TRUE">

It will have a BaseViewId of 3 and a Display Name indicating that it is the explorer view.  Just delete this entire View element and reactivate the feature and this view will not be present on any new document libraries you create.  Again, I recommend creating your own document library template instead of modifying the built-in one.

It will only remove it on new document libraries created.  Any existing ones you would have to remove manually from each library.


http://www.dotnetmafia.com/blogs/dotnettipoftheday/archive/2008/05/29/how-to-remove-the-explorer-view-from-a-document-library-template.aspx

9 Nov 2010

Các khái niệm cơ bản về Proxy


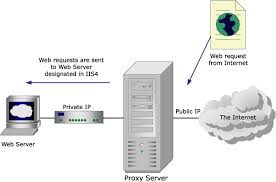
Proxy cung cấp cho người sử dụng truy xuất internet với những host đơn. Những proxy server phục vụ những nghi thức đặt biệt hoặc một tập những nghi thức thực thi trên dual_homed host hoặc basion host. Những chương trình client của người sử dụng sẽ qua trung gian proxy server thay thế cho server thật sự mà người sử dụng cần giao tiếp.
Proxy server xác định những yêu cầu từ phía client và quyết định đáp ứng hay không đáp ứng, nếu yêu cầu được đáp ứng, proxy server sẽ kết nối tới server thật thay cho client và tiếp tục chuyển tiếp đến những yêu cầu từ client đến server, cũng như đáp ứng những yêu cầu của server đến client.
Vì vậy proxy server đóng vai trò như là cầu nối trung gian giữa server và client (vì vậy có thể ví proxy server giống như là một đường hầm tạo ra giữa client, ở đây được coi là máy tính người sử dụng, và server được xem là web server hoặc chat server …. đi xuyên qua server ISP)

Cách thức hoạt động của proxy

Proxy cung cấp cho người sử dụng truy xuất internet với những host đơn. Những proxy server phục vụ những nghi thức đặt biệt hoặc một tập những nghi thức thực thi trên dual_homed host hoặc basion host. Những chương trình client của người sử dụng sẽ qua trung gian proxy server thay thế cho server thật sự mà người sử dụng cần giao tiếp.
Proxy server xác định những yêu cầu từ phía client và quyết định đáp ứng hay không đáp ứng, nếu yêu cầu được đáp ứng, proxy server sẽ kết nối tới server thật thay cho client và tiếp tục chuyển tiếp đến những yêu cầu từ client đến server, cũng như đáp ứng những yêu cầu của server đến client.
Vì vậy proxy server đóng vai trò như là cầu nối trung gian giữa server và client (vì vậy có thể ví proxy server giống như là một đường hầm tạo ra giữa client, ở đây được coi là máy tính người sử dụng, và server được xem là web server hoặc chat server …. đi xuyên qua server ISP)

Vậy Tại Sao Ta Phải Cần Proxy? (xem hình dưới)

Khi quan sát hình trên bạn sẽ thấy rõ lý do tại sao ta phải sử dụng proxy. Ví dụ như hình trên bạn sẽ thấy firewall (được coi như là firewall do ISP-nhà cung cấp dịch vụ dựng lên chẳng hạn) đã chặn port 6667 (sử dụng trong chương trình chat IRC) tức là bạn không thể kết nối tới IRC server thông qua port 6667 để chat, mà ISP chỉ cho phép bạn truy cập dịch vụ web và gởi mail thông qua port 80 và 25 mà thôi.
Trường hợp nếu IRC server chỉ lắng nghe trên port 80 thì truy cập của bạn không có vấn đề gì, nhưng vấn đề ở đây lại không phải như vậy vì các IRC server thường chỉ lắng nghe trên các port mặt định từ 6666 -> 6668, và các dịch vụ khác cũng tương tự như thế chẳng hạn như dịch vụ FTP(dich vụ chuyển file) sử dụng port 21, pop3(truy cập nhận mail) thì qua port 110 …. vì vậy nếu bạn muốn kết nối đến các dịch vụ trên trong trường hợp ISP của bạn chỉ cho phép kết nối thông qua port 25 hoặc 80 thì chỉ còn một con đường là sử dụng proxy (xem hình dưới)

Có thể giải thích đơn giản như sau: bạn cần kết nối đến dịch vụ chat IRC thì chương trình chat của bạn sẽ chỉ định kết nối tới proxy server xác định (tức là bạn phải biết được chính xác địa chỉ cũng như là IP của proxy server cần sử dụng) thông qua port 80 và sau đó yêu cầu cho proxy server tạo kết nối tới IRC server và proxy server sẽ đóng vai trò như một máy trung gian giữa bạn và IRC server để thực hiện công việc chat mà vẫn được firewall của ISP cho phép (có thể gọi trường hợp bị khóa port này là bạn bị firewall chặn từ bên trong).
Một ví dụ nữa như khi bạn truy cập một trang web nào đó ví dụ như là www.abc.com (trang web abc là các trang web bạn tự hiểu ) chẳng hạn thì mỗi kết nối của bạn đi ra ngoài và từ ngoài vào đều phải thông qua firewall của ISP, và nếu như đặt trường hợp firewall này có chứa một danh sách “hồ sơ thần chết” gồm các IP hoặc Host name (danh sách các web server không được phép truy cập bao gồm IP hoặc HOST NAME) thì dĩ nhiên yêu cầu truy cập của bạn sẽ bị chặn ngay lặp tức (ta gọi đó là trường hợp bị chặn từ bên ngoài) và cách duy nhất để truy cập những trang web kiểu này là kết nối thông qua proxy server để đánh lừa ISP-firewall, và ISP-firewall của bạn chỉ biết một điều là bạn đang truy cập đến server hợp lệ mà không nghĩ rằng nó chỉ là một server trung gian.
Trở lại vấn đề bị động đất tại Đài Loan vừa rồi, nếu như bạn kết nối trực tiếp đến các trang web tại Mỹ chẳng hạn và do đường cáp quang bị đứt thì dĩ nhiên kết nối trực tiếp của bạn sẽ gặp khó khăn do dung lượng đường truyền cũng như là khó khăn trong việc sử dụng dịch vụ Yahoo Messenger. Trong khi đó đường kết nối của nước ta đi qua các nước khác chẳng hạn như Úc hoặc Nhật không bị ảnh hưởng thì dĩ nhiên khi bạn sử dụng các proxy server đặt tại các nước này để kết nối ra bên ngoài thông qua đường vòng thì vấn đề trên coi như đã được giải quyết.
Còn mấy ông Hacker nhà ta khi muốn quậy phá một trang web nào đó thì mấy ổng thường dùng proxy server để lỡ log web có ghi lại thì chỉ ghi lại được IP của proxy server mà mấy ổng sử dụng chớ không ghi lại địa chỉ IP thực mà ISP cấp cho mấy ổng ở nhà. Vì thế khó mà phát hiện (nhưng nếu sự việc nghiêm trọng thì người ta vẫn có thể truy ngược ra cái địa chỉ IP của proxy server đó và nếu như trong proxy server đó có lưu lại IP của mấy ông thì coi như tiêu đời. Nhưng mấy ổng có thêm một chiêu nữa là không sử dụng duy nhất một IP proxy mà sử dụng nhiều IP chồng chồng lớp lớp để dùng trong những việc “hệ trọng” thì việc truy ra IP thực giống như là việc mò kim đáy bể vậy đó .
Nói tóm lại là công dụng của proxy thì rất rất nhiều nên để đỡ tốn thời gian online của các bạn cũng như tôi cũng đỡ mỏi tay thì bây giờ chúng ta đi vào phần chính.
Làm cách nào tìm một con proxy ngon lành để sử dụng ?
Tôi xin thưa: câu châm ngôn “google là tất cả” với từ khóa “free proxy servers“
Còn trường hợp anh em nào muốn chơi sang thì bỏ tiền ra mua thì sẽ có ngay một con proxy ngon lành và tốc độ thì không thua gì con SH để anh em thoải mái vi vu.
Thiết lập và sử dụng proxy trong trình duyệt:
+Chương trình IE:
-Đầu tiên Mở Menu Tool ==> Internet Option ==> Connections ==> chọn Setting (nếu là Dial up) hoặc Lan Setting
-Sau đó bạn sẽ thấy mục “Use the proxy server for this connection” (nếu là Dial up) hoặc “Use the proxy server for your Lan” bạn đánh dấu chọn vào đó.
-Cuối cùng là gõ địa chỉ IP của proxy server mà bạn muốn sử dụng nhớ kèm theo phần port nữa vì mỗi proxy server có kèm port đi theo.
-Thế là xong bây giờ bạn có thể vi vu lướt web
Lưu ý: nếu proxy nào không sử dụng được bạn phải đổi cái khác vì vụ này là thường xuyên nếu như bạn là con nhà nghèo (vì xài chùa mà và cái gì chùa thì thường không ổn định ). Và các bạn cứ việc lại nhờ vả tới anh Google nhà ta mà anh ta thì không bao giờ biết phàn nàn bạn cả (ngoại trừ cúp điện).
Thiết lập proxy trong yahoo messenger:
+Mở Yahoo Messenger ==> vào Menu Messenger ==> chọn Connection Preferences.
+Đánh dấu vào mục chọn “Enable HTTP proxy“
+Sau đó gõ vào IP của proxy server và port đi kèm.
+Trường hợp bạn cũng có thể sử dụng Socks proxy.
Ngoài 2 cách thiết lập việc sử dụng proxy như tôi vừa giới thiệu ở trên đây, các bạn cũng có thể sử dụng và thiết lập proxy trong các chương trình khác như các chương trình hổ trợ download, các web browser … đều có mục để cho bạn sử dụng thông qua proxy. 

Total Pageviews