Introduction
We currently use Windows XP with IIS 5 on our development machine.
Recently, I needed to work on the project at home, and I decided to use
my laptop instead of having to bring my desktop home. Problem is, my
laptop is configured with Windows Server 2008 R2 and IIS 7.5. After
getting my laptop ready for use, I needed to attach my ASP.NET website
project to IIS 7.5. After timeless searching on Google, reading
thousands of articles, I found no answer. I decided to do it myself
(which often is the best option) and got it working in almost no time. I
wrote this article to help anyone out there who either (a) struggles to
get it working or (b) needs to do this in the future. Use it, don't use
it, it's up to you. I suggest that you adapt this article if you are
not using Windows Server 2008 R2. Google is usually helpful here.
Installing IIS 7.5
At this point, I assume you already have your website project and all related technologies on the target system. Click
Start, then point to
Administrative Tools and select
Server Manager. On the left-hand side, you will see a list of items. Select right-click on
Roles and select
Add Roles.
If the welcome page shows, click Next. Then you will be presented with a
dialog that asks you to select all the roles of your choice ("Select
one or more roles to install on this server."). Select the
Web Server (IIS) option.
IMPORTANT: Ensure that all sub-items under Web Server (IIS) are also selected. Click Next/Install. Your system will require a restart to continue the IIS Installation.
Configuring IIS 7.5
Now that you have restarted your computer, click
Start >
Administrative Tools >
Internet Information Services (IIS) Manager. Expand your server name, then expand
Sites. Right-click on
Default Web Site and select
Add Virtual Directory.
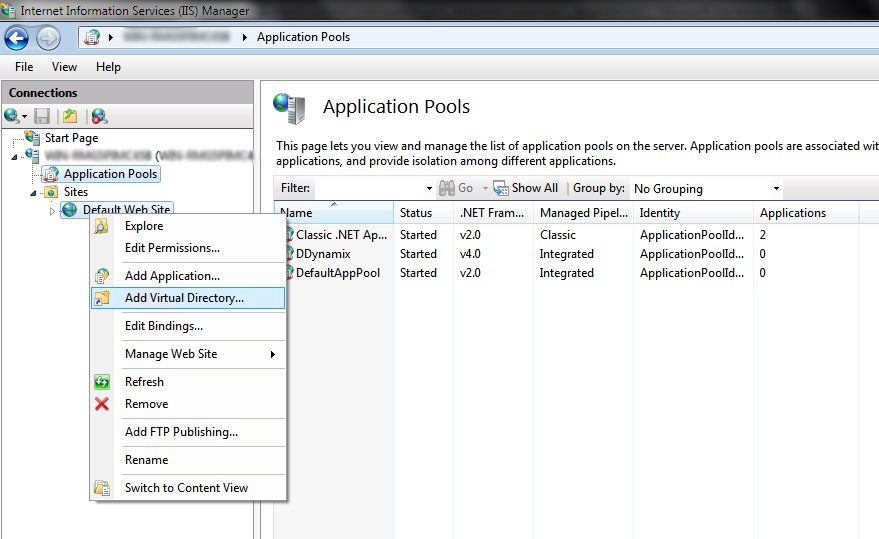
Now type in an alias (it will appear as
localhost/(youralias)
when browsing), then select the actual path of your website. It is
highly recommended to keep all hosted websites within one folder located
in
C:\ (e.g.
C:\Websites\Website1). This way, some privilege issues will not occur when running the application on a Windows 7/2008 R2 machine.
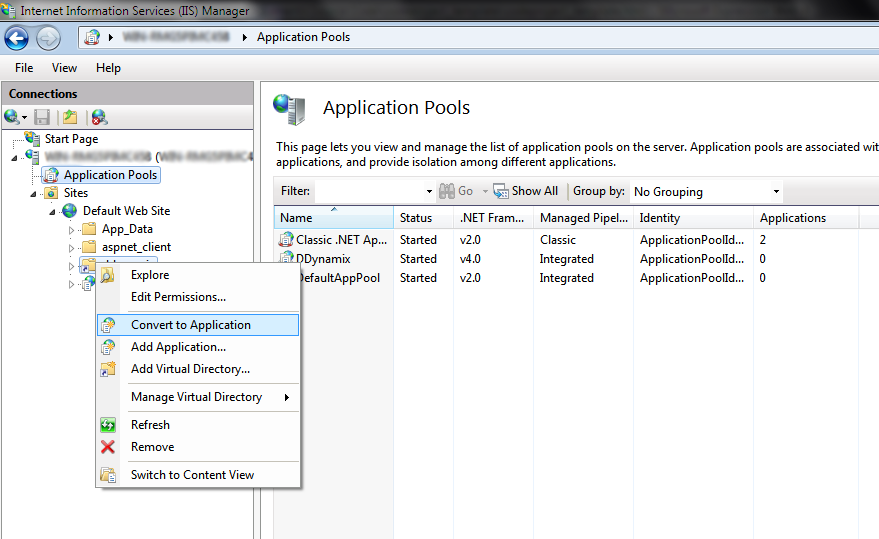
Expand the
Default Web Site. Right-click on your newly created website and select
Convert to Application.
Configuring Access Permissions
With the introduction of enhanced UAC in Windows Server 2008 R2, you
will already know by this time that at some point there will be an
access privilege issue. First, we will configure IIS to use an
impersonation account instead of the default IISPool account.
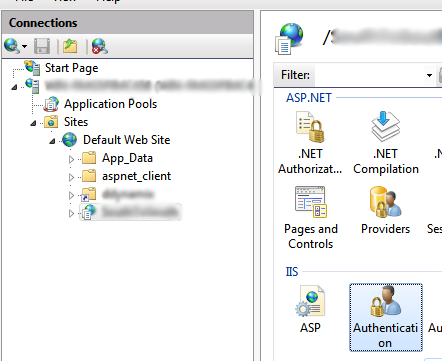
Click on your website in the connections view. On the right-hand
side, a page will open presenting you with a lot of options. In the
IIS section, double-click on
Authentication.
Once the Authentication page is open, right-click on
ASP.NET Impersonation and select
Enable.
Now you have successfully configured IIS and its authentication method.
Now, we need to configure SQL Server to allow this impersonated account
to access the databases. First, open
SQL Server Management Studio.
Expand the
Security item listed in the Object Explorer (all images relates to SQL Server 2008 R2).
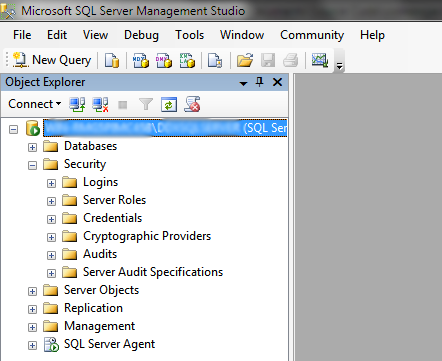
Right-click on
Logins and select
New Login. In the dialog that just opened, click
Search. Within the Object Search dialog, select
Advanced. Now click
Find Now.
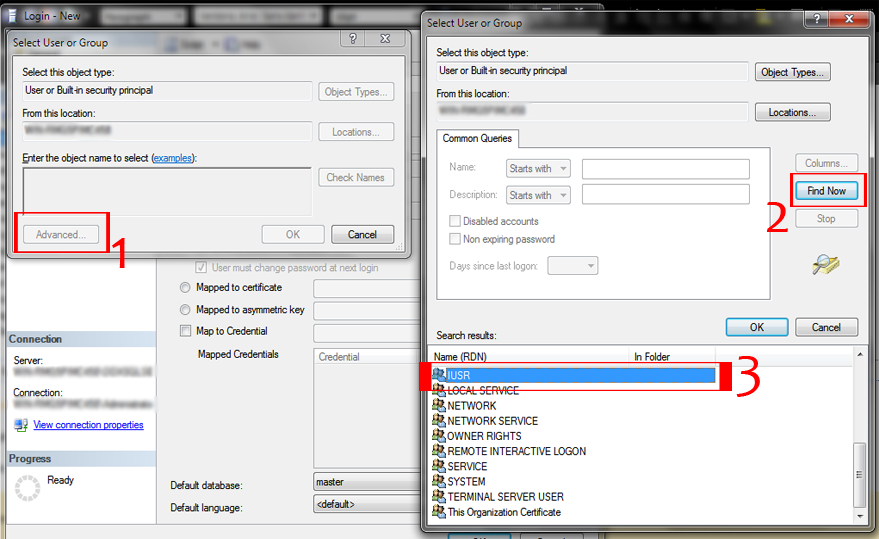
Select
IUSR and click
OK. Click
OK once again. If, at the end of this article, you still experience SQL Login problems, try adding more
Server Roles in the
Server Roles tab.
Click on the
User Mappings tab. Select all the
databases listed and finally, select the database your application uses.
In the option box below it, select all the role options listed. Now
click
OK.
Open your favorite browser, and type in the address bar
localhost/(youralias). Voila!


 Now type in an alias (it will appear as localhost/(youralias)
when browsing), then select the actual path of your website. It is
highly recommended to keep all hosted websites within one folder located
in C:\ (e.g. C:\Websites\Website1). This way, some privilege issues will not occur when running the application on a Windows 7/2008 R2 machine.
 Click on your website in the connections view. On the right-hand
side, a page will open presenting you with a lot of options. In the IIS section, double-click on Authentication.
 Right-click on Logins and select New Login. In the dialog that just opened, click Search. Within the Object Search dialog, select Advanced. Now click Find Now.
 Select IUSR and click OK. Click OK once again. If, at the end of this article, you still experience SQL Login problems, try adding more Server Roles in the Server Roles tab.