Unfortunately at the time I am installing Windows 2008 R2 on x3650M4 (7915) IBM has not yet updated ServeRaid M5110e on its ServerGuide 9.23. Whatever raid level I selected by following steps in ServerGuide the critical error of raid update failure displayed. It takes me a day before realizing that I need to find a way round.
First of all the raid setting have to be done via WebRaid because ServerGuide raid setup did not work.
Secondly find out RaidServe M5110e windows driver at http://download2.boulder.ibm.com/sar/CMA/XSA/ibm_dd_sraidmr_5.2.127_windows_32-64.exe and copy it in to USB key
Lastly restart 3650M4 by Windows 2008 R2 DVD and setup as normally except had to upload ServeRaid driver from the USB key before able to see the hard disk partition.
...Go for a beer now
9 Sept 2012
22 Aug 2012
Understanding where your virtual machine files are [Hyper-V]
http://blogs.msdn.com/b/virtual_pc_guy/archive/2010/03/10/understanding-where-your-virtual-machine-files-are-hyper-v.aspx
To be honest, I am surprised that I have not blogged about this before, but today I would like to talk about how virtual machine files are placed on the hard disk.
Virtual Machine files
The first thing to know is what files are used to create a virtual machine:
Hyper-V has a concept of the “virtual machine data root” and the “virtual machine snapshot root”. These are the locations where the virtual machine configuration (.XML) and saved state (.BIN & .VSV) files are stored. For example – a virtual machine which had a virtual machine data root of “D:\Foo” and a snapshot data root of “D:\Foo” and had two snapshots would have a file structure like this:
D:\Foo
D:\Foo\Snapshots
D:\Foo\Snapshots\[Snapshot #1 GUID directory]
D:\Foo\Snapshots\[Snapshot #1 GUID].XML
D:\Foo\Snapshots\[Snapshot #2 GUID directory]
D:\Foo\Snapshots\[Snapshot #2 GUID].XML
D:\Foo\Virtual Machines
D:\Foo\Virtual Machines\[Virtual Machine GUID directory]
D:\Foo\Virtual Machines\[Virtual Machine GUID].XML
If the snapshots and the virtual machine had saved states associated with them – then the file structure would look like this:
D:\Foo
D:\Foo\Snapshots
D:\Foo\Snapshots\[Snapshot #1 GUID directory]
D:\Foo\Snapshots\[Snapshot #1 GUID directory]\[Snapshot #1 GUID].BIN
D:\Foo\Snapshots\[Snapshot #1 GUID directory]\[Snapshot #1 GUID].VSV
D:\Foo\Snapshots\[Snapshot #1 GUID].XML
D:\Foo\Snapshots\[Snapshot #2 GUID directory]
D:\Foo\Snapshots\[Snapshot #2 GUID directory]\[Snapshot #1 GUID].BIN
D:\Foo\Snapshots\[Snapshot #2 GUID directory]\[Snapshot #1 GUID].VSV
D:\Foo\Snapshots\[Snapshot #2 GUID].XML
D:\Foo\Virtual Machines
D:\Foo\Virtual Machines\[Virtual Machine GUID directory]
D:\Foo\Virtual Machines\[Virtual Machine GUID directory]\[Virtual Machine GUID].BIN
D:\Foo\Virtual Machines\[Virtual Machine GUID directory]\[Virtual Machine GUID].VSV
D:\Foo\Virtual Machines\[Virtual Machine GUID].XML
Some key things to highlight about data roots:
.VHD files can be created pretty much anywhere you want. In Windows Server 2008 R2, .AVHD files are always created in the same location as their parent .VHD files.
Common Virtual Machine File Configuration #1 – Default Virtual Machine Data Root
A virtual machine with a default virtual machine data root is one where you created the virtual machine and accepted the default options in the new virtual machine wizard, specifically where you did not check to “Store the virtual machine in a different location” on the first page of the new virtual machine wizard:

In this configuration option the virtual machine data root and snapshot data root will be set to the path specified under the Hyper-V Settings in the “Virtual Machines” setting, and the virtual hard disk will be created under the path specified under the Hyper-V Settings in the “Virtual Hard Disks” setting:

These paths are normally set to “C:\ProgramData\Microsoft\Windows\Hyper-V” for the “Virtual Machines” setting and “C:\Users\Public\Documents\Hyper-V\Virtual Hard Disks” for the “Virtual Hard Disks” setting. That said – I usually change these settings to “D:\Hyper-V\Configuration Files” and “D:\Hyper-V\Virtual Hard Disks” on my systems as I find this easier to work with.
Common Virtual Machine File Configuration #2 – External Virtual Machine Data Root
If you do select to “Store the virtual machine in a different location” you will get what we call a virtual machine with an external virtual machine data root.

With this option we create a new folder named after the virtual machine, and set the virtual machine data root and snapshot data root to this folder. We also default to creating the virtual hard disk in this new folder.
Common Virtual Machine File Configuration #3 – Exported / Imported virtual machine
If you export a virtual machine a virtual machine and then import it without checking the option to “Duplicate all files so the same virtual machine can be imported again”, you will end up with a virtual machine that looks like a virtual machine with an external data root – but there will be one difference.

Instead of having the virtual hard disks stored in the same location as the virtual machine data root – they will be stored in a “Virtual Hard Disks” folder under the virtual machine data root folder instead.
Changing a virtual machine to a default data root virtual machine
If you have an existing virtual machine that you want to change to a “default data root” configuration – the easiest way to do this is to export the virtual machine and then import it and check the option to “Duplicate all files so the same virtual machine can be imported again”. The resulting virtual machine will be a default data root virtual machine.
Changing a virtual machine to an external data root virtual machine
If you have an existing virtual machine that you want to change to an “external data root” configuration, you have two options:
The only way to change the virtual machine data root for a virtual machine is by using import / export. But the snapshot data root for a virtual machine can be changed at any time – as long as all snapshots are deleted first. If you have deleted all existing snapshots you can change the snapshot data root by changing the “Snapshot File Location” setting for the virtual machine under the virtual machine settings user interface.
To be honest, I am surprised that I have not blogged about this before, but today I would like to talk about how virtual machine files are placed on the hard disk.
Virtual Machine files
The first thing to know is what files are used to create a virtual machine:
- .XML files
- These files contain the virtual machine configuration details. There is one of these for each virtual machine and each snapshot of a virtual machine. They are always named with the GUID used to internally identify the virtual machine or snapshot in question.
- .BIN files
- This file contains the memory of a virtual machine or snapshot that is in a saved state.
- .VSV files
- This file contains the saved state from the devices associated with the virtual machine.
- .VHD files
- These are the virtual hard disk files for the virtual machine
- .AVHD files
- These are the differencing disk files used for virtual machine snapshots
Hyper-V has a concept of the “virtual machine data root” and the “virtual machine snapshot root”. These are the locations where the virtual machine configuration (.XML) and saved state (.BIN & .VSV) files are stored. For example – a virtual machine which had a virtual machine data root of “D:\Foo” and a snapshot data root of “D:\Foo” and had two snapshots would have a file structure like this:
D:\Foo
D:\Foo\Snapshots
D:\Foo\Snapshots\[Snapshot #1 GUID directory]
D:\Foo\Snapshots\[Snapshot #1 GUID].XML
D:\Foo\Snapshots\[Snapshot #2 GUID directory]
D:\Foo\Snapshots\[Snapshot #2 GUID].XML
D:\Foo\Virtual Machines
D:\Foo\Virtual Machines\[Virtual Machine GUID directory]
D:\Foo\Virtual Machines\[Virtual Machine GUID].XML
If the snapshots and the virtual machine had saved states associated with them – then the file structure would look like this:
D:\Foo
D:\Foo\Snapshots
D:\Foo\Snapshots\[Snapshot #1 GUID directory]
D:\Foo\Snapshots\[Snapshot #1 GUID directory]\[Snapshot #1 GUID].BIN
D:\Foo\Snapshots\[Snapshot #1 GUID directory]\[Snapshot #1 GUID].VSV
D:\Foo\Snapshots\[Snapshot #1 GUID].XML
D:\Foo\Snapshots\[Snapshot #2 GUID directory]
D:\Foo\Snapshots\[Snapshot #2 GUID directory]\[Snapshot #1 GUID].BIN
D:\Foo\Snapshots\[Snapshot #2 GUID directory]\[Snapshot #1 GUID].VSV
D:\Foo\Snapshots\[Snapshot #2 GUID].XML
D:\Foo\Virtual Machines
D:\Foo\Virtual Machines\[Virtual Machine GUID directory]
D:\Foo\Virtual Machines\[Virtual Machine GUID directory]\[Virtual Machine GUID].BIN
D:\Foo\Virtual Machines\[Virtual Machine GUID directory]\[Virtual Machine GUID].VSV
D:\Foo\Virtual Machines\[Virtual Machine GUID].XML
Some key things to highlight about data roots:
- We always create a “Virtual Machines” folder under the virtual machine data root and store the virtual machine configuration files there.
- We always create a “Snapshots” folder under the snapshot data rot and store the snapshot configuration files there.
- We fully support multiple virtual machines having the same virtual machine and snapshot data root
.VHD files can be created pretty much anywhere you want. In Windows Server 2008 R2, .AVHD files are always created in the same location as their parent .VHD files.
Common Virtual Machine File Configuration #1 – Default Virtual Machine Data Root
A virtual machine with a default virtual machine data root is one where you created the virtual machine and accepted the default options in the new virtual machine wizard, specifically where you did not check to “Store the virtual machine in a different location” on the first page of the new virtual machine wizard:

In this configuration option the virtual machine data root and snapshot data root will be set to the path specified under the Hyper-V Settings in the “Virtual Machines” setting, and the virtual hard disk will be created under the path specified under the Hyper-V Settings in the “Virtual Hard Disks” setting:

These paths are normally set to “C:\ProgramData\Microsoft\Windows\Hyper-V” for the “Virtual Machines” setting and “C:\Users\Public\Documents\Hyper-V\Virtual Hard Disks” for the “Virtual Hard Disks” setting. That said – I usually change these settings to “D:\Hyper-V\Configuration Files” and “D:\Hyper-V\Virtual Hard Disks” on my systems as I find this easier to work with.
Common Virtual Machine File Configuration #2 – External Virtual Machine Data Root
If you do select to “Store the virtual machine in a different location” you will get what we call a virtual machine with an external virtual machine data root.

With this option we create a new folder named after the virtual machine, and set the virtual machine data root and snapshot data root to this folder. We also default to creating the virtual hard disk in this new folder.
Common Virtual Machine File Configuration #3 – Exported / Imported virtual machine
If you export a virtual machine a virtual machine and then import it without checking the option to “Duplicate all files so the same virtual machine can be imported again”, you will end up with a virtual machine that looks like a virtual machine with an external data root – but there will be one difference.

Instead of having the virtual hard disks stored in the same location as the virtual machine data root – they will be stored in a “Virtual Hard Disks” folder under the virtual machine data root folder instead.
Changing a virtual machine to a default data root virtual machine
If you have an existing virtual machine that you want to change to a “default data root” configuration – the easiest way to do this is to export the virtual machine and then import it and check the option to “Duplicate all files so the same virtual machine can be imported again”. The resulting virtual machine will be a default data root virtual machine.
Changing a virtual machine to an external data root virtual machine
If you have an existing virtual machine that you want to change to an “external data root” configuration, you have two options:
- Spend some time scripting the import / export APIs in Hyper-V. It is possible to do it this way – but it is not easy.
- Move the virtual machine using System Center Virtual Machine Manager. SCVMM will always transform a virtual machine into an external data root virtual machine in the process of moving it.
The only way to change the virtual machine data root for a virtual machine is by using import / export. But the snapshot data root for a virtual machine can be changed at any time – as long as all snapshots are deleted first. If you have deleted all existing snapshots you can change the snapshot data root by changing the “Snapshot File Location” setting for the virtual machine under the virtual machine settings user interface.
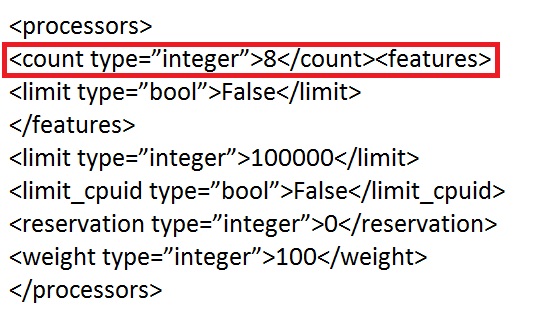
Hyper-V CPU limitation
By
default Hyper-V only allows max 4 CPU core to be displayed on VM. To
get the highest core available in your Hyper V host displayed on VM you simply edit count type value in VM
config xml file and ...enjoy your work.

14 Aug 2012
Resume Content DB upgrade
I’m going to start this post with a couple of little issues when
upgrading your SharePoint environment, but there are several great
references for you
If your SharePoint 2010 upgrade is stuck and you get the following in Central Administration “database is up to date, but some sites are not completely upgraded”. Note, there is a whole lot of misinformation out there about performing/reinitializing an upgrade by using the psconfig -cmd upgrade -inplace v2v (or b2b) commands. However, this is for upgrading your Farm and if it is failing on the content databases, it will continue to fail. The below is all about resuming the content database upgrade.
The first thing you will need to do is get the Site ID for the Database that is problematic

Once you have the ID, you’ll want to execute the Update-SPContentDatabase command
References:
If your SharePoint 2010 upgrade is stuck and you get the following in Central Administration “database is up to date, but some sites are not completely upgraded”. Note, there is a whole lot of misinformation out there about performing/reinitializing an upgrade by using the psconfig -cmd upgrade -inplace v2v (or b2b) commands. However, this is for upgrading your Farm and if it is failing on the content databases, it will continue to fail. The below is all about resuming the content database upgrade.
The first thing you will need to do is get the Site ID for the Database that is problematic
Get-SPContentDatabase -Identity Name_of_DatabaseThat should return something that looks like this…
Once you have the ID, you’ll want to execute the Update-SPContentDatabase command
upgrade-spcontentdatabase -id f7f9907c-71e8-494d-8f2b-4ce6a5b934ea
References:
- Resuming a SharePoint Database Upgrade: http://technet.microsoft.com/en-us/library/ff382638.aspx
- All about SharePoint 2010 Upgrades: http://technet.microsoft.com/en-us/library/cc303420.aspx
Diagnose MissingWebPart and MissingAssembly issues from the SharePoint Health Analyzer using PowerShell
In this article I am going to focus on MissingWebPart and MissingAssembly errors. As stated in previous articles, there is no silver bullet to solving these errors in all cases, but the scripts offered here will allow you troubleshoot the errors further to find exactly where they are happening in the content database. Once you know this, you have a fighting chance of being able to solve the problem.
MissingWebPart Error
In this example, I have received the following error whilst running a Test-SPContentDatabase operation after a content database migration from SharePoint 2007 to 2010. It also appears in the SharePoint Health Analyzer under the “Configuration” category with the title “Missing server side dependencies”:
Category : MissingWebPart
Error : True
UpgradeBlocking : False
Message : WebPart class [4575ceaf-0d5e-4174-a3a1-1a623faa919a] is referenced [2] times in the database [SP2010_Content], but is not installed on the current farm. Please install any feature/solution which contains this web part.
Remedy : One or more web parts are referenced in the database [SP2010_Content], but are not installed on the current farm. Please install any feature or solution which contains these web parts.
As you can see, the error gives you a “WebPart class” GUID, the name of the content database, and how many times it is referenced in the database, but little else. What we need to find out here is either the name of the web part or on which pages it is referenced in the database.
For this I am going to reuse the Run-SQLQuery PowerShell script that I introduced in my article on MissingSetupFile errors:
function Run-SQLQuery ($SqlServer, $SqlDatabase, $SqlQuery)Once you have loaded the function in a PowerShell console, you can run it by using the Run-SQLQuery command with the options relevant to your deployment. For [MissingWebPart] errors, you need to run a SQL SELECT query on the “AllDocs” table in the content database exhibiting the problem, joining to the “AllWebParts” table in order to find details about the missing web part. For example, you would type the following command to find details of the web part with the class ID “4575ceaf-0d5e-4174-a3a1-1a623faa919a”, as reported in the error above:
{
$SqlConnection = New-Object System.Data.SqlClient.SqlConnection
$SqlConnection.ConnectionString = "Server =" + $SqlServer + "; Database =" + $SqlDatabase + "; Integrated Security = True"
$SqlCmd = New-Object System.Data.SqlClient.SqlCommand
$SqlCmd.CommandText = $SqlQuery
$SqlCmd.Connection = $SqlConnection
$SqlAdapter = New-Object System.Data.SqlClient.SqlDataAdapter
$SqlAdapter.SelectCommand = $SqlCmd
$DataSet = New-Object System.Data.DataSet
$SqlAdapter.Fill($DataSet)
$SqlConnection.Close()
$DataSet.Tables[0]
}
Run-SQLQuery -SqlServer "SQLSERVER" -SqlDatabase "SP2010_Content" -SqlQuery "SELECT * from AllDocs inner join AllWebParts on AllDocs.Id = AllWebParts.tp_PageUrlID where AllWebParts.tp_WebPartTypeID = '4575ceaf-0d5e-4174-a3a1-1a623faa919a'" | select Id, SiteId, DirName, LeafName, WebId, ListId, tp_ZoneID, tp_DisplayName | Format-ListYes, it is a pretty long command, but it will produce a very useful output, as shown in this example:
Id : 6ab5e70b-60d8-4ddf-93cb-6a93fbc410be
SiteId : 337c5721-5050-46ce-b112-083ac52f7f26
DirName : News/Pages
LeafName : ArticleList.aspx
WebId : dcc93f3e-437a-4fae-acea-bb15d5c4ea7d
ListId : 7e13fe6c-3670-4d46-9601-832e3eb6a1e4
tp_ZoneID : Body
tp_DisplayName :
Id : b3fcfcd2-2f02-4fe9-93e4-9c9b5ecddf5b
SiteId : 337c5721-5050-46ce-b112-083ac52f7f26
DirName : Pages
LeafName : Welcome.aspx
WebId : 2ae0de59-a008-4244-aa66-d8f76c79f1ad
ListId : d8f083f0-16b9-43d0-9aaf-4e9fffecd6cc
tp_ZoneID : RightColumnZone
tp_DisplayName :
This tells us that the web part has been found on two pages (the references mentioned in the MissingWebPart error). SiteId tells us the site collection and WebId the site where the pages are located. We also have a DirName showing the relative path and the page name itself against the LeafName property. If you’re lucky, you might get the display name of the web part against the tp_DisplayName property, but if not, you should at least be able to tell which zone the web part has been added to by looking at the tp_ZoneID property.
Easily the best way of resolving these issues is to do as the error suggests and install the missing feature or solution containing the web part, but if this is not possible or feasible to do in your scenario, we can discover the site collection URL from the GUIDs using PowerShell and then remove the offending web parts from the pages specified.
To find the site collection URL using the information output from the query, type the following command:
$site = Get-SPSite -Limit all | where {$_.Id -eq "337c5721-5050-46ce-b112-083ac52f7f26"}One you have the site collection URL, you can use the relative path specified by the DirName property to find the location of the file. To remove the web part from the page, type the page URL in the browser and add ?contents=1 to the end of it. For example, to open the web part maintenance page for the ArticleList.aspx page specified in the output, type the following URL in the browser:
$site.Url
http://portal/news/pages/articlelist.aspx?contents=1You can then highlight the offending web part (normally called ErrorWebPart for MissingWebPart errors) by ticking the box and clicking Delete. The screenshot below shows a web part maintenance page to give you an idea of the UI, but not an example of an ErrorWebPart as I had already removed them!

Note: If you remove an ErrorWebPart from a publishing page with versioning switched on, you may have to delete all earlier versions of the page before the error disappears from the SharePoint Health Analyzer or Test-SPContentDatabase report. This is because the web part will still be referenced from these versions, even though you removed it from the currently published page.
MissingAssembly Error
MissingAssembly errors look similar to this one:
Category : MissingAssembly
Error : True
UpgradeBlocking : False
Message : Assembly [PAC.SharePoint.Tagging, Version=1.0.0.0, Culture=neutral, PublicKeyToken=b504d4b6c1e1a6e5] is referenced in the database [SP2010_Content], but is not installed on the current farm. Please install any feature/solution which contains this assembly.
Remedy : One or more assemblies are referenced in the database [SP2010_Content], but are not installed on the current farm. Please install any feature or solution which contains these assemblies.
I normally find MissingAssembly errors appear as the result of an event receiver, which is still registered on a list or library but part of a feature/solution no longer present on the farm.
In most cases, you may be able to look at the assembly name reported in this error and know what the problem is straight away. As before, the best way of resolving this is to reinstall the missing solution file. However, if you are not able to install the solution (e.g., maybe it only works in SharePoint 2007 and not 2010), then you may want to find the lists where the event receiver is installed and either remove the event receiver from the lists or delete the lists themselves.
To troubleshoot this issue we can re-use the Run-SQLQuery function used to help find missing web parts above. The table we need to look at this time though is called “EventReceivers”. For example, you would type the following command to find details of the assembly called “PAC.SharePoint.Tagging, Version=1.0.0.0, Culture=neutral, PublicKeyToken=b504d4b6c1e1a6e5”, as reported in the error above:
Run-SQLQuery -SqlServer "SQLSERVER" -SqlDatabase "SP2010_Content" -SqlQuery "SELECT * from EventReceivers where Assembly = ‘PAC.SharePoint.Tagging, Version=1.0.0.0, Culture=neutral, PublicKeyToken=b504d4b6c1e1a6e5'" | select Id, Name, SiteId, WebId, HostId, HostType | Format-ListThis will produce an output similar to the following:
Id : 657a472f-e51d-428c-ab98-502358d87612
Name :
SiteId : 337c5721-5050-46ce-b112-083ac52f7f26
WebId : 2ae0de59-a008-4244-aa66-d8f76c79f1ad
HostId : 09308020-45a8-41e4-bbc0-7c8d8cd54132
HostType : 2
Id : 0f660612-6be0-401e-aa1d-0ede7a9af8da
Name :
SiteId : 337c5721-5050-46ce-b112-083ac52f7f26
WebId : 2ae0de59-a008-4244-aa66-d8f76c79f1ad
HostId : 09308020-45a8-41e4-bbc0-7c8d8cd54132
HostType : 2
As with the MissingWebPart error before, we can use these GUIDs to get the site collection and site hosting the list with the missing event receiver, as follows:
$site = Get-SPSite -Limit all | where {$_.Id -eq "337c5721-5050-46ce-b112-083ac52f7f26"}The HostId property is the GUID of the object containing the event receiver. The HostType is the object type – in this case, HostType “2” means the event receiver host is a list. You can look at the other host types by checking this article on MSDN: http://msdn.microsoft.com/en-us/library/ee394866(v=prot.13).aspx.
$web = $site | Get-SPWeb -Limit all | where {$_.Id -eq "2ae0de59-a008-4244-aa66-d8f76c79f1ad"}
$web.Url
Now we know the GUID refers to a list, we can get it using PowerShell with this command:
$list = $web.Lists | where {$_.Id -eq "09308020-45a8-41e4-bbc0-7c8d8cd54132"}To remove the list completely, type the following command:
$list.Delete()To keep the list intact and just remove the offending event receiver, copy the Id property from the Run-SQLQuery output into this command:
$er = $list.EventReceivers | where {$_.Id -eq "657a472f-e51d-428c-ab98-502358d87612"}If you do decide to delete the list completely, ensure you also remove it from the site Recycle Bin and Site Collection Recycle Bin to ensure the file is removed from the content database. If not, the error may not disappear from the Health Analyzer or Test-SPContentDatabase operation.
$er.Delete()
http://get-spscripts.com/2011/08/diagnose-missingwebpart-and.html
Subscribe to:
Posts (Atom)