3 Aug 2014

Clone virtual machines in Hyper-V

As you know Hyper-V does not have an option to clone virtual machines, except when you use SCVMM. Because of this many admins need to use tricks so they don’t have to install and configure a new virtual machine from scratch every time they need a copy of Windows 7, or any other operating system. In this guide I’m going to show you two of the most popular ones, and they free. For this lab I have a Hyper-V server running on Windows Server 2008 R2 SP1, and a Windows 7 machine (reference machine) for cloning called Windows.7.Enterprise.

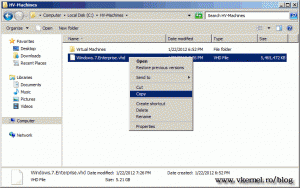
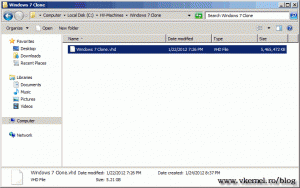
In this first example is important that the virtual machine should not have snapshots. The reference virtual machine (Windows.7.Enterprise) is located on the Hyper-V host C: drive, in a folder called HV-Machines. Inside HV-Machines folder create another folder and give it a distinctive name, so you can recognize it. I called mine Windows 7 Clone. Now copy the virtual disk (the *.vhd file) from the Windows.7.Enterprise machine to the Windows 7 Clone folder. If you want to, you can rename the copied virtual disk after the folder name, but is not necessary, is just that I like to have the virtual disk files named after the virtual machine that I will create.
     
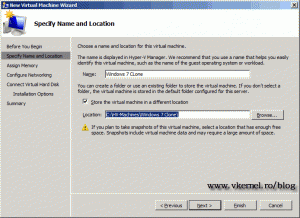
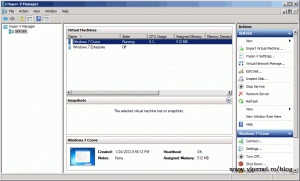
Open Hyper-V manager and create a new virtual machine from the Actions pane. Give the virtual machine a name, and I recommend you name the virtual machine after the folder we just created “Windows 7 Clone”. It will be much easier when troubleshooting. Now choose to store the virtual machine in the folder “Windows 7 Clone”. This is only if you want to have the configuration files and the virtual disk in the same folder.
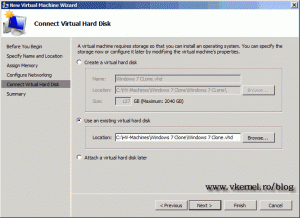
Continue the wizard until you reach the Connect Virtual Hard Disk page. Here instead of creating a new virtual disk we will go with the second option and use an existing virtual disk. Click the Browse button and select the virtual disk we just copied in the “Windows 7 Clone” folder.
Finish the wizard. Now we have an exact copy of the reference virtual machine. Don’t forget to change its name an IP address, if is a static one.
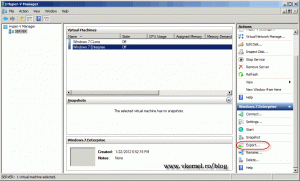
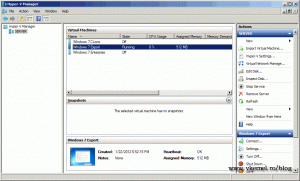
In the second example we are going to use the Hyper-V export function to clone the virtual machine. Using this method you can have snapshots and still being able to clone the machine. To start click the reference virtual machine (Windows.7.Enterprise) in the Hyper-V console, then in the Actions pane click the Export link.
On the Export Virtual Machine window click the Browse button and choose a place where to save this virtual machine, then click Export to start the process. Is going to take a while so be patient. When the export process is finished the Cancel export link in the Actions pane will disappear.
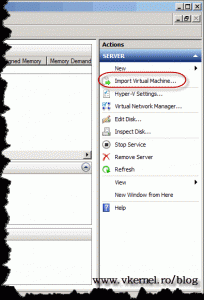
Back in Hyper-V manager console click the link Import Virtual Machine in the Actions pane.
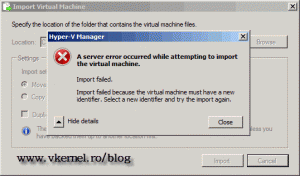
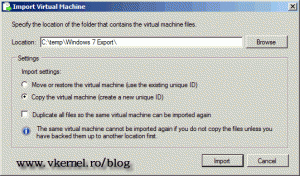
In the window that opens we have two radio buttons and a check box. The first radio button, Move or restore the virtual machine (use the existing unique ID) is going to import the virtual machine and preserve its ID’s. This option is used when importing to a different Hyper-V server. If you import a virtual machine, and on the same Hyper-V server that ID already exists you will get an error message, and the import process fails.
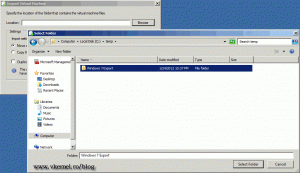
The second radio button, Copy the virtual machine (create a new unique ID), like the name implies, it will create a new ID for the virtual machine you are importing. This is used when you use the same Hyper-V host to export and import virtual machines, like in our case. The check box is there if you want to import the same virtual machine for more than one time, without going through the export process again. Since we are using the same Hyper-V host to import the virtual machine, and another one (the reference machine) exists with the same ID, select the second radio button. Now click Browse and select the exported virtual machine folder, then hit Import. I changed the folder name because this is how I’m going to call my virtual machine in the Hyper-V console.
     
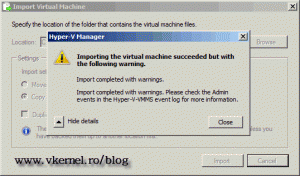
Looks like I have a warning message after the import process finished. This is because I forgot to unmount the Windows 7 ISO from the reference virtual machine before exporting. I’ll just ignore it and click Close.
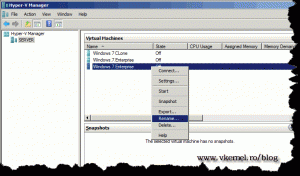
The last step is to rename the virtual machine in the Hyper-V console so we can distinguish it from the original one. Again don’t forget to change its name and IP address if is a static IP.
     
That’s it folks, hope it was informative for you.
http://www.vkernel.ro/blog/clone-virtual-machines-in-hyper-v
5 May 2014

SharePoint service accounts

http://sharepointgeorge.com/2010/installing-sharepoint-2010-privilege-service-accounts/

http://onpointwithsharepoint.blogspot.com/2013/01/sharepoint-2010-service-accounts.html


17 Mar 2014

Hide Title field in SharePoint

Title field in SP can not be deleted but you can hide it by follow the below steps
Goto Advanced Settings and change the Allow management of content types? to Yes. Then click on Item under Content Types. Click on Title. Choose Hidden. This will disallow users from ever seeing or filling in the Title section. Make sure you go back and change the allow management of content types back to no. Hope this helps!

4 Mar 2014

List Naming Contexts


ntdsutil
ntdsutil: roles
fsmo maintenance: ?
fsmo maintenance: select opreation target
select operation target: Connections
server connections: connect to domain XXX.local
 --Binding to \\dc-server.XXX.local..
 --Connected to \\dc-server.XXX.local using credentials....
server connections: quit
select operation target: list naming contexts


1 Feb 2014

Đảo lốp xe

Kỹ thuật đảo lốp xe

Đảo lốp xe là một trong những hoạt động bảo dưỡng quan trọng bởi nó có thể tăng tuổi thọ lốp, bảo đảm an toàn khi lái. Thông thường, quá trình đảo lốp có thể thực hiện theo phương pháp đổi chéo, đổi thẳng hoặc đổi ngang, tùy thuộc từng kiểu dẫn động.

Nguyên nhân phải đảo lốp định kỳ là do lốp trước và lốp sau bị mài mòn với tốc độ khác nhau. Thông thường, khi đánh tay lái, ma sát sẽ khiến lốp trước mòn nhanh hơn. Đối với xe có động cơ đặt trước, lốp trước chịu 60% trọng tải chiếc xe và đóng vai trò là điểm đặt công suất máy, bất kể chiếc xe đó dẫn động cầu trước hay cầu sau. Hơn nữa, bánh trước phải chịu 80% lực phanh nên lốp trước mòn nhanh hơn lốp sau. Thông thường, thứ tự mòn đối với xe tay lái thuận nhiều nhất ở lốp trước bên phải, đến lốp trước bên trái, lốp sau bên phải và cuối cùng là lốp sau bên trái.
rotate3-1348712249_480x0.gif
rotate2-1348712249_480x0.gif
rotate5-1348712249_480x0.gif
rotate4-1348712249_480x0.gif
rotate1-1348712249_480x0.gif
Các kiểu đảo lốp với xe không có lốp dự phòng. (Ảnh: Tirerack)
Vì vậy, các lốp phải được thay đổi vị trí cho nhau từ trước ra sau theo nguyên lý lốp mòn nhiều nhất thay cho lốp mòn ít nhất. Đảo lốp nên thực hiện vài lần trong vòng đời của lốp theo quy trình của nhà sản xuất nhằm cân bằng mức độ mòn và tăng tối đa tuổi. Tuy nhiên, nếu không có hướng dẫn sử dụng, đảo lốp có thể áp dụng theo các cách tuỳ thuộc hệ dẫn động của xe. Đối với xe dẫn động cầu trước, thứ tự đảo tuân theo lốp sau phải ra trước trái, lốp sau trái ra trước phải, lốp trước trái ra sau trái, trước phải ra sau phải (hình A). Ngoài ra, xe dẫn động cầu trước có thể đổi lốp theo kiểu chéo toàn bộ (hình B).
*Bắt bệnh lốp xe*Đọc chỉ số trên lốp xe hơi*Các kiểu lốp xe hơi*Các loại lốp thích hợp Đối với xe dẫn động cầu sau hoặc dẫn động 4 bánh, lốp trước trái ra sau phải, trước phải ra sau trái, sau phải lên trước phải, sau trái lên trước trái (hình C). Bên cạnh đó, xe dẫn động bánh sau có thể áp dụng kiểu đổi chéo toàn bộ (hình B). Nếu lốp hoặc bánh có hướng (lốp có rãnh) thì nên đảo lốp thẳng (hình D). Ngược lại, nếu lốp không có hướng và có kích thước khác nhau, thứ tự đảo lốp sẽ trên cùng một trục (hình E).
rotatea-1348712249_480x0.gifrotatec-1348712249_480x0.gif
 Kỹ thuật đảo lốp với xe có bánh dự phòng. (Ảnh: Tirerack)
Trong trường hợp xe có bánh dự phòng, nó sẽ thay cho bánh nào mòn nhiều nhất và bánh được thay sẽ thành bánh dự phòng. Đối với xe dẫn động cầu trước, bánh dự phòng thay cho bánh trước bên phải nhưng lắp vào bánh sau bên phải, còn bánh sau bên phải lên bánh trước bên trái, bánh trước bên trái xuống bánh sau trái, bánh sau bên trái sẽ lên bánh trước phải (hình A). Đối với xe dẫn động cầu sau, bánh dự phòng được thay cho bánh trước bên trái và tuân theo thứ tự của hình C.
Thời gian đảo lốp phụ thuộc nhiều vào chủng loại và hướng dẫn của nhà sản xuất, tuy nhiên, hầu hết các hãng khuyên cáo nên đảo lốp định kỳ trong khoảng 8.000-10.000 km.
http://vnexpress.net/tin-tuc/oto-xe-may/tu-van/ky-thuat-dao-lop-xe-2070418.html

13 Jan 2014

Edit email address for sharepoint 2010 user

A user's Email Address is stored within a profile property. By default a user isn't allowed to change his or her own e-mail address. The email address (Work e-mail) and whether or not user's can change their own can be specified in the settings of the User Profile Service Application.
  1. (As an administrator) open Central Admin
  2. Under "Application Management"  click "Manage Service Applications"
  3. Locate and click the link "User Profile Service Application". If this one is not there you haven't created a User Profile Service Application yet.
  4. Under "People"  there are two relevant links here. The first is "Manage User Properties", the second is "Manage User Profiles"
  5. Under "Manage User Properties" you can specify the settings for the Work e-mail property (i.e. whether or not the user is allowed to edit his or her own e-mail address).
  6. Under "Manage User Profiles" you can locate a user's profile and edit the e-mail address from there
By default it could take up to one hour to "see" the new e-mail address througout all web applications bound to the user profile service application. A timer job is taking care of this and you could kick this one of to run manually once by going to "Check Job Status" screen in Central Admin (_admin/Timer.aspx). Here locate the job definition with the title "User Profile Service Application - User Profile to SharePoint Full Synchronization", open the "Edit Timer Job Page" by clicking on the Job's name and then click the "Run Now" button.
Hope this helps!

1 Dec 2013

Make life easier with this

http://www.nintex.com/en-US/Products/Pages/NintexWorkflow.aspx
and this

http://www.muhimbi.com/products/pdf-converter-for-sharepoint.aspx

How to cook the perfect fillet steak

OK, this is pretty far removed from the norm of an IT blog, but it is the weekend so I feel it's allowed. The topic has some technical (practical) aspects, and is something I've been talking with a few people about lately.
I've seen various techniques on how to cook steak properly, but I came across one individual's website (which, frustratingly, I can no longer find) a few years ago, which summarised everything beatifully and set me trying out a few different ways from the norm. In a nutshell: cook the steak from room temperature, oil the meat and not the pan, use a pan as hot as you can, and let the steak rest for at least as long as you cooked it.
It's all about heat
I used to work in a professional kitchen. Well, I was a waiter in a nice restaurant, which meant I spent a bit of time in a pro kitchen (generally on the "other" side of the hot plate). Professional chefs seemingly have a duty to verbally abuse their waiting staff, which mine did with gusto if not applomb.
Several years later, I was being shown round a call centre (as The Client), when I recognised one of the chefs who'd been giving me verbal, was now trying to sell software over the phone. Presumably, the world of cooking hadn't worked out for him quite as he'd hoped.
Anyway, one thing I learned about cooking steak back then was, it's all about heat. Now the trick to cooking a good fillet steak (and that's pronounced fill-it, not fill-eh, unless you currently live in France), is to try to get close to restaurant kitchen heat levels in a domestic kitchen. It can make for a lot of smoke, but it's very effective. Here's the deal...
  • Take your fillet steak out of the fridge at least 20 minutes before you want to cook it, to allow it to get to room temperature. Taking a cold steak and throwing straight onto hot metal won't do anything for the tenderness of the end result.
     
  • Pat the steak with kitchen roll to remove any excess moisture (if the meat is wet, when you put it on the heat, that water will vapourise and only form a barrier between the steak and the heat source).
     
  • Once patted dry, rub a little sunflower or vegetable oil into the steak, with your fingers (don't use olive oil - it burns at too low a temperature), and leave to sit for a few minutes. Season with salt & pepper if you like.
     
  • Put a small, dry, frying pan on maximum heat on the biggest ring/burner on your hob. Leave it there for a least a couple of minutes. In the meantime, go and open some windows. Things are likely to get smokey. I've heard of some people leaving the pan on heat for as much as 10 minutes, but you might struggle to see the cooker by the time you're ready to put the fillet on.
     
  • When the pan is as hot as you can suffer, gently place the steak onto the surface. After 30 seconds or so, move it so it doesn't stick and burn. Now it's a straight function of how hot your pan is, how big the steak is, and how you like it cooked, which will determine how long to leave it there. I tend to find 2-3 minutes each side will give a nice medium-rare on a decent sized fillet on a pan that's been on heat for a few minutes.
There's a trick to being able to tell when the steak is properly cooked, and it involves prodding your own hand. Pressing on the surface with your finger, you'll feel the flesh give way a little, and it should be about the same firmness as if you press with the finger on the fleshy part of your hand when pinching thumb and fingers together. It's easier to show than describe:
 Rare Medium-well/Well-done
So if you touch thumb and index finger, the firmness of your hand will be about the same as a rare steak, while thumb and little finger will be more like well done. Experience and practice will help you out here, and don't be scared of cutting the steak to check it's cooked as you'd like - better a well-cooked dish with a cut in the middle, than an undercooked but nicely presented one.
I can't really understand wanting to cook a lovely fillet of beef to "well done". You might as well save a bit of cash and buy a cheaper cut. In fact, according to Anthony Bourdain (and I've heard this of other chefs too), the skankier bits of beef get set aside for serving to restaurant customers who like their meat good 'n burnt - with a label on the meat saying "SFWD", or "Save For Well Done".
Finally, take the steak off the heat and put on a warmed plate and just let it rest for 10 minutes or so, before serving. You might want to deglaze the pan with a little red wine and maybe a knob of butter, to make a nice sauce. Mmmmmmmmm.


12 Nov 2013

1156 vs 1157 bulb


10 Nov 2013

"Setup Groups for this Site"

If you change your mind and want to create unique groups for sharepoint site after it was created there will be an issue because "Setup Groups for this Site" disappeared. Even you can create groups and make them to be default groups for the site but "Add users to Sharepoint Group" will not be available from drop down box of "your own" Site Owners group.
Luckily you can still get "Setup groups for this site" page appeared by this url
siteurl/_layouts/permsetup.aspx

Hope it will help
Cheers, BB


24 Oct 2013

uninstall spfeature

Uninstall-SPFeature [-Identity] -force

Get SP2010 feature name from feature ID

get-spfeature GUID

23 Oct 2013

Increase size of SP template

To increase the maximum size, simply run the following stsadm command (from the C:\Program Files\Common Files\Microsoft Shared\web server extensions\12\BIN directory) replacing the propertyvalue to the new maximum size (in bytes):
stsadm -o setproperty -propertyname max-template-document-size -propertyvalue 150000000

15 Aug 2013

Giai nhat

Ðánh bại 12 đối thủ trong vòng thi chung kết "Ứng đáp lịch sự lần thứ 35" được tổ chức tối qua tại VN với câu hỏi quyết định "Giả sử trong một bữa ăn tối với một người bạn gái mới quen mà bạn muốn đi toilet thì phải nói cách nào cho lịch sự nhất" một thí sinh người Pháp - một đất nước nổi tiếng về tính gallant của phái nam - đã đoạt giải nhất tuyệt đối với câu trả lời:
"Xin lỗi cô tôi phải ra ngoài một lát để giúp đỡ một người bạn nhỏ của tôi người mà tôi hy vọng sẽ trang trọng giới thiệu với cô trong một ngày gần đây"

12 Aug 2013

Use list in parent site in custom list lookup field

What you need to do is create a site column at the top level site (IT) which is a lookup to your XXX list, then in your sub site you add the site column into your custom list.
From the parent site (the top level site where the list resides)
Go to Site Actions > Site Settings
Under Galleries select Site Columns
Click Create at the top of the list
Give the column a title you will reference in your "child" lists
Select Lookup as the column type
Select the site's column group to categorize the new column
Select the list to lookup from the "Get information from" dropdown
Select the column of the lookup list you want to reference as the key in your "child" lists
(I selected "Title (linked to item)" so that you can easily reference the parent item from your child list item)
Click OK

From the sub-site (site that you need to create the child list)
From the All Items list vies, select Settings > List Settings
At the end of the Columns list select Add from existing site columns
You can filter the selections by selecting the group you associated the parent column with from the dropdown
Select the site column you created above and click the Add button
Click OK and there you have it.

1 Aug 2013

Moving Exec Backup to new server

http://www.symantec.com/connect/blogs/backup-exec-install-blog-upgrades

So, your backup server is a few years old and you find yourself in need of a newer, bigger, better, faster one. Just one problem, you want/need to keep your data from Backup Exec for compliance reasons. You have the perfect server that is ready to take on this new role. It is some new 64 bit monster with Windows 2008 R2, tons of I/O capacity, memory, disk space and more. Then you ask yourself, how do I move Backup Exec’s data from the old server to the new server and keep everything in working order? Time to check the technote database! So you head off to http://support.symantec.com and start doing some queries. You may find this technote:
How to migrate (move) Backup Exec from one system to another with the same version of BE, Windows and same or different computer names.
http://www.symantec.com/business/support/index?page=content&id=TECH67768
In the last 10 years, there have been many who have followed this technote, for just this purpose. When you start reading it, there are some bold statements, and some restrictions. However, lets first review some of the components this technote will cover.
  1. The Backup Exec Database (BEDB).
  2. The Backup Exec Data (Job histories stored on disk, reports, and more).
  3. The Backup Exec Catalogs (Catalog folder on disk).
Today the SQL instance that hosts the BEDB is Microsoft SQL Server Express 2005 SP3. This version happens to be a 32 bit version when installed on either a 32 bit server, or on a 64 bit server. That is good news for customers who want to migrate from 32 bit operating systems, to 64 bit operating systems. That means there is really no difference in the database mounted on a 32bit OS, or a 64 bit OS, so you can carry it forward to a 64 bit OS without any compatibility issues. Furthermore, the Backup Exec Data and Catalogs on disk are files that are obviously transferrable between OS’s as well. The technote above is written to help move these three items between an old and new server. However, there are a few remaining items to consider.
One of the main items to consider is the configuration of the old and new server. The steps in the technote guide you through creating a matching configuration on the new server. If it is the same operating system as the previous install, then the same components and configuration items for that operating system will get laid down by the install. This should give a relatively similar configuration. The restriction at the top of the technote mentions operating systems of different versions. This is most likely for customers who tried to go backwards. Some examples where this would be broken would be:
  1. Customer installed the Deduplication option on Windows Server 2008 (64 bit), then tries to move to Windows 2008 (32 bit). This option does not install the same on Windows 2008 (32 bit), so this will cause issues.
  2. Customer has Microsoft Exchange (64 bit). Tries to move their data back to a Windows Server 2003 (32 bit) machine. Selections lists in the database would fail to protect these servers since they require tools that can only be present on a 64 bit machine. 
These are just a couple examples of how this could lead to possible compatibility/supportability issues. There may also be additional issues when migrating from 32 bit to 64 bit operating systems of different operating system versions, though I am not personally aware of any. I know of customers who have successfully migrated this way, but it not a supported upgrade path as is called out in this technote:
How to migrate Backup Exec to another server with a different Windows OS version.
http://www.symantec.com/business/support/index?page=content&id=TECH129826
There is also the added difficulty of having to move to a newer version of the product, and not being able to upgrade to the current version. Here is an example. A customer has Backup Exec 12.5 installed on a Windows 2000 Server. They would like to migrate to Backup Exec 2010 R3. However, Backup Exec 2010 R3 does not support installing on Windows 2000. In a situation like this, the only upgrade path is the following technote:
How to use BEMIG to manually upgrade the Backup Exec database from a previous version
http://www.symantec.com/business/support/index?page=content&id=TECH50537
Again this technote lists similar restrictions as the previous technote. Most if not all of the restrictions have very valid reasoning. Primarily because of the work that is done during the install, with respect to these items. The Backup Exec Installation will often make some database changes in coordination with the migration scripts. It’s a carefully orchestrated flow to carry the configuration forward to the new version. Trying the steps in the technote against a server that meets the restrictions will be hit or miss. Mostly depending on the database version being migrated, and changes made in each version of the product after that version. For example, trying to migrate a database that is from the 12.5 product, using the migration(BEMIG) scripts in our 2010 R3 release will yield failures when the “Shared Storage Option” is installed. This is because the install does some of the work, and the scripts do the rest of the work during the migration sequence. The only reliable way to get upgraded when you meet the restrictions is through operating system upgrades, and the supported Backup Exec Install upgrade paths. Now, if you don’t meet the restrictions, then you are essentially using the migration scripts in the newer version of the product, to migrate your database to the new version. This is the same sequence that the Backup Exec Installer uses to migrate the database between versions. However, you should also be careful that the old configuration and new configuration match as closely as possible. Doing so will save you many hours of frustration and issues that could be avoided!
Another question I received, asked about lingering server/devices post upgrade, that are un-removable in the Backup Exec 2010 UI. This issue may happen when migrating to a server with a different server name and different hardware. It’s a difficult issue to solve for our support team, and usually requires their intervention to fully remove. For this reason, it is recommended that you migrate to a server with the same name, and similar configuration. It saves many hours of resolving configuration issues when you do. If you decide change your server name, you will not be able to carry forward a deduplication folder, or its associated jobs. You may also decide to recreate your selection lists for proper viewing. There may even be more items you find needing your attention when you do. Save yourself the headache and keep the same server name. Follow the technote and copy the data to the network, take the server offline, bring up the new server with the same name, and finish followng the technote. You will be glad you did!

25 Jul 2013

Increase the SharePoint 2010 Upload File Size Limit

http://angler.wordpress.com/2012/03/21/increase-the-sharepoint-2010-upload-file-size-limit/

The Problem.
For teamsites and collaborations, sometimes it can be useful to upload big file size documents – which is allowed only partially by SharePoint and IIS. They both have different default settings for the maximum upload file size of a single document or file. They are:
  • SharePoint Server 2010: 50 MB
  • IIS7: ~30 MB
So, when trying to upload a big document, this results in the following error:
image
85 MB is simply too much for the above mentioned settings. Now, the solution section will show you how to fix this.
The Solution.
The good news is: This can be custom tailored to your needs, by simply following 3 steps. Here comes the first step:
1. Increase the SharePoint Upload Limit via Central Administration
First, you must increase the SharePoint 2010 upload limit.
  • Central Administration
  • “Manage Web Applications”
  • Select desired web application row (don’t click on the title, just select)
  • “General Settings” in the ribbon
  • Under Maximum Upload Size, change the setting to the desired value (e.g. 200 MB in our example)
  • “OK”

image
Now, the web app is equipped for receiving large files, but IIS7 will still prohibit it, resulting in the same error message as above. So, let’s move on to step 2.

2. Increase the IIS7 request length
Use the following command on the machine you are running the IIS 7:
%windir%\system32\inetsrv\appcmd set config -section:requestFiltering -requestLimits.maxAllowedContentLength:valueInBytes
In our case, we’ll simply put 200x1024x1024=209715200 bytes.
You will receive a confirmation message after applying the command. Please bear in mind that you will need to run the cmd.exe in administrator mode.
image
3. Increase the IIS7 connection timeout length (optional)
One more thing to keep in mind is the connection timeout settings: When you upload large files, depending on your connection speed it can happen that the connection times out. If you want, you can increase the connection timeout to a larger value. The standard is 120 seconds. This step is optional, but can become required if you have users with low speed internet connections.
image
  • Open IIS
  • Select the Web Application
  • Click on Advanced Settings
  • Expand Connection Limits
  • Set the new value for Connection Time-out (seconds)

This is it – all done!
You users will now be able to upload larger files:
image
As usual, test any commands, configuration and settings on a test environment before applying them in production. Applying request lengths bears also some security implications to keep in mind. Use any advices and configurations at your own risk and evaluate risks before applying them.

7 Jun 2013

IIS 7.5 and ASP.NET 2.0 class

Introduction

We currently use Windows XP with IIS 5 on our development machine. Recently, I needed to work on the project at home, and I decided to use my laptop instead of having to bring my desktop home. Problem is, my laptop is configured with Windows Server 2008 R2 and IIS 7.5. After getting my laptop ready for use, I needed to attach my ASP.NET website project to IIS 7.5. After timeless searching on Google, reading thousands of articles, I found no answer. I decided to do it myself (which often is the best option) and got it working in almost no time. I wrote this article to help anyone out there who either (a) struggles to get it working or (b) needs to do this in the future. Use it, don't use it, it's up to you. I suggest that you adapt this article if you are not using Windows Server 2008 R2. Google is usually helpful here.

Installing IIS 7.5

At this point, I assume you already have your website project and all related technologies on the target system. Click Start, then point to Administrative Tools and select Server Manager. On the left-hand side, you will see a list of items. Select right-click on Roles and select Add Roles. If the welcome page shows, click Next. Then you will be presented with a dialog that asks you to select all the roles of your choice ("Select one or more roles to install on this server."). Select the Web Server (IIS) option.
IMPORTANT: Ensure that all sub-items under Web Server (IIS) are also selected. Click Next/Install. Your system will require a restart to continue the IIS Installation.

Configuring IIS 7.5

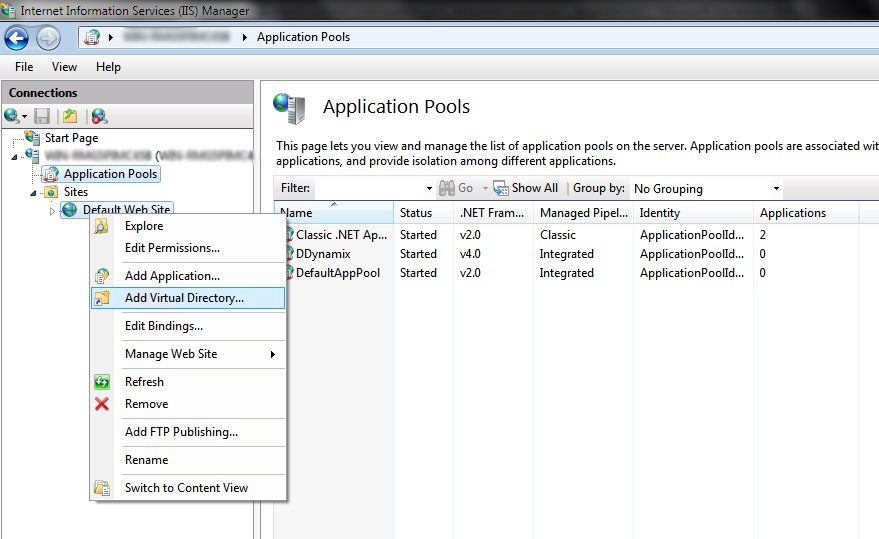
Now that you have restarted your computer, click Start > Administrative Tools > Internet Information Services (IIS) Manager. Expand your server name, then expand Sites. Right-click on Default Web Site and select Add Virtual Directory.
IIS Manager Now type in an alias (it will appear as localhost/(youralias) when browsing), then select the actual path of your website. It is highly recommended to keep all hosted websites within one folder located in C:\ (e.g. C:\Websites\Website1). This way, some privilege issues will not occur when running the application on a Windows 7/2008 R2 machine.
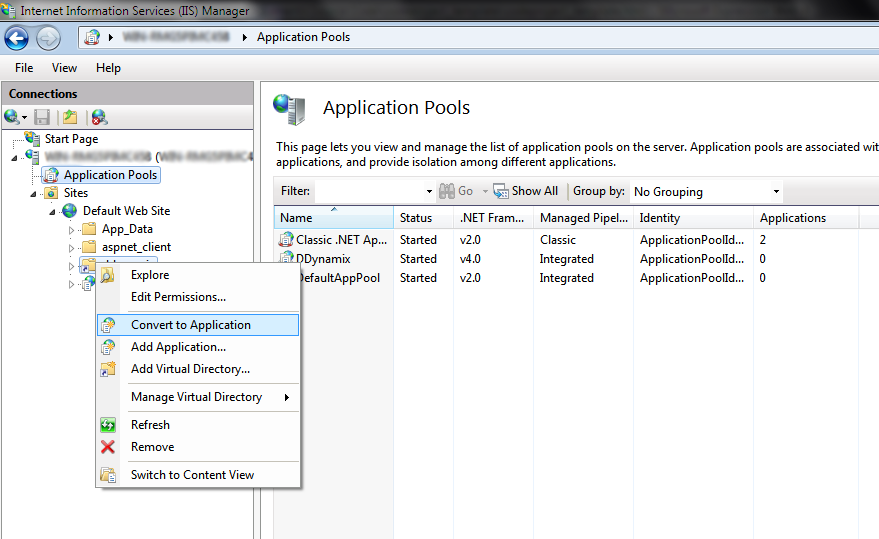
Expand the Default Web Site. Right-click on your newly created website and select Convert to Application.
Convert to Application

Configuring Access Permissions

With the introduction of enhanced UAC in Windows Server 2008 R2, you will already know by this time that at some point there will be an access privilege issue. First, we will configure IIS to use an impersonation account instead of the default IISPool account.
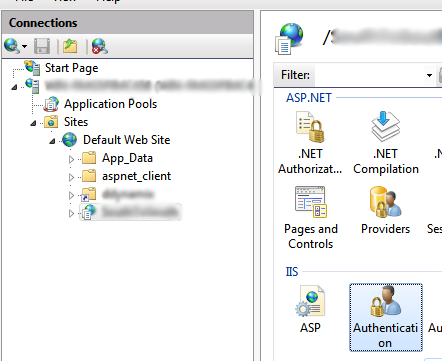
Authentication Click on your website in the connections view. On the right-hand side, a page will open presenting you with a lot of options. In the IIS section, double-click on Authentication.
Once the Authentication page is open, right-click on ASP.NET Impersonation and select Enable. Now you have successfully configured IIS and its authentication method. Now, we need to configure SQL Server to allow this impersonated account to access the databases. First, open SQL Server Management Studio.
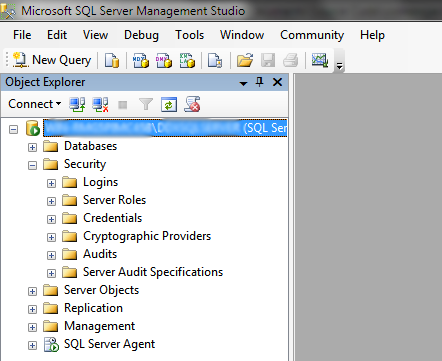
Expand the Security item listed in the Object Explorer (all images relates to SQL Server 2008 R2).
SQL Server Right-click on Logins and select New Login. In the dialog that just opened, click Search. Within the Object Search dialog, select Advanced. Now click Find Now.
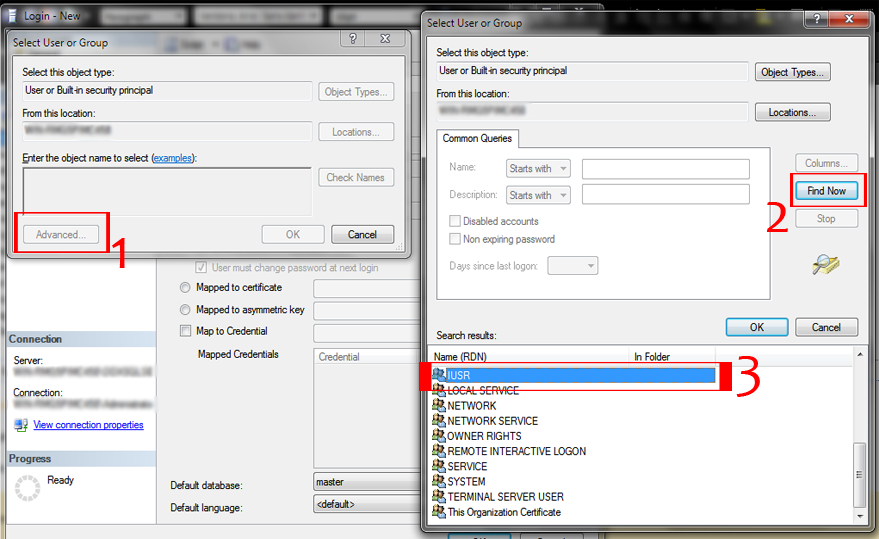
Select User Account Select IUSR and click OK. Click OK once again. If, at the end of this article, you still experience SQL Login problems, try adding more Server Roles in the Server Roles tab.
Click on the User Mappings tab. Select all the databases listed and finally, select the database your application uses. In the option box below it, select all the role options listed. Now click OK.
Open your favorite browser, and type in the address bar localhost/(youralias). Voila!

License

This article, along with any associated source code and files, is licensed under The Code Project Open License (CPOL)

http://www.codeproject.com/Articles/290238/Getting-Started-with-IIS-7-5-and-ASP-NET-2-0-Class
 

Total Pageviews