11 Dec 2014
25 Aug 2014
22 Aug 2014
SharePoint AAM for Dummies
I've never really understood Alternate Access Mapping called AAM. But when I started to use UAG and the SharePlus App it was necessary to understand the concept of AAM better.
I will not talk about how to configure AAM or the bindings in the IIS. There are lots of stuff out there. I want you to undestand the concept.
So I want to tell you how I made me understand AAM. There are three features of AAM
I will not talk about how to configure AAM or the bindings in the IIS. There are lots of stuff out there. I want you to undestand the concept.
So I want to tell you how I made me understand AAM. There are three features of AAM
- Internal URL
- Public URL
- Zone
- The internal URL is the URL that the SharePoint Server understands & accepts
- The public URL is the URL that the clients outside in the world knows
- A Zone is a logical container for a public URL with a name like "Interner" or "Extranet". It does nothing really special. You have 5 zones in SharePoint, means a max. of 5 public urls.
Explain AAM with some analogies
My name is Ihsan Baris. So when someone calls me "Baris" or "Ihsan" I'll respond to him. Some friends and my brother are calling me also "Biggy". Don't know why but I already accepted the nickname. These are my internal names.
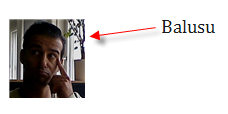
So when a Japanese tries so pronounce my name, he would say "Balusu". If someone calls me "Balusu" I would not respond to him, although he wants to contact me. This is a public name for a Japanese.
So what I need is a mapping between the public and the internal name. Here comes AAM. A translator tells me that "Balusu" means "Baris" in Japanese, so I make the connection in my mind. In the AAM configuration it would look like:
 |
| Adding balusu as internal url to the default zone |
Now I recognize the name "Balusu" but I'll respond to this name always with: Yes I'm Baris and not with Yes I'm Balusu.
In an real example the client is typing http://balusu, the server gets the request but renders all links within the content with http://baris.
 |
| Making balusu public |
Real World Example 1
- Assume we have a SharePoint WebApplication with http://sharepoint for internal users.
- Now we want also external users to connect to our SharePoint with https://gate.sp.company.com.
- We don't want to deal with certificates and terminate the ssl on a proxy server like UAG. The UAG then rewrites the request to http://gate.sp.company.com and points to SharePoint Server.
- The SharePoint server returns all links with https.
The AAM configuration for this example would look like
Now we have 2 Urls which our clients know (Public URLs)
- http://sharepoint
- https://gate.sp.company.com
But we have 3 Url which SharePoint has to know because the UAG rewrites the url.
- http://sharepoint
- http://gate.sp.company.com
- https://gate.sp.company.com
And we know that we have to respond with https://gate.sp.company when we get a request with http://gate.so.company.com.
Real World Example 2
An other example is when you extend your web application. You can extend a web application if you want to have two diffent types of authetication e.g.:
- Windows Authentication for internal users
- Form Authetication for external users.
SharePoint makes then 2 web applications referencing the same content.
This example is easy. We have 2 public urls and SharePoint has to know both. This means we need 2 internal urls and 2 public urls.
When do you have to pay attention
- Web Service Calls: When a webservice call is made, there can be URLs as parameter within the web service call. Web Service calls are used by Mobile Apps like SharePlus or Colligo to get the lists and sites.
So when you enter the URL https://gate.sp.company.com into an app it will send a webservice call to https://gate.sp.company.com/xxx. As SharePoint does not know the https URL (no internal url) you will get an error here. - Search: I think there is a problem with contextual search and non-default zone url. You can only do contextual search within the URL of the default zone. Contextual search means e.g. a search within a list or site. Take care to put the main public url into the default zone.
- IIS Binding: If you add an internal URL into AAM it is not automatically binded within IIS. You have to do that manually. SharePoint AAM does not any changes within IIS.
- Aliases: If you have an alias like http://sharepoint for http://sharepoint.company.com you have to configure both URL in the AAM.
http://blogbaris.blogspot.com/2013/07/sharepoint-alternate-access-mapping-aam.html
3 Aug 2014
Moving SP 2010 from one to another domain
1. Change primary site collection administrator from domain user account to local account
Application Management --> Site Collection Administrators
2. Stop these services
- SQL Server
- SharePoint Administration
- SharePoint Host Controller
- SharePoint Search Service
- SharePoint Time Service
- SharePoint Tracing Service
3. Full backup SharePoint database
4. Change domain for SharePoint
5. Restart and login as administrator
6. Check above services if they started successfully. If not change service account from old domain user account to new domain user account
7. Change Alternate Access Mapping by opening SharePoint Central Administration --> Application Management -->Configure Alternate Access Mapping
URL Protocol: -->intranet.newdomain.local
Zone: Intranet
8. Check DNS record for SharePoint server in new domain
9. Test by entering new address into broswer
Good luck
Clone virtual machines in Hyper-V
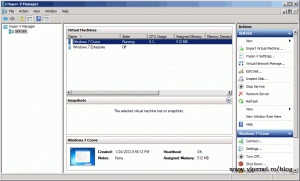
As you know Hyper-V does not have an option to clone virtual machines, except when you use SCVMM. Because of this many admins need to use tricks so they don’t have to install and configure a new virtual machine from scratch every time they need a copy of Windows 7, or any other operating system. In this guide I’m going to show you two of the most popular ones, and they free. For this lab I have a Hyper-V server running on Windows Server 2008 R2 SP1, and a Windows 7 machine (reference machine) for cloning called Windows.7.Enterprise.
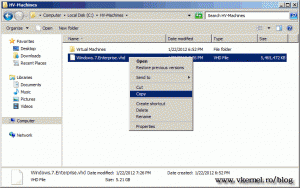
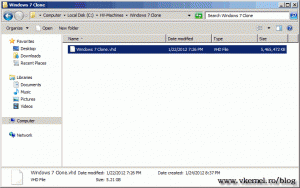
In this first example is important that the virtual machine should not have snapshots. The reference virtual machine (Windows.7.Enterprise) is located on the Hyper-V host C: drive, in a folder called HV-Machines. Inside HV-Machines folder create another folder and give it a distinctive name, so you can recognize it. I called mine Windows 7 Clone. Now copy the virtual disk (the *.vhd file) from the Windows.7.Enterprise machine to the Windows 7 Clone folder. If you want to, you can rename the copied virtual disk after the folder name, but is not necessary, is just that I like to have the virtual disk files named after the virtual machine that I will create.
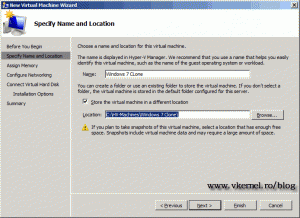
Open Hyper-V manager and create a new virtual machine from the Actions pane. Give the virtual machine a name, and I recommend you name the virtual machine after the folder we just created “Windows 7 Clone”. It will be much easier when troubleshooting. Now choose to store the virtual machine in the folder “Windows 7 Clone”. This is only if you want to have the configuration files and the virtual disk in the same folder.
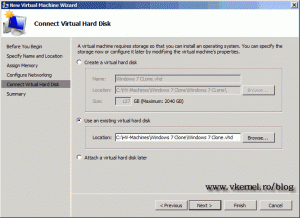
Continue the wizard until you reach the Connect Virtual Hard Disk page. Here instead of creating a new virtual disk we will go with the second option and use an existing virtual disk. Click the Browse button and select the virtual disk we just copied in the “Windows 7 Clone” folder.
Finish the wizard. Now we have an exact copy of the reference virtual machine. Don’t forget to change its name an IP address, if is a static one.
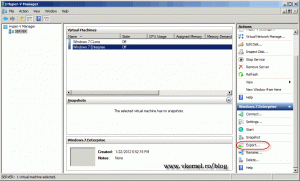
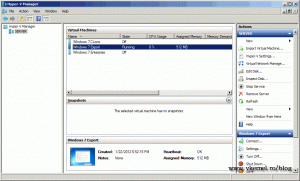
In the second example we are going to use the Hyper-V export function to clone the virtual machine. Using this method you can have snapshots and still being able to clone the machine. To start click the reference virtual machine (Windows.7.Enterprise) in the Hyper-V console, then in the Actions pane click the Export link.
On the Export Virtual Machine window click the Browse button and choose a place where to save this virtual machine, then click Export to start the process. Is going to take a while so be patient. When the export process is finished the Cancel export link in the Actions pane will disappear.
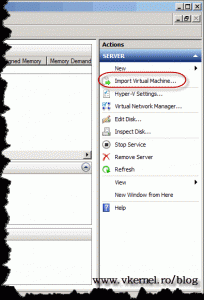
Back in Hyper-V manager console click the link Import Virtual Machine in the Actions pane.
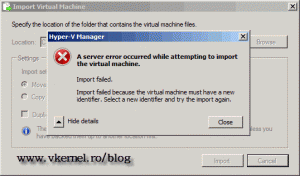
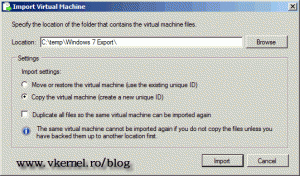
In the window that opens we have two radio buttons and a check box. The first radio button, Move or restore the virtual machine (use the existing unique ID) is going to import the virtual machine and preserve its ID’s. This option is used when importing to a different Hyper-V server. If you import a virtual machine, and on the same Hyper-V server that ID already exists you will get an error message, and the import process fails.
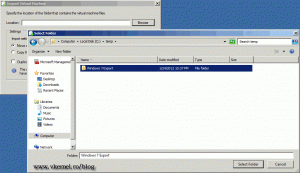
The second radio button, Copy the virtual machine (create a new unique ID), like the name implies, it will create a new ID for the virtual machine you are importing. This is used when you use the same Hyper-V host to export and import virtual machines, like in our case. The check box is there if you want to import the same virtual machine for more than one time, without going through the export process again. Since we are using the same Hyper-V host to import the virtual machine, and another one (the reference machine) exists with the same ID, select the second radio button. Now click Browse and select the exported virtual machine folder, then hit Import. I changed the folder name because this is how I’m going to call my virtual machine in the Hyper-V console.
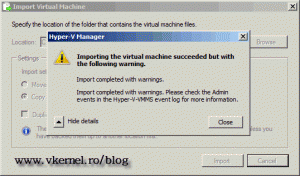
Looks like I have a warning message after the import process finished. This is because I forgot to unmount the Windows 7 ISO from the reference virtual machine before exporting. I’ll just ignore it and click Close.
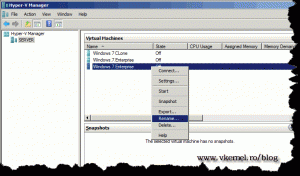
The last step is to rename the virtual machine in the Hyper-V console so we can distinguish it from the original one. Again don’t forget to change its name and IP address if is a static IP.
That’s it folks, hope it was informative for you.
http://www.vkernel.ro/blog/clone-virtual-machines-in-hyper-v
5 May 2014
SharePoint service accounts
http://sharepointgeorge.com/2010/installing-sharepoint-2010-privilege-service-accounts/
http://onpointwithsharepoint.blogspot.com/2013/01/sharepoint-2010-service-accounts.html
http://onpointwithsharepoint.blogspot.com/2013/01/sharepoint-2010-service-accounts.html
17 Mar 2014
Hide Title field in SharePoint
Title field in SP can not be deleted but you can hide it by follow the below steps
Goto Advanced Settings and change the Allow management of content types? to Yes. Then click on Item under Content Types. Click on Title. Choose Hidden. This will disallow users from ever seeing or filling in the Title section. Make sure you go back and change the allow management of content types back to no. Hope this helps!
Goto Advanced Settings and change the Allow management of content types? to Yes. Then click on Item under Content Types. Click on Title. Choose Hidden. This will disallow users from ever seeing or filling in the Title section. Make sure you go back and change the allow management of content types back to no. Hope this helps!
4 Mar 2014
List Naming Contexts
ntdsutil
ntdsutil: roles
fsmo maintenance: ?
fsmo maintenance: select opreation target
select operation target: Connections
server connections: connect to domain XXX.local
--Binding to \\dc-server.XXX.local..
--Connected to \\dc-server.XXX.local using credentials....
server connections: quit
select operation target: list naming contexts
1 Feb 2014
Đảo lốp xe
Kỹ thuật đảo lốp xe
Đảo lốp xe là một trong những hoạt động bảo dưỡng quan trọng bởi nó có thể tăng tuổi thọ lốp, bảo đảm an toàn khi lái. Thông thường, quá trình đảo lốp có thể thực hiện theo phương pháp đổi chéo, đổi thẳng hoặc đổi ngang, tùy thuộc từng kiểu dẫn động.
Nguyên nhân phải đảo lốp định kỳ là do lốp trước và lốp sau bị mài mòn với tốc độ khác nhau. Thông thường, khi đánh tay lái, ma sát sẽ khiến lốp trước mòn nhanh hơn. Đối với xe có động cơ đặt trước, lốp trước chịu 60% trọng tải chiếc xe và đóng vai trò là điểm đặt công suất máy, bất kể chiếc xe đó dẫn động cầu trước hay cầu sau. Hơn nữa, bánh trước phải chịu 80% lực phanh nên lốp trước mòn nhanh hơn lốp sau. Thông thường, thứ tự mòn đối với xe tay lái thuận nhiều nhất ở lốp trước bên phải, đến lốp trước bên trái, lốp sau bên phải và cuối cùng là lốp sau bên trái.
 |  |
 |  |
 | |
| Các kiểu đảo lốp với xe không có lốp dự phòng. (Ảnh: Tirerack) | |
Vì vậy, các lốp phải được thay đổi vị trí cho nhau từ trước ra sau theo nguyên lý lốp mòn nhiều nhất thay cho lốp mòn ít nhất. Đảo lốp nên thực hiện vài lần trong vòng đời của lốp theo quy trình của nhà sản xuất nhằm cân bằng mức độ mòn và tăng tối đa tuổi. Tuy nhiên, nếu không có hướng dẫn sử dụng, đảo lốp có thể áp dụng theo các cách tuỳ thuộc hệ dẫn động của xe. Đối với xe dẫn động cầu trước, thứ tự đảo tuân theo lốp sau phải ra trước trái, lốp sau trái ra trước phải, lốp trước trái ra sau trái, trước phải ra sau phải (hình A). Ngoài ra, xe dẫn động cầu trước có thể đổi lốp theo kiểu chéo toàn bộ (hình B).
 |  |
| Kỹ thuật đảo lốp với xe có bánh dự phòng. (Ảnh: Tirerack) | |
Trong trường hợp xe có bánh dự phòng, nó sẽ thay cho bánh nào mòn nhiều nhất và bánh được thay sẽ thành bánh dự phòng. Đối với xe dẫn động cầu trước, bánh dự phòng thay cho bánh trước bên phải nhưng lắp vào bánh sau bên phải, còn bánh sau bên phải lên bánh trước bên trái, bánh trước bên trái xuống bánh sau trái, bánh sau bên trái sẽ lên bánh trước phải (hình A). Đối với xe dẫn động cầu sau, bánh dự phòng được thay cho bánh trước bên trái và tuân theo thứ tự của hình C.
Thời gian đảo lốp phụ thuộc nhiều vào chủng loại và hướng dẫn của nhà sản xuất, tuy nhiên, hầu hết các hãng khuyên cáo nên đảo lốp định kỳ trong khoảng 8.000-10.000 km.
Kỹ thuật đảo lốp xe
Đảo lốp xe là một trong những hoạt động bảo dưỡng quan trọng bởi nó có thể tăng tuổi thọ lốp, bảo đảm an toàn khi lái. Thông thường, quá trình đảo lốp có thể thực hiện theo phương pháp đổi chéo, đổi thẳng hoặc đổi ngang, tùy thuộc từng kiểu dẫn động.
Nguyên nhân phải đảo lốp định kỳ là do lốp trước và lốp sau bị mài mòn với tốc độ khác nhau. Thông thường, khi đánh tay lái, ma sát sẽ khiến lốp trước mòn nhanh hơn. Đối với xe có động cơ đặt trước, lốp trước chịu 60% trọng tải chiếc xe và đóng vai trò là điểm đặt công suất máy, bất kể chiếc xe đó dẫn động cầu trước hay cầu sau. Hơn nữa, bánh trước phải chịu 80% lực phanh nên lốp trước mòn nhanh hơn lốp sau. Thông thường, thứ tự mòn đối với xe tay lái thuận nhiều nhất ở lốp trước bên phải, đến lốp trước bên trái, lốp sau bên phải và cuối cùng là lốp sau bên trái.
 |  |
 |  |
 | |
| Các kiểu đảo lốp với xe không có lốp dự phòng. (Ảnh: Tirerack) | |
Vì vậy, các lốp phải được thay đổi vị trí cho nhau từ trước ra sau theo nguyên lý lốp mòn nhiều nhất thay cho lốp mòn ít nhất. Đảo lốp nên thực hiện vài lần trong vòng đời của lốp theo quy trình của nhà sản xuất nhằm cân bằng mức độ mòn và tăng tối đa tuổi. Tuy nhiên, nếu không có hướng dẫn sử dụng, đảo lốp có thể áp dụng theo các cách tuỳ thuộc hệ dẫn động của xe. Đối với xe dẫn động cầu trước, thứ tự đảo tuân theo lốp sau phải ra trước trái, lốp sau trái ra trước phải, lốp trước trái ra sau trái, trước phải ra sau phải (hình A). Ngoài ra, xe dẫn động cầu trước có thể đổi lốp theo kiểu chéo toàn bộ (hình B).
 |  |
| Kỹ thuật đảo lốp với xe có bánh dự phòng. (Ảnh: Tirerack) | |
Trong trường hợp xe có bánh dự phòng, nó sẽ thay cho bánh nào mòn nhiều nhất và bánh được thay sẽ thành bánh dự phòng. Đối với xe dẫn động cầu trước, bánh dự phòng thay cho bánh trước bên phải nhưng lắp vào bánh sau bên phải, còn bánh sau bên phải lên bánh trước bên trái, bánh trước bên trái xuống bánh sau trái, bánh sau bên trái sẽ lên bánh trước phải (hình A). Đối với xe dẫn động cầu sau, bánh dự phòng được thay cho bánh trước bên trái và tuân theo thứ tự của hình C.
Thời gian đảo lốp phụ thuộc nhiều vào chủng loại và hướng dẫn của nhà sản xuất, tuy nhiên, hầu hết các hãng khuyên cáo nên đảo lốp định kỳ trong khoảng 8.000-10.000 km.
Kỹ thuật đảo lốp xe
Đảo lốp xe là một trong những hoạt động bảo dưỡng quan trọng bởi nó có thể tăng tuổi thọ lốp, bảo đảm an toàn khi lái. Thông thường, quá trình đảo lốp có thể thực hiện theo phương pháp đổi chéo, đổi thẳng hoặc đổi ngang, tùy thuộc từng kiểu dẫn động.
Nguyên nhân phải đảo lốp định kỳ là do lốp trước và lốp sau bị mài mòn với tốc độ khác nhau. Thông thường, khi đánh tay lái, ma sát sẽ khiến lốp trước mòn nhanh hơn. Đối với xe có động cơ đặt trước, lốp trước chịu 60% trọng tải chiếc xe và đóng vai trò là điểm đặt công suất máy, bất kể chiếc xe đó dẫn động cầu trước hay cầu sau. Hơn nữa, bánh trước phải chịu 80% lực phanh nên lốp trước mòn nhanh hơn lốp sau. Thông thường, thứ tự mòn đối với xe tay lái thuận nhiều nhất ở lốp trước bên phải, đến lốp trước bên trái, lốp sau bên phải và cuối cùng là lốp sau bên trái.
 |  |
 |  |
 | |
| Các kiểu đảo lốp với xe không có lốp dự phòng. (Ảnh: Tirerack) | |
Vì vậy, các lốp phải được thay đổi vị trí cho nhau từ trước ra sau theo nguyên lý lốp mòn nhiều nhất thay cho lốp mòn ít nhất. Đảo lốp nên thực hiện vài lần trong vòng đời của lốp theo quy trình của nhà sản xuất nhằm cân bằng mức độ mòn và tăng tối đa tuổi. Tuy nhiên, nếu không có hướng dẫn sử dụng, đảo lốp có thể áp dụng theo các cách tuỳ thuộc hệ dẫn động của xe. Đối với xe dẫn động cầu trước, thứ tự đảo tuân theo lốp sau phải ra trước trái, lốp sau trái ra trước phải, lốp trước trái ra sau trái, trước phải ra sau phải (hình A). Ngoài ra, xe dẫn động cầu trước có thể đổi lốp theo kiểu chéo toàn bộ (hình B).
 |  |
| Kỹ thuật đảo lốp với xe có bánh dự phòng. (Ảnh: Tirerack) | |
Trong trường hợp xe có bánh dự phòng, nó sẽ thay cho bánh nào mòn nhiều nhất và bánh được thay sẽ thành bánh dự phòng. Đối với xe dẫn động cầu trước, bánh dự phòng thay cho bánh trước bên phải nhưng lắp vào bánh sau bên phải, còn bánh sau bên phải lên bánh trước bên trái, bánh trước bên trái xuống bánh sau trái, bánh sau bên trái sẽ lên bánh trước phải (hình A). Đối với xe dẫn động cầu sau, bánh dự phòng được thay cho bánh trước bên trái và tuân theo thứ tự của hình C.
Thời gian đảo lốp phụ thuộc nhiều vào chủng loại và hướng dẫn của nhà sản xuất, tuy nhiên, hầu hết các hãng khuyên cáo nên đảo lốp định kỳ trong khoảng 8.000-10.000 km.
http://vnexpress.net/tin-tuc/oto-xe-may/tu-van/ky-thuat-dao-lop-xe-2070418.html
13 Jan 2014
Edit email address for sharepoint 2010 user
A user's Email Address is stored within a profile property. By default a user isn't allowed to change his or her own e-mail address. The email address (Work e-mail) and whether or not user's can change their own can be specified in the settings of the User Profile Service Application.
- (As an administrator) open Central Admin
- Under "Application Management" click "Manage Service Applications"
- Locate and click the link "User Profile Service Application". If this one is not there you haven't created a User Profile Service Application yet.
- Under "People" there are two relevant links here. The first is "Manage User Properties", the second is "Manage User Profiles"
- Under "Manage User Properties" you can specify the settings for the Work e-mail property (i.e. whether or not the user is allowed to edit his or her own e-mail address).
- Under "Manage User Profiles" you can locate a user's profile and edit the e-mail address from there
By default it could take up to one hour to "see" the new e-mail address througout all web applications bound to the user profile service application. A timer job is taking care of this and you could kick this one of to run manually once by going to "Check Job Status" screen in Central Admin (_admin/Timer.aspx). Here locate the job definition with the title "User Profile Service Application - User Profile to SharePoint Full Synchronization", open the "Edit Timer Job Page" by clicking on the Job's name and then click the "Run Now" button.
Hope this helps!
10 Dec 2013
8 Dec 2013
Path and file name in Muhimbi
http://blog.muhimbi.com/2011/11/specifying-paths-and-file-names-when.html
http://blog.muhimbi.com/2011/11/specifying-paths-and-file-names-when.html
Subscribe to:
Comments (Atom)

