Symptom: + Associate program with file extension does not work. Program selected does not appear in the Open With window.
+ Default Program also does not work or it ignores all changes.
Problem: The program that you're pointing to isn't registered correctly.
Solution:
In regedit: Navigate to Computer\HKEY_CLASSES_ROOT\Applications and find your .exe name.
Navigate under its name to shell>open>command. In the Default change its location to the actual location of the executable, hit okay and then try and reassociate the file type as you normally would.
1. Configuring the CA
2. Creating Certificate Request
3. Getting the Pending Request accepted by our CA
4. Appending the Certificate to the Default Website
5. Enable SSL on the Default Website
6. Testing our SSL enabled Default Website
1. Configuring the Certificate Authority
The first thing to do is to decide which server should hold the Certicate Authority (CA) role, it could be any server as long as it’s at least a member server. If you have a single box setup, such as a Small Business Server (SBS), the decision shouldn’t be very hard.
Note: In order to add the Certificate Service Web Enrollment component (subcomponent to CA), which we’re going to use in this article, the server needs to be running IIS, so if you haven’t already done so, install IIS before continuing with this article. If you plan on installing the CA component on the Exchange server itself, then there’s nothing to worry about, because as you know, Exchange 2003 relies heavily on IIS, which means It’s already installed.
To install the CA component, do the following:
Click Start > Control Panel > Add or Remove Programs
Select Add/Remove Windows Components
Put a checkmark in Certificate Services
Below screen will popup as a warning, just click Yes > then Next
We now have to select what type of CA to use, choose Enterprise root CA and click Next
In the following screen we have to fill out the Common name for our CA, which in this article is mail.testdomain.com.
Leave the other fields untouched and click Next >
We now have the option of specifying an alternate location for the certificate database, database log, and configuration information. In this article we will use the defaults, which in most cases should be just fine.
Now click Next >
The Certificate Service component will be installed, when it’s completed, click Finish
2. Creating the Certificate Request
Now that we have installed the Certificate Services component, it’s time to create the Certificate Request for our Default Website. We should therefore do the following:
Click Start > Administrative Tools > Internet Information Services (IIS) Manager
Expand Websites > Right-click Default Website then select Properties
Now hit the Directory Security tab
Under Secure Communications click Server Certificate…
As we’re going to create a new certificate, leave the first option selected and click Next >
Because we’re using our own CA, select Prepare the request now, but send it later, then click Next >
Type a descriptive name for the Certificate and click Next >
We now need to enter our organization name and the organizational unit (which should be pretty self-explanatory), then click Next >
In the next screen we need to pay extra attention, as the common name reflects the external FQDN (Fully Qualified Domain Name), to spell it out, this is the address external users have to type in their browsers in order to access OWA from the Internet. Note:As many (especially small to midsized) companies don’t publish their Exchange servers directly to the Internet, but instead runs the Exchange server on a private IP address, they let their ISP’s handle their external DNS settings. In most cases the ISP creates a so called A record named mail.domain.com pointing to the company’s public IP address, which then forwards the appropriate port (443) to the Exchange servers internal IP address.
When your have entered a Common Name click Next >
Now it’s time to specify the Country/Region, State/Province and City/locality, this shouldn’t need any further explanation, when you have filled out each field, click Next >
In the below screen we have to enter the name of the certificate request we’re creating, the default is just fine, click Next >
In this screen we can see all the information we filled in during the previous IIS Certificate Wizard screens, if you should have made a mistake, this is your last chance to correct it. If everything looks fine click Next >
And finally we can click Finish.
3. Getting the Pending Request accepted by our Certificate Authority
Now that we have a pending Certificate Request, we need to have it accepted by our CA, which is done the following way:
On the server open Internet Explorer
Type http://server/certsrv
Note: In order to access the Certsvr virtual folder, you may be prompted to enter a valid username/password, if this is the case use the Administrator account. When you have been validated the Windows 2003 Server will most probably block the content of the CertSrv virtual folder, which means you wil have to add it to your trusted sites in order to continue.
Now that you’re welcomed by the Certificate Services, select Request a Certificate
Click advanced certificate request
Under Advanced Certificate Request click Submit a certificate request by using a base-64-encoded CMC or PKCS #10 file, or submit a renewal request by using a base-64-encoded PKCS #7 file
Now we need to insert the content of the certreq.txt file we created earlier, you can do this by clicking the Browse for a file to insert or by opening the certreq.txt file in notepad, then copy/paste the content as shown in the screen below, then click Submit >
Now select Base 64 encoded then click Download certificate
Click Save
Choose to save the certnew.cer on the C: drive > then click Save
Close the Microsoft Certificate Services IE window.
4. Appending the Certificate to the Default Website
Okay it’s time to append the approved Certificate to our Default Website, to accomplish this we need to do the following:
Click Start > Administrative Tools > Internet Information Services (IIS) Manager
Expand Websites > Right-click Default Website then select Properties
Now select the Directory Security tab
Under Secure Communications click Server Certificate… > then Next
Select Process the pending request and install the certificate > click Next >
Unless you have any specific requirements to what port SSL should run at, leave the default (443) untouched, then click Next >
You will now see a summary of the Certificate, again if you should have made any mistakes during the previous wizard screens, this is the final chance to correct them, otherwise just click Next >
The Certificate has now been successfully installed and you can click Finish
5. Enabling SSL on the Default Website
We have now appended the Certificate to our Default Website, but before the data transmitted between the clients and the server is encrypted, we need to click the Edit… button under Secure Communications.
Here we should put a checkmark in Require Secure Channel (SSL) and Require 128-bit encryption just like below:
Now click OK.
6. Testing our SSL enabled Default Website
Now that we have gone through all the configuration steps necessary to enable SSL on our Default Website, it’s time to test if our configuration actually works.
From the server (or a client) open Internet Explorer, then type: http://exchange_server/exchange
You should get a screen similar to the one shown below:
This is absolutely fine, as we shouldn’t be allowed to access the Default Website (and any virtual folders below) through an unsecure connection. Instead we should make a secure connetion which is done by typing https, therefore type below URL instead: https://exchange_server/exchange
The following box should appear:
Note: You may have noticed the yellow warning sign, this informs us The name on the security certificate is invalid or does not match the name of the site. Don’t worry there’s nothing wrong with this, the reason why it appears is because we aren’t accessing OWA through the common name, which we specified when the certificate was created. When you access OWA from an external client through mail.testdomain.com/exchange, this warning will disappear.
Click Yes
You will now be prompted for a valid username/password in order to enter your mailbox, for testing purposes just use the administrator account, like shown below:
Now click OK
We should now see the Administrator mailbox.
Notice the yellow padlock in the lower right corner, a locked padlock indicates a secure connection, which means OWA now uses SSL.
Final words
Even though it’s possible to run your OWA environments without securing it with a SSL certificate, I strongly advise against doing so, as this would mean any traffic send between the external OWA clients, and the Exchange server would be sent in cleartext (this includes the authentication process). As you now know SSL provides us with 128-bit encryption, but be aware enabling SSL in your OWA environment isn’t an optimal security solution, in addition to enabling SSL, you should at least have some kind of firewall (such as an ISA server) placed in front of your Exchange server(s). You might also consider enabling the new Exchange 2003 functionality Forms Based Authentication, which provides a few additional benefits such as a new logon screen, which, among other things, uses session cookies to make the OWA sessions more secure, unfortunately the Forms Based Authentication functionality is out of the scope of this article, but I will at some point of time in the near future write another article covering this funtionality.
That was it for this time, I hope you enjoyed the article. http://www.msexchange.org/tutorials/SSL_Enabling_OWA_2003.html
2.The order of cipher suites on Windows 2003 is hard-coded. AES 128 is the highest priority. AES 256 is the next. We only need to disable AES 128 then AES 256 will have the highest priority.
a.Open regedit.exe on IIS 6.0 machine.
b.Go to HKEY_LOCAL_MACHINE\SYSTEM\CurrentControlSet\Control\SecurityProviders\SCHANNEL\Ciphers. You should be able to find there are many subkeys, e.g. AES 128/128.
c.In subkey AES 128/128, create a DWORD value “Enabled”. Set it as the value 0. It means we would disable AES 128.
3.Reboot the IIS 6.0 machine.
On Vista/Windows7 which support AES 256 machine, you can use IE to browse that IIS 6.0 web site through HTTPS. The SSL uses 256 bit encryption.
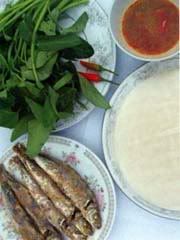
Nguyên liệu:- Rau muống hạt 1/2kg
- Bánh tráng gạo 300g
- Cá nục thuôn mình các tròn và tươi xanh 1kg
- Ớt, tỏi, chanh, muối, đường, nước mắm nhĩ
Chuẩn bị
- Cá nục rửa sạch để ráo nước
- Ướp cá chừng 10 phút với 1 muỗng cà phê muối
- Rau muống bỏ 1/3 lá, rửa sạch, để ráo
- Ớt, tỏi giã nhuyễn.
- Rửa sạch xửng, nồi hấp
Thực hiện - Xếp cá vào xửng hấp (có lót 1 cái đĩa có lòng sâu để hứng nước cá hấp).
- Đun nước sôi, đặt xửng hấp vào, chưng cách thủy chừng 10 - 15 phút là cá chín.
- Bánh tráng nhúng nước sơ, để ráo.
- Pha nước chấm Ớt, tỏi giã nhuyễn pha với 2 muỗng canh nước mắm nhĩ, thêm 1 muỗng cà phê đường, 1 muỗng cà phê nước cốt chanh, hoà với nước cá hấp (quan trọng là ở đây ;-) )
Trình bày
- Cá hấp gắp ra đĩa, trang trí thêm 1 vài cọng hành hương, ngò.
- Rau muống, bánh tráng, nước chấm.
Lần đầu tiên tôi được ăn soup nấm là vào năm 2010. Ngon tuyệt!!! Nhất là được ăn trong cái gió lạnh và không khí trong lành của đêm Carlisle...mmmm. Peter sư phụ của tôi ở Carlisle người mà tôi gọi là Master chef đã thực hiện món này rất nhanh với một phong thái rất ư là ...thảnh thơi và thư giản. Đối với Pete nấu ăn là một nghệ thuật trộn các mùi lại với nhau để các thành phần nguyên liệu vẫn giữ được hương vị đăc trưng và thể hiện khi nó được vào đưa vào miệng.
Cách nấu soup nấm thật ra rất đơn giản và nguyên liệu để nấu nếu bạn đang ở các nước Tây Âu thì rất dễ. Tất cả đều được bán ở mall
Nếu bạn ở Việt nam thì cũng có thể tìm mua tại Big C
Nguyên liệu:
Món này dành cho 6 người ăn, mỗi người một tô...haha
Nấm rơm: 400g
Cần tây (celery stick): 8 cọng
Củ hành trắng hoặc đỏ: 1 củ lớn bằng trái banh tennis
Hành ba rô (leak): 1 cọng
Hạt nêm Knorr hương nấm rơm và rong biển (nếu ở UK bạn mua vegetable stock pot)
Cream
Bơ
Tiêu sọ xay
Cách nấu
Nấm rơm, cần tây, củ hảnh, leak thái nhỏ
Cho bơ vào nồi rồi cho củ hành vào (4 phút), cần tây + leak(4 phút), sau đó nấm rơm. Nấu cho tới khi nào có nước xâm xấp thì cho nửa lít nước sôi và bột nêm vào nêm vừa ăn (hoặc cho stock pot với nửa lit nước sôi vào tô quậy đều rồi cho vào nồi). Nấu cho chín rục rồi dùng máy khuấy khuấy nhuyễn. Thêm tiêu vào khi ăn.
Món này khi trời lạnh mà được 1 chén thì quá đã...:-)
Nếu tây hơn nữa thì dùng cream cho vào nồi rồi mới khuấy nhuyễn.
Thời khắc giao thừa, người miền Nam cúng ngoài sân và trong nhà. Lễ cúng đơn giản với dĩa ngũ quả, hoa trang hoặc vạn thọ, sống đời, hai cây đèn cầy, lư hương, giấy tiền vàng bạc và một trái dừa tươi đã chặt sẵn. Đúng giờ khắc chuyển giao, gia chủ đốt nhang, thành kính khấn theo bài khấn: “Vái chín phương trời, mười phương Phật…”
Đó là lễ cúng giao thừa miền Nam ngày nay đã lượt bớt một số công đoạn cũng như giảm đi phần lễ. Nếu đầy đủ và “đúng chuẩn” thì phần lễ cần: hương (3 cây nhang to), hoa, đèn nến, trầu cau, quần áo, mũ thần linh và mâm lê mặn. Với thủ lợn luộc, gà trống luộc, xôi, bánh chưng. Đặt biệt kèm thêm bắp cải thảo… tất cả được bày lên bàn trang trọng đặt ở trước cửa nhà. Vào đúng thời điểm giao thừa, người chủ gia đình phải thắp đèn, nến, rót rượu, rồi khấn vái trước án. Văn khấn có thể viết vào giấy để đọc, sau khi hết 3 tuần hương thì hoá tờ giấy viết văn khấn cùng vàng mã dâng cúng
Khi khần xong gia chủ nên đốt thêm 4 cây nhang nhỏ, rồi ra cửa khấn tiếp và nhìn 4 hướng: Tây nam, Tây bắc, Đông bắc hoặc hướng Tây cho những người thuộc về Tây tứ trạch. Tiếp theo là khấn rước các vị tài thần mời họ vào để dùng hương hoa sắm lễ…của gia đình. Các vị tài thần gồm hỷ thần, tài thần… để cầu xin sức khỏe 1 năm an lành, hạnh phúc tấn tài tấn lộc, vạn sự như ý, an khang thịnh vượng. Do mỗi năm các vị tài thần đứng mỗi hướng khác nhau. Ví dụ: năm 2007 tài thần ở hướng Tây, hỷ thần Đông Nam. Vì vậy, gia chủ tốt nhất vái 4 hướng.
Lễ cúng giao thừa được cử hành đúng thời khắc giao thừa, kết thúc năm cũ, chuyển sang năm mới.
Ý nghĩa:
Lễ cúng giao thừa được cử hành đúng thời khắc giao thừa, kết thúc năm cũ, chuyển sang năm mới. Cúng giao thừa là một nghi lễ thành kính và trang trọng, toàn thể thành viên trong gia đình đứng trước bàn thờ gia tiên cầu khấn cho một năm mới được khoẻ mạnh, vạn sự may mắn tốt lành.
Sau khi cung kính bày lễ lên bàn thờ thì đốt nến (đèn), thắp nén hương thơm và thành kính cầu khấn.
VĂN KHẤN GIAO THỪA TRONG NHÀ
Nam mô a di Đà Phật!
Nam mô a di Đà Phật!
Nam mô a di Đà Phật
- Con lạy chín phương Trời, mười phương Chư Phật, Chư Phật mười phương.
- Con kính lảy Đức Dương lai hạ sinh Di lặc Tôn Phật.
- Con kính lạy Hoàng thiên, Hậu Thổ, chư vị Tôn thần.
- Con kính lạy Long Mạch, Táo quân, chư vị Tôn thần
- Con kính lạy – Các cụ tổ tiên nội, ngoại chư vị Tiên linh. .
Nay phút giao thừa năm……………………………………….
Tín chủ (chúng) con là………………………………………..
Phút giao thừa vừa tới, giờ Tý đầu xuân, đón mừng nguyên đán, tín chủ chúng con thành tâm, sửa biện hương hoa phẩm vật, dâng lên trước án, cúng dâng Phật Thánh, dâng hiến Tôn thần, tiến cũng Tổ tiên, đốt nén hương, thành tâm kính lễ.
Chúng con xin kính mời ngài Bản cảnh Thành hoàng chư vị Đại Vương, ngài Bản xứ Thần linh Thổ địa, Phúc đức chính thần, các ngài Ngũ phương, Ngũ thổ, Long Mạch Tài thần, các ngài Bản gia Táo quân và chư vị Thần linh cai quản ở trong xứ này giáng lâm trước hương án thụ hưởng lễ vật.
Con lại kính mời các cụ Tiên lnh Cao Tằng Tổ Khảo, Cao Tằng Tổ Tỷ, Bá Thúc Huynh Đệ, Cô Di, Tỷ Muội, nội ngoại Gia tộc, chư vị Hương linh, cúi xin giáng về linh sàng thụ hưởng lễ vật.
Tín chủ chúng con lại kính mời vong linh các vị Tiền chủ, Hậu chủ, y thảo thụ mộc ngụ tại đất này, nhân tiết giao thừa, giáng lâm trước hương án thụ hưởng lễ vật.
Cúi xin các vị phù hộ độ trì cho toàn thể gia chủ
Chúng con năm mới tốt lành, sức khoẻ dồi dào, tấn tài tấn lộc, vạn sự tốt lành, vạn điều như ý.
Chúng con lễ bạc tâm thành, nhất tâm kính lễ, cúi xin phù hộ độ trì.


 Nguyên liệu:- Rau muống hạt 1/2kg


